Shallow Thoughts : tags : tips
Akkana's Musings on Open Source Computing and Technology, Science, and Nature.
Tue, 18 Jan 2011
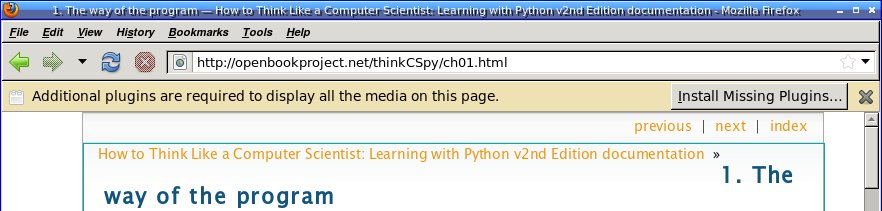
![[Displaying colors in an xterm]](http://shallowsky.com/blog/images/screenshots/xterm-color-ss-fade.jpg)
At work, I'm testing some web programming on a server where we use a
shared account -- everybody logs in as the same user. That wouldn't
be a problem, except nearly all Linuxes are set up to use colors in
programs like ls and vim that are only readable against a dark background.
I prefer a light background (not white) for my terminal windows.
How, then, can I set things up so that both dark- and light-backgrounded
people can use the account? I could set up a script that would set up
a different set of aliases and configuration files, like when I
changed
my vim colors.
Better, I could fix all of them at once by
changing my terminal's idea of colors -- so when the remote machine
thinks it's feeding me a light color, I see a dark one.
I use xterm, which has an easy way of setting colors: it has a list
of 16 colors defined in X resources. So I can change them in ~/.Xdefaults.
That's all very well. But first I needed a way of seeing the existing
colors, so I knew what needed changing, and of testing my changes.
Script to show all terminal colors
I thought I remembered once seeing a program to display terminal colors,
but now that I needed one, I couldn't find it.
Surely it should be trivial to write. Just find the
escape sequences and write a script to substitute 0 through 15, right?
Except finding the escape sequences turned out to be harder than I
expected. Sure, I found them -- lots of them, pages that
conflicted with each other, most giving sequences that
didn't do anything visible in my xterm.
Eventually I used script to capture output from a vim session
to see what it used. It used <ESC>[38;5;Nm to set color
N, and <ESC>[m to reset to the default color.
This more or less agreed Wikipedia's
ANSI
escape code page, which says <ESC>[38;5; does "Set xterm-256
text coloor" with a note "Dubious - discuss". The discussion says this
isn't very standard. That page also mentions the simpler sequence
<ESC>[0;Nm to set the
first 8 colors.
Okay, so why not write a script that shows both? Like this:
#! /usr/bin/env python

# Display the colors available in a terminal.

print "16-color mode:"
for color in range(0, 16) :
    for i in range(0, 3) :
        print "\033[0;%sm%02s\033[m" % (str(color + 30), str(color)),
    print

# Programs like ls and vim use the first 16 colors of the 256-color palette.
print "256-color mode:"
for color in range(0, 256) :
    for i in range(0, 3) :
        print "\033[38;5;%sm%03s\033[m" % (str(color), str(color)),
    print
Voilà! That shows the 8 colors I needed to see what vim and ls
were doing, plus a lovely rainbow of other possible colors in case I ever
want to do any serious ASCII graphics in my terminal.
Changing the X resources
The next step was to change the X resources. I started
by looking for where the current resources were set, and found them
in /etc/X11/app-defaults/XTerm-color:
$ grep color /etc/X11/app-defaults/XTerm-color
irrelevant stuff snipped
*VT100*color0: black
*VT100*color1: red3
*VT100*color2: green3
*VT100*color3: yellow3
*VT100*color4: blue2
*VT100*color5: magenta3
*VT100*color6: cyan3
*VT100*color7: gray90
*VT100*color8: gray50
*VT100*color9: red
*VT100*color10: green
*VT100*color11: yellow
*VT100*color12: rgb:5c/5c/ff
*VT100*color13: magenta
*VT100*color14: cyan
*VT100*color15: white
! Disclaimer: there are no standard colors used in terminal emulation.
! The choice for color4 and color12 is a tradeoff between contrast, depending
! on whether they are used for text or backgrounds.  Note that either color4 or
! color12 would be used for text, while only color4 would be used for a
! Originally color4/color12 were set to the names blue3/blue
!*VT100*color4: blue3
!*VT100*color12: blue
!*VT100*color4: DodgerBlue1
!*VT100*color12: SteelBlue1
So all I needed to do was take the ones that don't show up well --
yellow, green and so forth -- and change them to colors that work
better, choosing from the color names in /etc/X11/rgb.txt
or my own RGB values. So I added lines like this to my ~/.Xdefaults:
!! color2 was green3
*VT100*color2: green4
!! color8 was gray50
*VT100*color8: gray30
!! color10 was green
*VT100*color10: rgb:00/aa/00
!! color11 was yellow
*VT100*color11: dark orange
!! color14 was cyan
*VT100*color14: dark cyan
... and so on.
Now I can share accounts, and
I no longer have to curse at those default ls and vim settings!
Update: Tip from Mikachu: ctlseqs.txt
is an excellent reference on terminal control sequences.
Tags: color, X11, linux, programming, python, tips
[
10:56 Jan 18, 2011
More linux |
permalink to this entry |
]
Fri, 25 Jun 2010
Several groups I'm in insist on using LinkedIn for discussions,
instead of a mailing list. No idea why -- it's so much harder to use
-- but for some reason that's where the community went.
Which is fine except for happens just about every time I try to view
a discussion:
I get a notice of a thread that sounds interesting, click on the link
to view it, read the first posting, hit the space bar to scroll down
... whoops! Focus was in that silly search field at the top right of the page,
so it won't scroll.
It's even more fun if I've already scrolled down a bit with the
mousewheel -- in that case, hitting spacebar jumps back up to the
top of the page, losing any context I have as well as making me
click in the page before I can actually scroll.
Setting focus to search fields is a good thing on some pages.
Google does it, which makes terrific sense -- if you go to
google.com, your main purpose is to type something in that search box.
It doesn't, however, make sense on a page whose purpose is to
let people read through a long discussion thread.
Since I never use that search field anyway, though, I came up with
a solution using Firefox's user css.
It seems there's no way to make an input field un-focusable or
read-only using pure CSS (of course, you could use Javascript and
Greasemonkey for that); but as long as you don't need to use it,
you can make it disappear entirely.
Add this line to chrome/userContent.css inside your Firefox profile
(create it if it doesn't already exist):
form#global-search span#autocomplete-container input#main-search-box {
  visibility:hidden;
}
Then restart Firefox and load a discussion page.
The search box should be hidden,
and spacebar should scroll the page just like it does on most web pages.
Of course, this will need to be updated the next time
LinkedIn changes their page layout. And it's vaguely possible that
somewhere else on the web is a page with that hierarchy of element names.
But that's easy enough to fix: run a View Page Source
on the LinkedIn page and add another level or two to the CSS rule.
The concept is the important thing.
Tags: html, web, css, tips, annoyances
[
17:17 Jun 25, 2010
More tech/web |
permalink to this entry |
]
Fri, 18 Jun 2010
While I was in Europe, Dave stumbled on a handy alias on his Mac to
check the time where I was:
date -v +10 (+10 is the offset
from the current time). But when he tried to translate this to Linux,
he found that the -v flag from FreeBSD's
date program
wasn't available on the GNU
date on Linux.
But I suggested he could do the same thing with the TZ environment variable.
It's not documented well anywhere I could find, but if you set TZ to
the name of a time zone, date will print out the time for
that zone rather than your current one.
So, for bash:
$ TZ=Europe/Paris date  # time in Paris
$ TZ=GB date            # time in Great Britain
$ TZ=GMT-02 date        # time two timezones east of GMT
or for csh:
% ( setenv TZ Europe/Paris; date)
% ( setenv TZ GB; date)
% ( setenv TZ GMT-02; date)
That's all very well. But when I tried
% ( setenv TZ UK; date)
% ( setenv TZ FR; date)
they gave the wrong time, even though Wikipedia's
list
of time zones seemed to indicate that those abbreviations were okay.
The trick seems to be that setting TZ only works for abbreviations
in /usr/share/zoneinfo/, or maybe in /usr/share/zoneinfo/posix/.
If you give an abbreviation, like UK or FR or America/San_Francisco,
it won't give you an error, it'll just print GMT as if that was what
you had asked for.
So this trick is useful for printing times abroad -- but if you want
to be safe, either stick to syntaxes like GMT-2, or make a script that
checks whether your abbreviation exists in the directory before
calling date, and warns you rather than just printing the wrong time.
Tags: linux, tips, travel, cmdline
[
14:04 Jun 18, 2010
More linux/cmdline |
permalink to this entry |
]
Thu, 01 Apr 2010
Second time I've run into this -- time to write it down.
Trying to run
debootstrap
to install the new Ubuntu beta, I kept hitting a snag right at the
beginning: debootstrap kept saying the filesystem was mounted with
the wrong permissions, and it couldn't create an executable file
or a device.
I have lines for each of my spare filesystems in /etc/fstab, like this:
/dev/sda4 /lucid ext3 relatime,user,noauto 0 0
That way, if I'm booted into one OS but I want to check a file from
another, I can mount it without needing sudo, just by typing
mount /lucid.
Not being able to create executable files means it's mounted with
the noexec flag. I checked another machine and saw
that it was using lines like
/dev/sda4 /lucid ext3 exec,user,noauto 0 0
I added the "exec," to fstab, unmounted and remounted ... and it was
still mounted with noexec.
Turns out on some Linux versions, making a filesystem user
mountable turns off exec even if you've specified it
explicitly. You have to add the exec after the
user.
But that still didn't make debootstrap happy, because it couldn't
create a device. That's a separate fstab option, dev,
and user implies nodev.
So here's the fstab entry that finally worked:
/dev/sda4 /lucid ext3 relatime,user,exec,dev,noauto 0 0
Tags: linux, filesystem, fstab, tips
[
23:07 Apr 01, 2010
More linux |
permalink to this entry |
]
Tue, 09 Feb 2010
I haven't been using the spare machine much lately. So I hadn't
noticed until last week that since upgrading to the emacs 23.1.1 on
Ubuntu Karmic koala, every time I press the Scroll Lock key -- the
key my KVM uses to switch to the other computer -- with focus in
an emacs window, emacs beeps and complains that the key is unbound.
That was a problem I thought I'd solved long ago, an easy fix in
.emacs:
(global-set-key [scroll-lock] 'ignore)
But in emacs 23, it wasn't working any more. Emacs listed the key
as "<Scroll_Lock>", but using that directly in global-set-key
doesn't work.
The friendly and helpful (really!) crew at #emacs found me a
solution, after some fiddling around.
(global-set-key (kbd "<Scroll_Lock>") 'ignore)
Tags: emacs, editors, kvm, tips
[
23:47 Feb 09, 2010
More linux/editors |
permalink to this entry |
]
Mon, 25 Jan 2010
Ever since I upgraded to Ubuntu 9.10 "Karmic koala", printing text files
has been a problem. They print out with normal line height, but in a
super-wide font so I only get about 48 ugly characters per line.
Various people have reported the problem -- for instance,
bug 447961
and this
post -- but no one seemed to have an answer.
I don't have an answer either, but I do have a workaround. The problem
is that Ubuntu is scaling incorrectly. When it thinks it's putting
10 characters per inch (cpi) on a line, it's actually using a font that
only fits 6 characters. But if you tell it to fit 17 characters per inch,
that comes out pretty close to the 10cpi that's supposed to be the default:
lpr -o cpi=17 filename
As long as you have to specify the cpi, try different settings for it.
cpi=20 gives a nice crisp looking font with about 11.8
characters per inch.
If needed, you can adjust line spacing with lpi=NN as well.
Update: The ever-vigilant Till Kamppeter has tracked the problem
down to the font used by texttopdf for lp/lpr printing. Interesting details in
bug
447961.
Tags: printing, ubuntu, linux, tips
[
16:36 Jan 25, 2010
More linux |
permalink to this entry |
]
Wed, 13 Jan 2010
To wrap long lines, or not to wrap? It's always
a dilemma. Automatic wrapping is great when you're hammering away
typing lots of text. But it's infuriating when you're trying to format
something yourself and the editor decides it wants to line-wrap a
little too early.
Although of course you can set the wrapping width, Emacs has a tendency
to wrap early -- especially when you hit return. All too often, I'll
be typing away at a long line, get to the end of the sentence and
paragraph with the last word on the same line with the rest -- then
realize that as soon as I hit return, Emacs is going to move that
last word to a line by itself. Drives me nuts!
And the solution turns out to be so simple. The Return key,
"\C-m". was bound to the (newline) function (you can find out
by typing M-x, then describe-key, then hitting Return).
Apparently (newline) re-wraps the current line before
inserting a line break. But I just wanted it to insert a line break.
No problem -- just bind "C-m" to (insert "\n").
But there's a second way, too, if you don't want to rebind:
there's a magic internal emacs table you can change.
(set-char-table-range auto-fill-chars 10 nil)
But wait -- there's one other thing I want to fix in text mode.
Automatic indent is another one of those features that's very
convenient ... except when it's not.
If I have some text like:
First point:
  - subpoint a
  - subpoint b
then it's handy if, when I hit Return after
subpoint a,
emacs indents to the right level for
subpoint b.
But what happens when I get to the end of that list?
First point:
  - subpoint a
  - subpoint b

Second point:
  - subpoint c
When I hit Return after subpoint b, Emacs quite reasonably
indents two spaces. If I immediately type another Return,
Emacs sensibly deletes the two spaces it just inserted, opens a
new line -- but then it indents that new line another two spaces.
After a blank line, I always want to
start at the beginning, not indented at all.
Here's how to fix that. Define a function that will be called
whenever you hit return in text mode. That function tests whether the
caret comes immediately after a blank line, or at the beginning of
the file. It indents except in those two cases; and in neither case
does it re-wrap the current line.
;; In text mode, I don't want it auto-indenting for the first
;; line in the file, or lines following blank lines.
;; Everywhere else is okay.
(defun newline-and-text-indent ()
  "Insert a newline, then indent the next line sensibly for text"
  (interactive)
  (cond
   ;; Beginning of buffer, or beginning of an existing line, don't indent:
   ((or (bobp) (bolp)) (newline))

   ;; If we're on a whitespace-only line,
   ((and (eolp)
         (save-excursion (re-search-backward "^\\(\\s \\)*$"
                                             (line-beginning-position) t)))
    ;; ... delete the whitespace, then add another newline:
    (kill-line 0)
    (newline))

   ;; Else (not on whitespace-only) insert a newline,
   ;; then add the appropriate indent:
   (t (insert "\n")
      (indent-according-to-mode))
   ))
Then tell emacs to call that function when it sees the Return key in
text mode:
(defun text-indent-hook ()
  (local-set-key "\C-m" 'newline-and-text-indent)
  )
(setq text-mode-hook 'text-indent-hook)
Finally, this is great for HTML mode too, if you get irritated at
not being able to put an <a href="longurl"> all on one line:
(defun html-hook ()
  (local-set-key "\C-m" (lambda () (interactive) (insert "\n")))
  )
(setq sgml-mode-hook 'html-hook)
Tags: emacs, editors, tips
[
11:29 Jan 13, 2010
More linux/editors |
permalink to this entry |
]
Sat, 28 Nov 2009
While debugging Javascript, I've occasionally come across references
to a useful function called
console.log. Supposedly you
can log errors with a line like:
console.log(""key press, char code " + e.charCode);
Since the only native way of logging debug statements in Javascript
is with a pop-up alert() box, having a less obtrusive way to print
is something any JS programmer could use.
The catch? It didn't do anything -- except print
console is not defined.
Today a friend was crowing about how wonderful Javascript debugging
was in Google's Chrome browser -- because it has functions like
console.log.
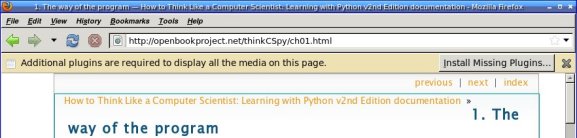
![[Firebug console menu]](http://shallowsky.com/blog/images/screenshots/firebug-consoleT.jpg) After some searching and poking around, we determined that Firefox
also has
After some searching and poking around, we determined that Firefox
also has console.log -- it's just well hidden and a bit
hard to get going.
First, you need the Firebug extension. If you're developing Javascript,
you probably already have it. If not, you need it.
Run Firebug and click to the Console tab. Now click on the
tiny arrow that shows up at the right edge of that tab, as shown.
Turns out there's a whole menu of options under there -- one of
which is Enabled.
But wait, that's not all. In my case, the console was already
Enabled according to the menu. To get the console working,
I had to
- Disable the console
- Re-enable it
- Shift-reload the page being debugged
My friend also said that if she didn't enable the console in Firebug,
then her script died when she called console.log.
That didn't happen for me -- all that happened was that I got error
messages in the error console (the one accessed from Firefox's
Tools menu, different from the Firebug console). But it's
a good idea to check for its existence if you're going to use
debugging statements in your code. Like this:
  if (typeof console != "undefined") {
    console.log( "key press, char code " + e.charCode
                + ", key code " + e.keyCode
                + ", " + e.ctrlKey + ", " + e.altKey
		+ ", " + e.metaKey );
  }
Here are some more things
you can do with Firebug's console.
Tags: firefox, javascript, programming, tips
[
16:41 Nov 28, 2009
More tech/web |
permalink to this entry |
]
Fri, 27 Nov 2009
Two separate friends just had this problem, one of them a fairly
experienced Linux user:
You're in bash, history works, but it's not remembered across sessions.
Why?
Maybe the size of the history file somehow got set to zero?
$ echo $HISTFILESIZE
500
Nope -- that's not it.
Maybe it's using the wrong file. In bash you can set $HISTFILE to
point to different places; for instance, you can use that to maintain
different histories per window, or per machine.
$ echo $HISTFILE
/home/username/.bash_history
Nope, that's not it either.
The problem, for both people, turned out to be really simple:
$ ls -l $HISTFILE
-rw------- 1 root root 92 2007-08-20 14:03 /home/user/.bash_history
I'm not sure how it happens, but sometimes the .bash_history file
becomes owned by root, and then as a normal user you can't update
your history any more.
So a simple
$ rm $HISTFILE
and you're all set -- history across sessions should start working again.
Tags: shell, bash, tips
[
14:42 Nov 27, 2009
More linux/cmdline |
permalink to this entry |
]
Tue, 14 Jul 2009
Dave just discovered a useful preference in Firefox.
So many pages give that annoying info bar at the top that says
"Additional plugins are needed to view this page."
It doesn't tell you which plugins, but for Linux users it's a safe bet
that whatever they are, you can't get them. Why have the stupid
nagbar taking up real estate on the page for something you can't do
anything about?
Displaying the info bar is the right thing for Firefox to do, of
course. Some users may love to go traipsing off installing random
plugins to make sure they see every annoying bit of animation and
sound on a page. But Dave's excellent discovery was that the rest
of us can turn off that bar.
The preference is
plugins.hide_infobar_for_missing_plugin
and you can see it by going to about:config and
typing missing. Then double-click the line, and
you'll never see that nagbar again.
Tags: web, browsers, firefox, tips
[
12:09 Jul 14, 2009
More tech/web |
permalink to this entry |
]
Wed, 24 Jun 2009
I've been enjoying my
random
system beeps, different every day. At least up until yesterday,
when I didn't seem to have one. Today I didn't have one either,
and discovered that was because the beep module was no longer loaded.
Why not? Well, I updated my kernel to tweak some ACPI parameters
(fruitlessly, as it turns out; I'm trying to get powertop to give
me more information but I haven't found the magic combination of
kernel parameters it wants on this machine) and so I did a
make modules_install. And it seems that
make modules_install starts out by doing
rm -rf /lib/modules/VERSION/kernel which removed
my externally built beep module along with everything else.
I couldn't find documentation on this, but I did find
Intel
Wireless bug 556 which talks about the issue. Apparently
somewhere along the way 2.6 started doing this rm -rf,
but you can get around it by installing outside the kernel
directory.
In other words, instead of
cp beep.ko /lib/modules/2.6.29.4/kernel/drivers/input/misc/
do
cp beep.ko /lib/modules/2.6.29.4/drivers/input/misc/
Then your external module won't get wiped out at the next
modules_install.
I've let the maintainer of
Fancy Beeper
know about this, so it won't be a problem for that module,
but it's a good tip to know about in general --
I'm sure there are lots of modules that hit this problem.
Tags: linux, kernel, tips
[
10:30 Jun 24, 2009
More linux/kernel |
permalink to this entry |
]
Fri, 19 Jun 2009
A silly little thing, but something that Python books mostly don't
mention and I can never find via Google:
How do you find all the methods in a given class, object or module?
Ideally the documentation would tell you. Wouldn't that be nice?
But in the real world, you can't count on that,
and examining all of an object's available methods can often give
you a good guess at how to do whatever you're trying to do.
Python objects keep their symbol table in a dictionary
called __dict__ (that's two underscores on either end of the word).
So just look at object.__dict__. If you just want the
names of the functions, use object.__dict__.keys().
Thanks to JanC for suggesting dir(object) and help(object), which
can be more helpful -- not all objects have a __dict__.
Tags: programming, python, tips
[
12:44 Jun 19, 2009
More programming |
permalink to this entry |
]
Wed, 08 Apr 2009
I was curious whether Linux could read the CPU temperature on Dave's
new Mac Mini. I normally read the temperature with something like
this:
cat /proc/acpi/thermal_zone/ATF0/temperature
(the ATF0 part varies from machine to machine).
Though this doesn't work on all machines -- on my AMD desktop
it always returns the same number, which, I'm told, means that
the BIOS probably has some code that looks something like this:
if (OS == "Win95" || OS == "Win98") {
  return get_win9x_temp();
}
else if (OS == "WinNT" || OS == "WinXP" || OS == "Vista") {
  return get_nt_temp();
}
else {
  return 40;
}
Anyway, I wondered whether the Mac would have that problem
(with different OS names, of course).
There wasn't anything in /proc/acpi/thermal_zone on the Mac,
but /proc is deprecated and we're all supposed to be moving to /sys,
right? But nobody writes about the new way to get the temperature
from /sys; most people are still using the old /proc way.
Took some digging, but I found it:
cat /sys/class/thermal/thermal_zone0/temp
It's in thousandths of a degree C now, rather than straight degrees C.
And on the Mini? Nope, it's not there either. If Dave needs the
temperature he needs to stick to OS X, or else figure out lm_sensors.
Update: Matthew Garrett has an excellent blog article on
the OS entries
reported to ACPI. Apparently Linux since 2.6.29 has claimed to
be "Microsoft Windows NT" to avoid just the sort of problem I
mentioned. Though that leaves me confused about why my desktop
machine always reports 40C.
Thanks to JanC for pointing me to that article!
Tags: linux, acpi, kernel, tips
[
21:54 Apr 08, 2009
More linux/kernel |
permalink to this entry |
]
Sun, 22 Mar 2009
I use a light background for my X terminals (xterm and rxvt):
not white, but a light grey that I find easy on the eyes.
Long ago, I spent the time to set up a custom vim color scheme
that works with the light background.
But sometimes I need to
run vim somewhere where I don't have access to my custom scheme.
It always starts up with a lot of the words displayed in
yellow, completely unreadable against a light background.
:set background=light
doesn't help -- the default colorscheme is already intended for a
light background, yet it still uses yellow characters.
I tried all the colorschemes installed with ubuntu's vim
(you can get a list of them with ls /usr/share/vim/vim71/colors).
The only light-background vim schemes that don't use yellow
all have their primary text color as red. Do a lot of people
really want to edit red text? Maybe the same people who think that
yellow is a dark color?
Curiously, it turns out that if you use one of these light
color schemes on a Linux console (with its black background),
the yellow text isn't yellow (which would show up fine against
black), but orange (which would be better on a light background).
Mikael knew the answer:
:set t_Co=88
This tells vim to use 88-color mode instead of its default of 8,
and the yellow text turns light blue. Not terrifically readable
but much better than yellow. Or, instead, try
:set t_Co=256
and the yellow/light blue text turns an ugly, but readable, orange
(probably the same orange as the console used).
So, vim users with dark-on-light terminal schemes: add
set t_Co=256 in your .vimrc (no colon)
and you'll be much happier.
Update: Pádraig Brady has a great page explaining more about
terminal
colour highlights, including a TERM=xterm-256color
setting to get
vim to use 256 colors automatically. There's also a lot of good advice
there on enabling colors in other console apps.
The only catch: on Ubuntu you do have to install the
ncurses-term package, which will get you xterm-256color as
well as 256color variants for lots of other terminal types.
Here's useful page on 256-Color
XTerms in Ubuntu.
Tags: editors, vim, color, tips
[
22:29 Mar 22, 2009
More linux/editors |
permalink to this entry |
]
Wed, 18 Mar 2009
Firefox started forgetting new bookmarks. I'd make a few bookmarks,
filing them in the right place ... then the next time I started up,
they wouldn't be there and I had to go find them again. I tested
and verified that it wasn't that I was exiting Firefox uncleanly;
even if I ran from the terminal, made a bookmark, and exited,
nothing would be saved.
It took me forever to find anything on this with google, so I'm
blogging it in the hope of making it easier for the next person
to find. It turns out the Mozilla Knowledge Base has a terrific
article called
Bookmarks
not saved that discusses lots of ways this can happen. Go through
the list and you'll probably find a solution.
In my case it was the second item: "Places preferences - Firefox 3".
It turned out that all three of my boolean browser.places
preferences were set to non-default values -- not by me, since I'd
never heard of any of the browser.places preferences before.
After toggling all three of them by double-clicking,
Firefox lost its
anterograde
amnesia and started remembering new bookmarks again.
Tags: firefox, mozilla, tips
[
23:01 Mar 18, 2009
More tech/web |
permalink to this entry |
]
Thu, 05 Feb 2009
Making desktop backgrounds in GIMP is a bit tedious if you have
several machines with screens of different sizes. The workflow goes
something like this:
First, choose Crop tool and turn on Fixed: Aspect Ratio.
Then loop over images:
- Load an image
- Go to Tool Options
- Type in the aspect ratio: 4:3, 8:5, 5:4, 1366:768 etc.
- Go to the image and crop.
- Image->Scale (I have this on Shift-S, can't remember whether
that was a default binding or not).
- Ctrl-K to delete the current width (Ctrl-U also works, but beeps;
I'm not sure why)
- Type in the desired width (1024 or 1680 or 1366 or whatever)
(I always hit Tab here, though it's probably not necessary)
- Click Scale or type Alt-S (unfortunately, Return doesn't work
in this dialog).
- Save As to the appropriate name and path for the current resolution
- Undo (the Scale), Undo (the Crop)
- Load a new image (continue loop)
But you can use Save Options (Tool Presets) to avoid step 3,
typing in the aspect ratio.
Here's how:
- Set up the aspect ratio you want in the Crop tool, with Fixed checked
- Click on Save Options (the floppy disk icon in the lower left of
Tool Options)
- Choose a name (choose New Entry first if you've already saved options).
Repeat, for each aspect ratio you might want to use.
Now clicking on Restore Options gives you a menu of all your commonly
used aspect ratios -- much faster than typing them in every time.
Too bad there's no way to use this shortcut for the Scale step,
or to do Crop and Scale in one operation.
Nice shortcut! But having done that, I realized I could shorten it
even more: I could make a selection (not a crop) with one of my preset
aspect ratios, then run a script that would figure out from the aspect
ratio which absolute size I wanted, crop and scale, and either save
it to the right place, or make a new image so I could save without
needing to Redo or Save a Copy. That was an easy script to write,
so here it is:
wallpaper.py.
Tags: gimp, tips, programming, hack
[
23:45 Feb 05, 2009
More gimp |
permalink to this entry |
]
Fri, 02 Jan 2009
I've been offline and unable to update the blog for a while
(technical glitch, long story) but I'm back and have several
stories to polish up and post, beginning with this helpful
(I hope) Firefox tidbit:
I've often wanted a way to get Firefox to save the current set of tabs
without actually bookmarking them -- the way it does when you install
an extension and need to restart. But I'd never found a way to do that
through the menus.
But then I realized that I could use the same trick that I use for
landscape
printing:
- Edit user.js in your Firefox profile directory, and add
this line:
user_pref("browser.sessionstore.resume_from_crash", false);
This will ensure that normally, it doesn't give you the confirmation
box, only when you ask for it.
- In your running Firefox, go to about:config and search for
sessionstore
- Look for the browser.sessionstore.resume_session_once line
and doubleclick it (change it to true)
Now the current session will be restored the next time you start Firefox,
but in the future you'll still get clean startups.
Update: this article used to reference
"browser.tabs.warnOnClose", which is probably the wrong preference.
There's some documentation (not much) at the
Mozilla
support: Session Restore.
Tags: mozilla.firefox, tips
[
22:31 Jan 02, 2009
More tech/web |
permalink to this entry |
]
Thu, 12 Jun 2008
I discovered a handy tip for Linux Firefox' printing Page Setup today.
Normal web page printing uses "Portrait" mode: you read the page
with the paper oriented so that it's taller than it is wide.
Once a week, I need to print a form from a club web site to bring
to the meetings. It's a table that's much wider than it is tall,
so I want to print it that way: in "Landscape" mode.
In Firefox 2 (at least on Linux), you can't do that from the Print
dialog -- there's no Portrait/Landscape option. So you have to use
a separate dialog, Page Setup, following these steps:
- Run Page Setup
- Change Portrait to Landscape
- Click OK
- Print (bring up the Print dialog and click OK)
- Run Page Setup
- Change Landscape to Portrait
- Click OK
Kind of a lot of steps just to print one landscape page!
But if you forget,
the next page you print from Firefox will be printed in Landscape
mode and will take twice as many pages as it should (if you don't
notice what's happening and dive for the printer's OFF switch in time,
that being the only way to cancel a printing job once it hits the printer).
This morning, it finally occurred to me that Firefox was storing this
setting somehow, most likely in prefs.js.
If I could find the setting and force it in user.js (which takes
precedence over prefs.js and is not updated by Firefox), I could make
Firefox set itself back to Portrait every time it starts up.
(prefs.js and user.js are both generally found in $HOME/.mozilla/firefox/).
Some greppery-pokery revealed the solution.
I needed only to add a line in user.js that looks like this:
user_pref("print.printer_CUPS/Epson.print_orientation", 0);
and presto! my problem was solved.
Oddly, it's set separately for every printer you have defined, even
though there's no way to set one printer to Landscape while another
one is still on Portrait (the Page Setup dialog is global, and applies
to every printer Firefox knows about). "Epson" is the CUPS name of my
primary printer; replace that with your printer's name (as set in
CUPS), and add a similar line for each printer you have. For the
printers I've used, 0 is Portrait and 1 is Landscape, but you can
verify that by typing:
grep orientation prefs.js | grep name
That command will also help you
if you're not sure what printers you have defined, or you don't use
CUPS but want to try this under a different print spooler.
(Don't be misled by all the orientation prefs with "tmp" in the name.)
As a minor digression, there's actually a secret pref that's supposed
to give another way around the problem:
user_pref("print.whileInPrintPreview", true);
This lets you do all your printing from the Print Preview window,
which offers its own Portrait and Landscape buttons. That would
be a nice solution. Alas, the Portrait and Landscape buttons in that
dialog currently don't work, and since this preference is undocumented
and unmaintained, filing more bugs isn't likely to help.
(I should mention that this all pertains to Firefox 2.
I haven't switched to Firefox 3 yet,
so I don't know the state of its printing UI, or whether this
preference is either helpful or effective there.)
Tags: mozilla, firefox, printing, tips
[
21:07 Jun 12, 2008
More tech/web |
permalink to this entry |
]
Wed, 22 Jun 2005
An upgrade from woody to sarge introduced a new problem with editing
mail messages in vim: Subject lines appeared in yellow, against my
light grey background, so they weren't readable any more.
Vim color files have always been a mystery to me. I have one which
I adapted from one of the standard color schemes, but I've never
been clear what the legal identifiers are or how to find out.
But I changed both places where it said "ctermfg=Yellow" to another
color, and nothing changed, so this time I had to find out.
Fortunately a nice person on #vim suggested :he synID (he
is short for "help", of course) which told me all I needed to know.
Put the cursor on the errant line and type:
:echo synIDattr(synID(line("."), col("."), 1), "name")
That told me that the Subject line was syntax class "mailSubject".
So I tried (copying other lines in my color file) adding this line:
hi mailSubject term=underline ctermfg=Red guifg=Red
and now all is happy again in vim land. I wish I'd learned that
synID trick a long time ago!
Tags: vim, color, editors, tips
[
10:59 Jun 22, 2005
More linux/editors |
permalink to this entry |
]
Thu, 17 Feb 2005
One of those niggling problems that has plagued me for a long
time: in the editor vim, if I'm typing along in insert mode and
instead of a space I accidentally hit control-space, vim inserts
a bunch of text I didn't want, then exits insert mode. Meanwhile
I'm still merrily typing away, typing what are now vim comments
which invariably end up deleting the last two paragraphs I typed
then doing several more operations which end up erasing the undo
buffer so I can't get those paragraphs back.
Ctrl-space inserts a null character (you can verify this by
putting it in a file and running od -xc on it).
I've done lots of googling in the past, but it's hard to google on
strings like " " or even "space" or "null", and nobody I asked had a
clue what this function was called (it turns out it re-inserts
whatever the last inserted characters were) so I couldn't google
on the function name.
Vim's help suggests that <Nul>, <Char-0>, or
<C-^V > should do it. I tried them with map, vmap,
cmap, and nmap, to no avail. I also tried <C-@> since
that's a historical way of referring to the null character,
googling found some references to that in vim, and that's how it
displays if I type it in vim.
I finally found #vim on freenode, and asked there. Last night
nobody knew, but this morning, p0g found the problem: I needed
to use imap, not the map/vmap/cmap/nmap I'd been using.
So here, perserved for google posterity in case other people are
plagued by this problem, is the answer:
imap <Nul> <Space>
For good measure, I also mapped the character to no-op in all the
other modes as well:
map  <Nul> <Nop>
vmap <Nul> <Nop>
cmap <Nul> <Nop>
nmap <Nul> <Nop>
My current .vimrc.
Tags: vim, editors, tips
[
11:24 Feb 17, 2005
More linux/editors |
permalink to this entry |
]
![[Firebug console menu]](http://shallowsky.com/blog/images/screenshots/firebug-console.jpg)