Photographing Farolitos (and other night scenes)
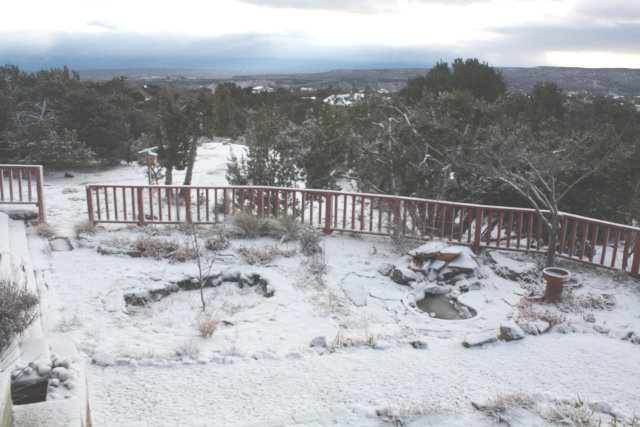
Excellent Xmas to all! We're having a white Xmas here..
Dave and I have been discussing how "Merry Christmas" isn't
alliterative like "Happy Holidays". We had trouble coming up with a
good C or K adjective to go with Christmas, but then we hit on the
answer: Have an Excellent Xmas! It also has the advantage of
inclusivity: not everyone celebrates the birth of Christ, but Xmas is
a secular holiday of lights, family and gifts, open to people of all
belief systems.
 Meanwhile:
I spent a couple of nights recently learning how to photograph Xmas
lights and farolitos.
Meanwhile:
I spent a couple of nights recently learning how to photograph Xmas
lights and farolitos.
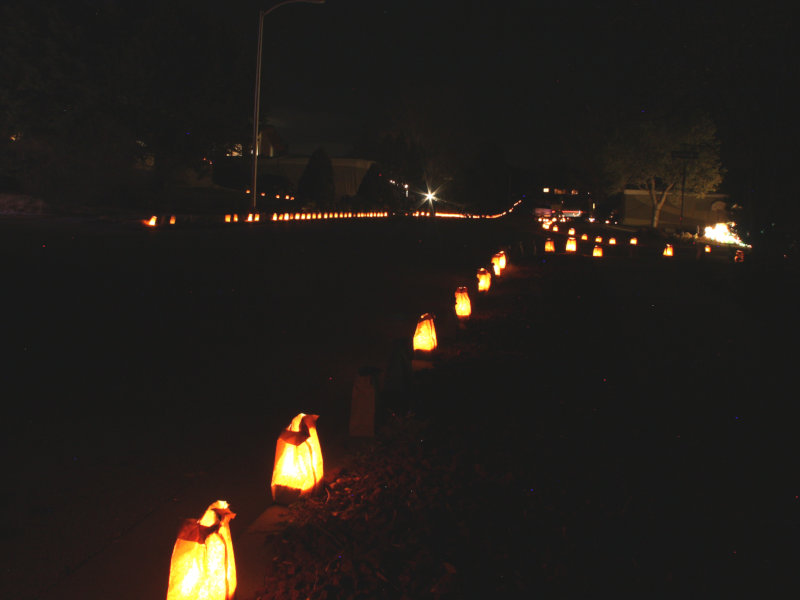
Farolitos, a New Mexico Christmas tradition, are paper bags, weighted down with sand, with a candle inside. Sounds modest, but put a row of them alongside a roadway or along the top of a typical New Mexican adobe or faux-dobe and you have a beautiful display of lights.
They're also known as luminarias in southern New Mexico, but Northern New Mexicans insist that a luminaria is a bonfire, and the little paper bag lanterns should be called farolitos. They're pretty, whatever you call them.
Locally, residents of several streets in Los Alamos and White Rock set
out farolitos along their roadsides for a few nights around Christmas,
and the county cooperates by turning off streetlights on those
streets. The display on Los Pueblos in Los Alamos is a zoo, a slow
exhaust-choked parade of cars that reminds me of the Griffith Park
light show in LA. But here in White Rock the farolito displays are
a lot less crowded, and this year I wanted to try photographing them.
Canon bugs affecting night photography
I have a little past experience with night photography. I went through a brief astrophotography phase in my teens (in the pre-digital phase, so I was using film and occasionally glass plates). But I haven't done much night photography for years.
That's partly because I've had problems taking night shots with my current digital SLRcamera, a Rebel Xsi (known outside the US as a Canon 450d). It's old and modest as DSLRs go, but I've resisted upgrading since I don't really need more features.
Except maybe when it comes to night photography. I've tried shooting star trails, lightning shots and other nocturnal time exposures, and keep hitting a snag: the camera refuses to take a photo. I'll be in Manual mode, with my aperture and shutter speed set, with the lens in Manual Focus mode with Image Stabilization turned off. Plug in the remote shutter release, push the button ... and nothing happens except a lot of motorized lens whirring noises. Which shouldn't be happening -- in MF and non-IS mode the lens should be just sitting there intert, not whirring its motors. I couldn't seem to find a way to convince it that the MF switch meant that, yes, I wanted to focus manually.
It seemed to be primarily a problem with the EF-S 18-55mm kit lens; the camera will usually condescend to take a night photo with my other two lenses. I wondered if the MF switch might be broken, but then I noticed that in some modes the camera explicitly told me I was in manual focus mode.
I was almost to the point of ordering another lens just for night shots when I finally hit upon the right search terms and found, if not the reason it's happening, at least an excellent workaround.
Back Button Focus
I'm so sad that I went so many years without knowing about Back Button Focus. It's well hidden in the menus, under Custom Functions #10.
Normally, the shutter button does a bunch of things. When you press it halfway, the camera both autofocuses (sadly, even in manual focus mode) and calculates exposure settings.
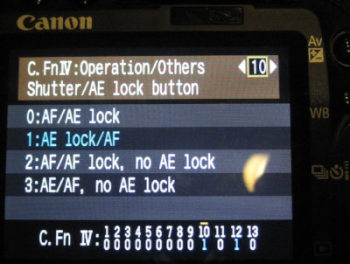 But there's a custom function that lets you separate the focus and
exposure calculations. In the Custom Functions menu option #10
(the number and exact text will be different on different Canon models,
but apparently most or all Canon DSLRs have this somewhere),
the heading says: Shutter/AE Lock Button.
Following that is a list of four obscure-looking options:
But there's a custom function that lets you separate the focus and
exposure calculations. In the Custom Functions menu option #10
(the number and exact text will be different on different Canon models,
but apparently most or all Canon DSLRs have this somewhere),
the heading says: Shutter/AE Lock Button.
Following that is a list of four obscure-looking options:
- AF/AE lock
- AE lock/AF
- AF/AF lock, no AE lock
- AE/AF, no AE lock
The text before the slash indicates what the shutter button, pressed halfway, will do in that mode; the text after the slash is what happens when you press the * or AE lock button on the upper right of the camera back (the same button you use to zoom out when reviewing pictures on the LCD screen).
The first option is the default: press the shutter button halfway to activate autofocus; the AE lock button calculates and locks exposure settings.
The second option is the revelation: pressing the shutter button halfway
will calculate exposure settings, but does nothing for focus. To focus,
press the * or AE button, after which focus will be locked. Pressing
the shutter button won't refocus. This mode is called "Back button focus"
all over the web, but not in the manual.
Back button focus is useful in all sorts of cases. For instance, if you want to autofocus once then keep the same focus for subsequent shots, it gives you a way of doing that. It also solves my night focus problem: even with the bug (whether it's in the lens or the camera) that the lens tries to autofocus even in manual focus mode, in this mode, pressing the shutter won't trigger that. The camera assumes it's in focus and goes ahead and takes the picture.
Incidentally, the other two modes in that menu apply to AI SERVO mode when you're letting the focus change constantly as it follows a moving subject. The third mode makes the * button lock focus and stop adjusting it; the fourth lets you toggle focus-adjusting on and off.
Live View Focusing
There's one other thing that's crucial for night shots: live view focusing. Since you can't use autofocus in low light, you have to do the focusing yourself. But most DSLR's focusing screens aren't good enough that you can look through the viewfinder and get a reliable focus on a star or even a string of holiday lights or farolitos.
Instead, press the SET button (the one in the middle of the right/left/up/down buttons) to activate Live View (you may have to enable it in the menus first). The mirror locks up and a preview of what the camera is seeing appears on the LCD. Use the zoom button (the one to the right of that */AE lock button) to zoom in; there are two levels of zoom in addition to the un-zoomed view. You can use the right/left/up/down buttons to control which part of the field the zoomed view will show. Zoom all the way in (two clicks of the + button) to fine-tune your manual focus. Press SET again to exit live view.
It's not as good as a fine-grained focusing screen, but at least it gets you close. Consider using relatively small apertures, like f/8, since it will give you more latitude for focus errors. Yyou'll be doing time exposures on a tripod anyway, so a narrow aperture just means your exposures have to be a little longer than they otherwise would have been.
After all that, my Xmas Eve farolitos photos turned out mediocre. We had a storm blowing in, so a lot of the candles had blown out. (In the photo below you can see how the light string on the left is blurred, because the tree was blowing around so much during the 30-second exposure.) But I had fun, and maybe I'll go out and try again tonight.

An excellent X-mas to you all!
[ 12:30 Dec 25, 2016 More photo | permalink to this entry | ]