Shallow Thoughts : : Apr
Akkana's Musings on Open Source Computing and Technology, Science, and Nature.
Sat, 30 Apr 2011
Intel hosted a MeeGo developer camp on Friday where they gave out
ExoPC tablets for developers, and I was lucky enough to get one.
Intel is making a big MeeGo push -- they want lots of apps available for
this platform, so they're trying to make it as easy as possible for
develoeprs to make new apps for their
AppUp store.
Meego looks fun -- it's a real Unix under the hood, with a more or less
mainstream kernel and a shell. I'm looking forward to developing for it;
in theory it can run Python programs (using Qt or possibly even gtk for
the front end) as well as C++ Qt apps. Of course, I'll be writing about
MeeGo developing once I know more about it; for now I'm still setting up
my development environment.
But on a lazy Saturday, I thought it would be fun to see if the new
Ubuntu 11.04, "Natty Narwhal", can run on the ExoPC. Natty's whizzy new "Unity"
interface (actually not new, but much revamped since the previous Ubuntu
release) is rumoured to be somewhat aimed at tablets with touchscreens.
How would it work on the ExoPC?
Making a bootable Ubuntu USB stick
The first step was to create a bootable USB stick with Ubuntu on it.
Sadly, this is
not
as easy as on Fedora or SuSE. Ubuntu is still very CD oriented, and
to make a live USB stick you need to take an ISO intended for a CDROM
then run a program that changes it to make it bootable from USB.
There are two programs for this: usb-creator and unetbootin.
In the past, I've had zero luck getting these programs to work except
when running under a Gnome desktop on the same version of Ubuntu I
was trying to install. Maybe it would be better this time.
I tried usb-creator-gtk first, since that seems to be the one Ubuntu
pushes most. It installed without too many extra dependencies -- it
did pull in several PolicyKit libraries like libpolkit-backend-1-0 and
libpolkit-gobject-1-0. When I ran it, it saw the USB stick right away,
and I chose the ubuntu-11.04-desktop-i386.iso file I'd downloaded.
But the Make Startup Disk button remained blank. I guess I needed to
click the Erase Disk button first. So I did -- and was presented
with an error dialog that said:
org.freedesktop.DBus.Error.ServiceUnknown: The name org.freedesktop.PolicyKit1 was not provided by any service files
Dave (who's wrestled with this problem more than I have) suggested maybe
it wanted a vfat partition on the USB stick. So I quit usb-creator-gtk,
used gparted to make the stick into a single vfat partition, and restarted
usb-creator-gtk. Now everything was un-greyed -- so I clicked
Make Startup Disk and was immediately presented with another dialog:
Installation failed
No clue about what went wrong or why. Okay, on to unetbootin.
When I ran unetbootin, it gave me a helpful dialog that "unetbootin
must be run as root." Then it proceeded to show its window anyway.
I can read, so I quit and ran it again as root. I chose the iso
file, clicked OK -- and it worked! In a minute or two I had a bootable
Ubuntu USB stick.
(Update: unetbootin is better than usb-creator for another reason:
you can use it to burn CDs other than the default live desktop CD --
like if you want to burn the "alternate installer" ISO so you can
install server systems, use RAID partitions, etc.)
Booting on the ExoPC
![[Ubuntu Natty running on ExoPC]](http://shallowsky.com/blog/images/hardware/exopc-nattyT.jpg)
Natty booted up just fine! I inserted the USB stick, powered on, leapt
for the XXX button that shows the boot menu and told it to boot from the
stick. Natty booted quite fast, and before long I was in the Unity desktop,
and, oddly, it started off in a banshee screen telling me I didn't
have any albums installed. I dismissed banshee ...
... at which point I found I couldn't actually do much without a keyboard.
I couldn't sign on to our wi-fi since I couldn't type the password,
and I didn't have any local files installed. But wait! I had an
SD card with some photos on it, and Ubuntu recognized it just fine and
popped up a file browser.
But I wanted to try net access.
I borrowed Dave's Mac USB keyboard to type in the WPA password. It
worked fine, and soon I was signed on to wi-fi and happily browsing the web.
"onboard" keyboard
What about an onscreen keyboard, though? I found one, called "onboard".
It's installed by default. Unfortunately, I couldn't find a way to run
it without a keyboard. Unity has a "+" button that took me to a window
with a text field labeled Search Applications, but you have to
type something there before it will show you any applications.
I couldn't find any way to get a list of applications without a
keyboard.
With a keyboard, I was able to find a terminal app, from which I was
able to run onboard. It's tiny! Far too small for me to type on a
capacitive display, even with my tiny fingers. It has no man page,
but it does have a --help argument, by which I was able to discover
the -s argument: onboard -s 900x300 did nicely.
It's ugly, but I can live with that.
Now if I can figure out how to make a custom Unity launcher for that,
I'll be all set.
Unity on tablets -- not quite there yet
With onboard running, I gave Dave back his keyboard, and discovered a
few other problems. I couldn't scroll in the file browser window: the
scrollbar thumb is only a few pixels wide, too narrow to hit with a
finger on a touchscreen, and the onboard keyboard has no up/down arrows
or Page Up/Down. I tried dragging with two fingers, but no dice.
Also, when I went back to that Unity Search Applications screen,
I discovered it takes up the whole screen, covering the onscreen
keyboard, and there's no way to move it so I can type.
Update: forgot to mention that Unity, for all its huge Playskool
buttons, has a lot of very small
targets that are hard to hit with a finger. It took me two or three
tries to choose the wi-fi icon on the top bar rather than the icon
to the left or right of it, and shutdown is similarly tricky.
So Natty's usability on tablets isn't quite there. Still, I'm impressed
at how easy it was to get this far. I didn't expect it to boot, run and
be so usable without any extra work on my part. Very cool!
And no, I won't be installing Natty permanently on the ExoPC. I got this
tablet for MeeGo development and I'm not welching on that deal. But it's
fun to know that it's so easy to boot Ubuntu when I want to.
Tags: exopc, ubuntu, tablet, boot, install
[
13:46 Apr 30, 2011
More linux/install |
permalink to this entry |
]
Wed, 27 Apr 2011
Today I have three tips I've found useful with ssh.
Clearing ssh control sockets
We had a network failure recently while I had a few ssh connections open.
After the network came back up, when I tried to ssh to one host, it always
complained
Control socket connect(/home/username/ssh-username@example.com:port): Connection refused
-- but then it proceeded to connect anyway.
Another server simply failed to connect.
Here's how to fix that: on the local machine -- not the remote one --
there's a file named /home/username/ssh-username@example.com:port.
Remove that file, and ssh will work normally again.
Connection Sharing
I think the stuck control socket happened because I was using
ssh connection sharing,
a nifty feature introduced a few years back that lets ssh-based commands
re-use an existing connection without re-authenticating.
Suppose you have an interactive ssh session to a remote host,
and you need to copy some files over with a program like scp.
Normally, each scp command needs to authenticate with remotehost,
sometimes more than once per command. Depending on your setup and
whether you're running a setup like ssh-agent, that might mean you
have to retype your password several times, or wait while it
verifies your host key.
But you can make those scps re-use your existing connection.
Add this to .ssh/config:
Host *
  ControlMaster auto
  ControlPath ~/ssh-%r@%h:%p
Eliminating strict host key checking
The final tip is for my biggest ssh pet peeve: strict host key checking.
That's the one where you ssh to a machine you use all the time
and you get:
@@@@@@@@@@@@@@@@@@@@@@@@@@@@@@@@@@@@@@@@@@@@@@@@@@@@@@@@@@@
@    WARNING: REMOTE HOST IDENTIFICATION HAS CHANGED!     @
@@@@@@@@@@@@@@@@@@@@@@@@@@@@@@@@@@@@@@@@@@@@@@@@@@@@@@@@@@@
IT IS POSSIBLE THAT SOMEONE IS DOING SOMETHING NASTY!
... and many more lines of stuff like that.
And all it really means is something like
- that machine has re-installed its OS, or rebooted into a different
distro; or
- the DHCP server has given that IP address to a different machine
from the one that had it last time.
The really frustrating thing is that there's no flag you can pass to
ssh to tell it "look, it's fine, just let me in." The only solution is to
edit ~/.ssh/known_hosts, find the line corresponding with that
host (not so easy if you've forgotten to add HashKnownHosts no)
so you can actually see the hostnames) and delete it -- or delete the
whole ~/.ssh/known_hosts file. ssh does have an option
for StrictHostKeyChecking no, and the documentation implies
it might help; but it doesn't get you past this error, and it doesn't
prevent ssh asking for confirmation when it sees a new host, either.
I'm not sure what it actually does.
What does get you past the error? Here's a fun trick.
Add a stanza like this to .ssh/config:
Host 192.168.1.*
  StrictHostKeyChecking no
  UserKnownHostsFile /dev/null
Translation: for every host on your local net (assuming it's 192.168.1),
pretend /dev/null has the list you'd normally get from ~/.ssh/known_hosts.
Since there's definitely no host line there matching your intended
remote host, it will ask you whether it's okay, then connect.
I wish I could find a way to eliminate the prompt too (I thought that
was what StrictHostKeyChecking no was supposed to do);
but at least you can just hit return, which is a lot easier than
editing known_hosts every time.
And yes, this all makes ssh less secure. You know what? For hosts on
my local network, that are sitting in the same room with me, I'm
really not too concerned about that.
Tags: linux, ssh
[
17:53 Apr 27, 2011
More linux |
permalink to this entry |
]
Sun, 24 Apr 2011
I spent Friday and Saturday at the
WhereCamp unconference on mapping,
geolocation and related topics.
This was my second year at WhereCamp. It's always a bit humbling. I
feel like I'm pretty geeky, and I've written a couple of Python
mapping apps and I know spherical geometry and stuff ... but when
I get in a room with the folks at WhereCamp I realize I don't know
anything at all. And it's all so interesting I want to learn all of it!
It's a terrific and energetic unconference.
I
I won't try to write up a full report, but here are some highlights.
Several Grassroots Mapping
people were there again this year.
Jeffrey Warren led people in constructing balloons from tape and mylar
space blankets in the morning, and they shot some aerial photos.
Then in a late-afternoon session he discussed how to stitch the
aerial photos together using
Cargen Knitter.
But he also had other projects to discuss:
the Passenger
Pigeon project to give cameras to people who will
be flying over environmental that need to be monitored -- like New York's
Gowanus Canal superfund site, next to La Guardia airport.
And the new Public Laboratory for Open
Technology and Science has a new project making vegetation maps
by taking aerial photos with two cameras simultaneously, one normal,
one modified for infra-red photography.
How do you make an IR camera? First you have to remove the IR-blocking
filter that all digital cameras come with (CCD sensors are very
sensitive to IR light). Then you need to add a filter that blocks
out most of the visible light. How? Well, it turns out that exposed
photographic film (remember film?) makes a good IR-only filter.
So you go to a camera store, buy a roll of film, rip it out of the
reel while ignoring the screams of the people in the store, then hand
it back to them and ask to have it developed. Cheap and easy.
Even cooler, you can use a similar technique to
make a
spectrometer from a camera, a cardboard box and a broken CD.
Jeffrey showed spectra for several common objects, including bacon
(actually pancetta, it turns out).
| JW: | See the dip in the UV? Pork fat is very absorbent
in the UV. That's why some people use pork products as sunscreen.
|
| Audience member: | Who are these people?
|
| JW: | Well, I read about them on the internet.
|
I ask you, how can you beat a talk like that?
Two Google representatives gave an interesting demo of some of
the new Google APIs related to maps and data visualization, in
particular Fusion
Tables. Motion charts sounded especially interesting
but they didn't have a demo handy; there may be one appearing soon
in the Fusion Charts gallery.
They also showed the new enterprise-oriented
Google Earth Builder, and custom street views for Google Maps.
There were a lot of informal discussion sessions, people brainstorming
and sharing ideas. Some of the most interesting ones I went to included
- Indoor orientation with Android sensors: how do you map an unfamiliar
room using just the sensors in a typical phone? How do you orient
yourself in a room for which you do have a map?
- A discussion of open data and the impending shutdown of data.gov.
How do we ensure open data stays open?
- Using the Twitter API to analyze linguistic changes -- who initiates
new terms and how do they spread? -- or to search for location-based
needs (any good ice cream places near where I am?)
- Techniques of data visualization -- how can we move beyond basic
heat maps and use interactivity to show more information? What works
and what doesn't?
- An ongoing hack session in the scheduling room included folks
working on projects like a system to get information from pilots
to firefighters in real time. It was also a great place to get help
on any map-related programming issues one might have.
- Random amusing factoid that I still need to look up
(aside from the pork and UV one): Automobile tires have RFID in them?
Lightning talks included demonstrations and discussions of
global Twitter activity as the Japanese quake and tsunami
news unfolded, the new CD from OSGeo,
the upcoming PII conference --
that's privacy identity innovation -- in Santa Clara.
There were quite a few outdoor game sessions Friday. I didn't take part
myself since they all relied on having an iPhone or Android phone: my
Archos 5 isn't
reliable enough at picking up distant wi-fi signals to work as an
always-connected device, and the Stanford wi-fi net was very flaky
even with my laptop, with lots of dropped connections.
Even the OpenStreetMap mapping party
was set up to require smartphones, in contrast with past mapping
parties that used Garmin GPS units. Maybe this is ultimately a good thing:
every mapping party I've been to fizzled out after everyone got back
and tried to upload their data and discovered that nobody had
GPSBabel installed, nor the drivers for reading data off a Garmin.
I suspect most mapping party data ended up getting tossed out.
If everybody's uploading their data in realtime with smartphones,
you avoid all that and get a lot more data. But it does limit your
contributors a bit.
There were a couple of lowlights. Parking was very tight, and somewhat
expensive on Friday, and there wasn't any info on the site except
a cheerfully misleading "There's plenty of parking!" And the lunch
schedule on Saturday as a bit of a mess -- no one was sure when the
lunch break was (it wasn't on the schedule), so afternoon schedule had
to be re-done a couple times while everybody worked it out. Still,
those are pretty trivial complaints -- sheesh, it's a free, volunteer
conference! and they even provided free meals, and t-shirts too!
Really, WhereCamp is an astoundingly fun gathering. I always leave
full of inspiration and ideas, and appreciation for the amazing
people and projects presented there. A big thanks to the organizers
and sponsors. I can't wait 'til next year -- and I hope I'll have
something worth presenting then!
Tags: wherecamp, mapping, GIS, tech, openstreetmap
[
23:40 Apr 24, 2011
More mapping |
permalink to this entry |
]
Wed, 20 Apr 2011
(or: Fixing a multi flash card reader on Ubuntu Natty)
For the first time after installing Ubuntu Natty, I needed to upload
some photos from my camera -- and realized with a sinking feeling
that I now had the new UDEV, which no longer lets you use the
udev
all_partitions directive, so that cards inserted into a multi flash
card reader will show up as /dev/sdb1 or whatever the appropriate
device name is.
Without all_partitions, you get the initial
sdb, sdc, sdd and sde for the various slots in the card reader, but
since there's no card there when the machine boots, and the reader
doesn't send an event when you insert a card later,
you never get a mountable /dev/sdb1 device.
But the udev developers in their infinite wisdom removed
all_partitions some time last year, apparently without providing any
replacement for it. So you can no longer solve this problem through
udev rules.
Static udev devices
Fortunately, there's another way, which is actually easier (though
less flexible) than udev rules: udev static devices. You can create
the devices you need once, and tell udev to create exactly those
devices every time.
To begin, first find out what your base devices are.
Look through dmesg | more for your card reader.
Mine looks something like this:
[    3.304938] scsi 4:0:0:0: Direct-Access     Generic  USB SD Reader    1.00 PQ
: 0 ANSI: 0
[    3.305440] scsi 4:0:0:1: Direct-Access     Generic  USB CF Reader    1.01 PQ
: 0 ANSI: 0
[    3.305939] scsi 4:0:0:2: Direct-Access     Generic  USB xD/SM Reader 1.02 PQ
: 0 ANSI: 0
[    3.306438] scsi 4:0:0:3: Direct-Access     Generic  USB MS Reader    1.03 PQ
: 0 ANSI: 0
[    3.306876] sd 4:0:0:0: Attached scsi generic sg1 type 0
[    3.307020] sd 4:0:0:1: Attached scsi generic sg2 type 0
[    3.307165] sd 4:0:0:2: Attached scsi generic sg3 type 0
[    3.307293] sd 4:0:0:3: Attached scsi generic sg4 type 0
[    3.313181] sd 4:0:0:1: [sdc] Attached SCSI removable disk
[    3.313806] sd 4:0:0:0: [sdb] Attached SCSI removable disk
[    3.314430] sd 4:0:0:2: [sdd] Attached SCSI removable disk
[    3.315055] sd 4:0:0:3: [sde] Attached SCSI removable disk
Notice that the SD reader is scsi 4:0:0:0, and a few lines later, 4:0:0:0
is mapped to sdb. They're out of order, so make sure you match those scsi
numbers. If I want to read SD cards, /dev/sdb is where to look.
(Note: sd in "sdb" stands for "SCSI disk", while SD in "SD card"
stands for "Secure Digital". Two completely different meanings for
the same abbreviation -- just an unfortunate coincidence to make
this all extra confusing.)
To create static devices, I'll need the major and minor device numbers
for the devices I want to create. Since I know the SD card slot is sdb,
I can get those with ls:
$ ls -l /dev/sdb
brw-rw---- 1 root disk 8, 16 2011-04-20 09:43 /dev/sdb
The b at the beginning of the line tells me it's a block device;
the major and minor device numbers for the base SD card device are 8 and 16.
To get the first partition on that card, use the same major device and
add one to the minor device: 8 and 17.
Now you can create new static block devices, as root, using mknod
in the /lib/udev/devices directory:
$ sudo mknod /lib/udev/devices/sdb1 b 8 17
$ sudo mknod /lib/udev/devices/sdb2 b 8 18
$ sudo mknod /lib/udev/devices/sdb3 b 8 19
Update: Previously I had here
$ sudo mknod b 8 17 /lib/udev/devices/sdb1
but the syntax seems to have changed as of mid-2012.
Although my camera only uses one partition, sdb1, I created devices
for a couple of extra partitions because I
sometimes
partition cards that way.
If you only use flash cards for cameras and MP3 players, you
may not need anything beyond sdb1.
You can make devices for the other slots in the card reader the same way.
The memory stick reader showed up as scsi 4:0:0:3 or sde, and
/dev/sde has device numbers 8, 64 ... so to read the memory stick
from Dave's Sony camera, I'd need:
$ sudo mknod /lib/udev/devices/sde1 b 8 65
You don't have to call the devices sdb1, either. You can call them
sdcard1 or whatever you like. However, the base device will still
be named sdb (unless you write a udev rule to change that).
fstab entry
I like to use fstab entries and keep control over what's mounted,
rather than letting the system automatically mount everything it sees.
I can do that with this entry in /etc/fstab:
/dev/sdb1 /sdcard vfat user,noauto,exec,fmask=111,shortname=lower 0 0
plus
sudo mkdir /sdcard.
Now, whenever I insert an SD card and want to mount it, I type
mount /sdcard
as myself. There's no need for sudo because of the user directive.
Tags: linux, udev, ubuntu
[
20:22 Apr 20, 2011
More linux |
permalink to this entry |
]
Mon, 18 Apr 2011
I had to buy a new hard drive recently, and figured as long as I had a
new install ahead of me, why not try the latest Ubuntu 11.04 beta,
"Natty Narwhal"?
One of the things I noticed right away was that sound was really LOUD! --
and my usual volume keys weren't working to change that.
I have a simple setup under openbox: Meta-F7 and Meta-F8 call a shell
script called "louder" and "softer" (two links to the same script),
and depending on how it's invoked, the script calls
aumix -v +4 or aumix -v -4.
Great, except it turns out aumix doesn't work -- at all -- under Natty
(bug
684416). Rumor has it that Natty has dropped all support for OSS
sound, though I don't know if that's actually true -- the bug has
been sitting for four months without anyone commenting on it.
(Ubuntu never seems terribly concerned about having programs in
their repositories that completely fail to do anything; sadly,
programs can persist that way for years.)
The command-line replacement for aumix seems to be amixer, but its
documentation is sketchy at best. After a bit of experimentation, I
found if I set the Master volume to 100% using alsamixergui, I could
call amixer set PCM 4- or 4-. But I couldn't
use amixer set Master 4+ -- sometimes it would work but
most of the time it wouldn't.
That all seemed a bit too flaky for me -- surely there must be a
better way? Some magic Python library? Sure enough, there's
python-alsaaudio, and learning how to use it took a lot less
time than I'd already wasted trying random amixer commands to see
what worked. Here's the program:
#!/usr/bin/env python
# Set the volume louder or softer, depending on program name.

import alsaaudio, sys, os

increment = 4

# First find a mixer. Use the first one.
try :
    mixer = alsaaudio.Mixer('Master', 0)
except alsaaudio.ALSAAudioError :
    sys.stderr.write("No such mixer\n")
    sys.exit(1)

cur = mixer.getvolume()[0]
if os.path.basename(sys.argv[0]).startswith("louder") :
    mixer.setvolume(cur + increment, alsaaudio.MIXER_CHANNEL_ALL)
else :
    mixer.setvolume(cur - increment, alsaaudio.MIXER_CHANNEL_ALL)
print "Volume from", cur, "to", mixer.getvolume()[0]
Tags: python, audio, ubuntu, natty
[
21:13 Apr 18, 2011
More programming |
permalink to this entry |
]
Wed, 13 Apr 2011
Are you a GIMP user or Summer of Code student who's been
wanting to get involved,
but having trouble building, or a bit intimidated by the build process?
I'll be running a session on IRC to help anyone build GIMP
on Linux, as part of the
OpenHatch "Build it"
project.
The session will take place on #gimp on irc.gimp.org (also known as
GimpNet), on Fri, Apr 15, 0300 UTC -- that's Thursday
night in the Americas. To convert to your time zone,
run this command on your local machine:
$ date -d 'Fri Apr 15 03:00 UTC'
Thu Apr 14 20:00:00 PDT 2011
Or try this link:
world
time server.
This is a time that's usually fairly quiet on #gimp -- European users
don't fret, since it's pretty
easy to get help there during more Europe-friendly time zones.
I'll hang around for at least two hours; that should be plenty of
time to build GIMP and all its prerequisites.
For folks new to IRC, note that irc.gimp.org is its own server --
this is not the #gimp channel on Freenode. You can learn more about
IRC on the LinuxChix IRC for
Beginners page, or, if you have trouble getting an IRC client
configured, try this link for
mibbit
web chat.
Note: The #gimp IRC channel was recently under attack by trolls,
and it's possible that it may not be usable at the time of the session.
In that case, I will update this blog page with the name of an
alternate channel to use, and any other necessarily details.
Preparation
If you want to get your system set up ahead of time, I've put the
instructions needed to build on Ubuntu Lucid and other older Linux
distros here:
Gimp Building
Tips (for Linux).
I might be able to offer a little help with building on Macs,
but no guarantees.
Mac and Windows users, or people running a very old Linux distro
(more than a year old) might want to consider an alternate approach:
install Virtualbox or
VMware and install Ubuntu "Natty
Narwhal" (currently still in beta) in a virtual machine.
Of course, this isn't the only time you can get help with building GIMP.
There are folks around on #gimp most of the time who are happy to
help with problems. But if you've been meaning to get started and
want a good excuse, or you've been holding off on asking for help ...
come hang out with us and try it!
Tags: gimp, programming, education
[
12:50 Apr 13, 2011
More gimp |
permalink to this entry |
]
Mon, 11 Apr 2011
In the last article, I wrote about how to get a very
simple
webcam demo running on a plug computer, also known as a Sheevaplug.
Okay, a webcam is sorta cool, but it's still a pretty easy thing to do
from any laptop. I wanted to demonstrate some lower-level hardware control.
As I mentioned in the previous article, trying to run hardware directly from a plug
computer is an exercise in frustration.
So what do you do when you want to drive low-level hardware?
Use an Arduino, of course!
Add the Arduino
![[light sensor and Arduino]](http://shallowsky.com/blog/images/hardware/img_5165s.jpg) Happily, the sheeva.with-linux
kernels include the FTDI driver you need to talk to an Arduino.
So you can plug the Arduino to the plug computer, then let the Arduino
read the sensor and write its value to the serial port, which you
can read on the plug.
Happily, the sheeva.with-linux
kernels include the FTDI driver you need to talk to an Arduino.
So you can plug the Arduino to the plug computer, then let the Arduino
read the sensor and write its value to the serial port, which you
can read on the plug.
First I tried a simple light
sensor from Adafruit, using the circuit from the
LadyAda photocell
tutorial.
I wrote a very simple Arduino sketch to read the analog output:
lightsensor.pde.
I'm allergic to Java IDEs, so I compiled the sketch from
the commandline using this
lightsensor
Arduino Makefile. Edit the Makefile to point to wherever you've
installed the Arduino software.
Now, on the plug, I needed a Python script to read the numbers coming in on
the serial line. I ran apt-get install python-serial, then wrote
this script:
readsensor.py.
The script loops, reading the sensor and writing the output to an
HTML file called arduino.html. Visit that in a browser from
your desktop or laptop, and watch it reload and change the number as
you wave your hand or a flashlight over the photocell.
Ultrasonic rangefinder for proximity detection
Pretty cool ... if you're extremely geeky and have no life. Otherwise,
it's maybe a bit limited. But can we use this Arduino technique to
do something useful in combination with the webcam exercise?
How about an
ultrasonic
sonar rangefinder?
The rangefinder comes with a little PC board, and you have to solder
wires to it. I wanted to be able to plug and unplug -- the rangefinger
also has digital outputs and I may want to experiment with those some day.
So I soldered an 8-pin header to the board. (The rangefinder board only
has 7 holes, so I had to cut off the 8th pin on the header.)
I ran power and ground wires to 5v and Gnd on the Arduino, and a wire from
the rangefinder's analog out to the Arduino's Analog In 2. A little
heatshrink keeps the three wires together.
Then I rubber-banded the rangefinder to the front of the webcam,
and I was ready to test.
![[rangefinder and Arduino]](http://shallowsky.com/blog/images/hardware/img_5181s.jpg)
![[camera with rangefinder]](http://shallowsky.com/blog/images/hardware/img_5169s.jpg)
Use a sketch almost identical to the one for the light sensor:
rangefinder.pde, and its
rangefinder Arduino Makefile.
I used pin 2 so I could leave the light sensor plugged in on Pin 1.
Now I ran that same readsensor.py script, paying attention to the
numbers being printed out. I found that they generally read around 35-40
when I was sitting right in front of it (camera mounted on my laptop
screen), and more like 150-250 when I got out of the way and pointed
it across the room.
So I wrote a script,
proximity.py,
that basically does this:
  if data < 45 :
    if verbose :
      print "Snapping photo!"
    os.system("fswebcam --device /dev/video0 -S 1 output.jpg")
It also rewrites the HTML file to display the value it read from the
rangefinder, though that part isn't so important.
Put it all together, and the proximity-sensitive camera
snaps a photo any time something is right in front of it;
otherwise, it keeps displaying the last photo and doesn't snap a
new one. Sample uses: find out who's using your
computer when you're away at lunch, or run a security camera at home,
or set up a camera to snap shots of the exotic wildlife that's
visiting your feeder or research station.
You could substitute an infra-red motion sensor and use it as a
motion-operated security camera or bird feeder camera. I ordered one,
but got bogged down trying to reverse-engineer the sensor (I should
have just ordered one from Adafruit or Sparkfun).
I'm happy to say this all worked pretty well as a demo. But mostly,
it's fun to know that I can plug in virtually any sensor and collect
any sort of data I want. Adding the Arduino makes the plug computer
much more fun and useful.
Tags: hardware, arduino, plug, programming, maker
[
21:23 Apr 11, 2011
More tech |
permalink to this entry |
]
Sun, 10 Apr 2011
I was asked to give a talk on plug computers ("sheevaplugs") at a local LUG.
I thought at first I didn't have much to say about them, but after
writing down an outline I realized that wouldn't be a problem.
But plugs aren't that interesting unless you have something fun to
demonstrate. Sure, plugs can run a web server or a file server, but
that doesn't make for a very fun demo -- "woo, look, I'm loading a
web page!" What's more fun? Hardware.
The first step to running any hardware off a plug computer is to get
an upgraded kernel. The kernels that come with these things can't
drive any useful external gizmos.
I've often lamented how the folks who build plug computers
seem oblivious to the fact that a large part of their potential customer
base wants to drive hardware -- temperature and light sensors,
weather stations, garage door openers, servos, whatever.
By not including drivers for GPIO, 1-wire, video and so forth,
they're shutting out anyone who doesn't feel up to building a kernel.
And make no mistake: building a kernel for a sheevaplug is quite a bit
harder than building one for your laptop or workstation. Some of the
hardware isn't supported by fully open source drivers, and most Linux
distros don't offer a cross-compiler that can do the job.
I covered some of the issues in my LinuxPlanet article on
Cross-compiling
Custom Kernels for Plug Computers.
Fortunately, the sheeva.with-linux
kernels include a webcam driver. That seemed like a good start for a demo.
A simple webcam demo
My demo plug is running Debian Squeeze, which has a wealth of webcam
software available. Although there are lots of packages to stream live
video to a web server, they all have a lot of requirements, so
I settled for a simple snapshot program, fswebcam.
The command I needed to snap a photo is:
fswebcam --device /dev/video0 -S 1 output.jpeg
The
-S 1 skips a frame to account for the fact that my
cheap and crappy webcam (a
Gearhead
Sound FX) tends to return wildly striped green and purple images otherwise.
So I run that in a loop, something like:
while /bin/true; do
  fswebcam --device /dev/video0 -S 1 output.jpeg
  sleep 2
done
Now that I have a continuously updating image,
I need to run some sort of web server on the plug.
Plugs are perfectly capable of running apache or lighttpd or whatever
server you favor. But for this simple demo, I used
a tiny Python server script:
simpleserver.py.
Then all I have to do is a simple web page that includes <img
src="output.jpg"> and point my computer at http://192.168.1.102:8080
to see the image. Either refresh the page to see the image update, or
add something like
<meta http-equiv="Refresh" content='2'>
to make it refresh
The next parts of the demo added an Arduino to the mix. But this is
already getting long and I'm out of time ... so the second part of
this demo will follow in a day or two.
Tags: hardware, plug, programming, maker
[
22:18 Apr 10, 2011
More tech |
permalink to this entry |
]
Wed, 06 Apr 2011
I like to travel in out-of-the-way places.
On desert back roads, one often encounters mysteries of one
sort or another. And the mystery under consideration today is a prosaic
one: road signs.
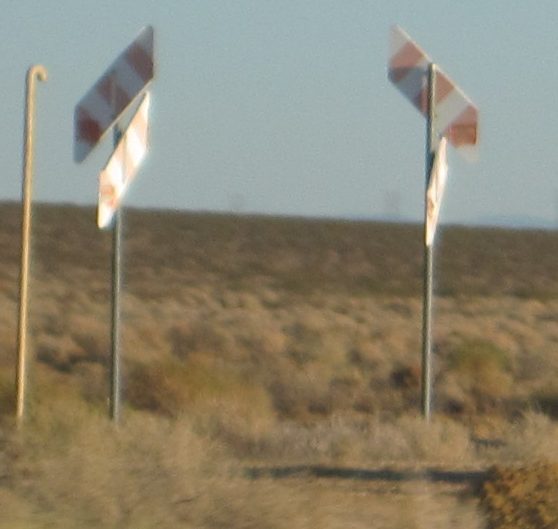
![[slanted dirt-road sign]](http://shallowsky.com/blog/images/slantsigns/img_2169.jpg) Dirt roads, especially in the desert, seldom have much in the way of
signage. You're lucky if you get an occasional signpost with a BLM
route number (which invariably isn't marked on any of your maps anyway).
Dirt roads, especially in the desert, seldom have much in the way of
signage. You're lucky if you get an occasional signpost with a BLM
route number (which invariably isn't marked on any of your maps anyway).
And yet, quite often out on deserted dirt roads, you'll see odd, slanted
signs painted yellow with black stripes. No numbers or letters, and not
every road has them. What do they mean?
They don't always seem to slant the same way. I've wondered if they
might point to underground cables or other hazards -- but there are
usually much clearer signs for such things. Sometimes they run along
a fence ... but not always.
I've seen them a lot in California, but I'm pretty sure I've seen them in
Nevada and maybe in Arizona. I don't think I've seen any in New Mexico.
![[slanted dirt-road sign]](http://shallowsky.com/blog/images/slantsigns/img_2174.jpg)
![[slanted dirt-road sign]](http://shallowsky.com/blog/images/slantsigns/img_2176.jpg) Sometimes they come in pairs -- and sometimes the pairs are at
right angles to one another, or
at some other
angle entirely.
Sometimes they come in pairs -- and sometimes the pairs are at
right angles to one another, or
at some other
angle entirely.
Sometimes they seem to be aimed primarily at traffic coming from
one direction; sometimes they're posted on opposite sides of the
same post and clearly meant to be viewed both ways.
Try as I might, I haven't been able to detect any regularly in where
the signs appear or which direction they slant.
And I can't figure out how to search the web. How do you search for
"slanted sign with strips on dirt roads"? I've tried, but I haven't
had much luck. I've found lots of compendia of standard signs for
paved roads and construction areas, but nothing that covers off-road
symbolism.
![[slanted dirt-road sign]](http://shallowsky.com/blog/images/slantsigns/img_2179.jpg) I've seen them in the Mojave, in deserts in other states like Arizona
and Utah, and even a few along I-5 through the California central valley.
They're clearly a widespread phenomenon, not a regional thing.
I've seen them in the Mojave, in deserts in other states like Arizona
and Utah, and even a few along I-5 through the California central valley.
They're clearly a widespread phenomenon, not a regional thing.
Of course, there are lots of mysterious dirt road signs besides
the slanted ones: I don't know what the little round ones mean either,
nor the little houses on thick posts.
Can anyone decode the signs and solve the mystery?
Tags: roadsigns, desert, travel, mysteries
[
11:19 Apr 06, 2011
More misc |
permalink to this entry |
]
Fri, 01 Apr 2011
![[Tasmanian Devil]](http://shallowsky.com/images/tasmania/bonorong/img_8616c.jpg) The LA Times had a great article last weekend about
Tasmanian devils,
the mysterious facial cancer which is threatening to wipe them out,
and the Bonorong wildlife preserve
in Hobart which is involved in trying to rescue them.
The LA Times had a great article last weekend about
Tasmanian devils,
the mysterious facial cancer which is threatening to wipe them out,
and the Bonorong wildlife preserve
in Hobart which is involved in trying to rescue them.
The disease, called
devil
facial tumour disease, is terrible.
It causes tumours on the devils' face and mouth, which eventually grow
so large and painful that the animal starves to death.
It's a cancer, but a very unusual one: it's transmissible and can pass
from one devil to another, one of only three such cancers known.
That means that unlike most cancers, tumour cells aren't from the
infected animal itself; they're usually contracted from a bite from
another devil.
Almost no Tasmanian devils are immune to DFTD. Being isolated for so
long on such a small island, devils have little genetic diversity,
so a disease that affects one devil is likely to affect all of them.
It can wipe out a regional population within a year.
A few individuals seem to have partial immunity, and scientists
are desperately hunting for the secret before the disease wipes out
the rest of the devil population. Organizations like Bonorong are
breeding Tasmanian devils in captivity in case the answer comes too
late to save the wild population.
When I was in Hobart in 2009 for Linux.conf.au (which, aside from being
a great Linux conference, also raised over $35,000 to help
save the devils),
I had the chance to visit Bonorong. I was glad I did: it's fabulous.
You can wander around and feed kangaroos, wallabees and the ever-greedy
emus, see all sorts of rarer Australian wildlife like echidnas, quolls
and sugar gliders, and pet a koala (not as soft as they look).
![[Greg Irons and devil]](http://shallowsky.com/images/tasmania/bonorong/img_8582c.jpg) But surprisingly, the best part was the tour. I'm usually not much for
guided tours, and Dave normally hates 'em. But this one was given by
Greg Irons, the director of the park who's featured in the Times
article, and he's fantastic. He obviously loves the animals and he knows
everything about them -- Dave called him an "animal nerd" (that's a
compliment, really!) And he's a great showman, with a lively and
fact-filled presentation that shows each animal at its best while
keping all ages entertained. If you didn't love marsupials, and
particularly devils and wombats, before you come to Bonorong,
I guarantee you will by the time you leave.
But surprisingly, the best part was the tour. I'm usually not much for
guided tours, and Dave normally hates 'em. But this one was given by
Greg Irons, the director of the park who's featured in the Times
article, and he's fantastic. He obviously loves the animals and he knows
everything about them -- Dave called him an "animal nerd" (that's a
compliment, really!) And he's a great showman, with a lively and
fact-filled presentation that shows each animal at its best while
keping all ages entertained. If you didn't love marsupials, and
particularly devils and wombats, before you come to Bonorong,
I guarantee you will by the time you leave.
![[Tasmanian devil tug-o-war]](http://shallowsky.com/images/tasmania/bonorong/img_8635c.jpg)
A lot of the accounts of devil facial tumour disease talk about devils
fighting with each other and spreading the disease, but watching them
feed at Bonorong showed that fighting isn't necessary. Tasmanian devils
feed in groups, helping each other tear apart the carcass by all
latching onto it at once and pulling. With this style of feeding,
it's easy to get bitten in the mouth accidentally.
![[ferocious killer Tasmanian devil]](http://shallowsky.com/images/tasmania/bonorong/img_8587c.jpg) Of course, I have a lot more photos from Bonorong:
Bonorong
Wildlife Park photos.
Of course, I have a lot more photos from Bonorong:
Bonorong
Wildlife Park photos.
Tags: travel, lca2009, linux.conf.au, australia, nature
[
10:48 Apr 01, 2011
More travel/tasmania |
permalink to this entry |
]
![[Ubuntu Natty running on ExoPC]](http://shallowsky.com/blog/images/hardware/exopc-natty.jpg) Natty booted up just fine! I inserted the USB stick, powered on, leapt
for the XXX button that shows the boot menu and told it to boot from the
stick. Natty booted quite fast, and before long I was in the Unity desktop,
and, oddly, it started off in a banshee screen telling me I didn't
have any albums installed. I dismissed banshee ...
Natty booted up just fine! I inserted the USB stick, powered on, leapt
for the XXX button that shows the boot menu and told it to boot from the
stick. Natty booted quite fast, and before long I was in the Unity desktop,
and, oddly, it started off in a banshee screen telling me I didn't
have any albums installed. I dismissed banshee ...