Shallow Thoughts : : Jul
Akkana's Musings on Open Source Computing and Technology, Science, and Nature.
Thu, 31 Jul 2014
Part II: Predicting Conjunctions
After I'd written a basic
script
to calculate when planets will be visible,
the next step was predicting conjunctions, times when two or more
planets are close together in the sky.
Finding separation between two objects is easy in PyEphem: it's just one
line once you've set up your objects, observer and date.
p1 = ephem.Mars()
p2 = ephem.Jupiter()
observer = ephem.Observer()  # and then set it to your city, etc.
observer.date = ephem.date('2014/8/1')
p1.compute(observer)
p2.compute(observer)

ephem.separation(p1, p2)
So all I have to do is loop over all the visible planets and see when
the separation is less than some set minimum, like 4 degrees, right?
Well, not really. That tells me if there's a conjunction between
a particular pair of planets, like Mars and Jupiter. But the really
interesting events are when you have three or more objects close
together in the sky. And events like that often span several days.
If there's a conjunction of Mars, Venus, and the moon, I don't want to
print something awful like
Friday:
  Conjunction between Mars and Venus, separation 2.7 degrees.
  Conjunction between the moon and Mars, separation 3.8 degrees.
Saturday:
  Conjunction between Mars and Venus, separation 2.2 degrees.
  Conjunction between Venus and the moon, separation 3.9 degrees.
  Conjunction between the moon and Mars, separation 3.2 degrees.
Sunday:
  Conjunction between Venus and the moon, separation 4.0 degrees.
  Conjunction between the moon and Mars, separation 2.5 degrees.
... and so on, for each day. I'd prefer something like:
Conjunction between Mars, Venus and the moon lasts from Friday through Sunday.
  Mars and Venus are closest on Saturday (2.2 degrees).
  The moon and Mars are closest on Sunday (2.5 degrees).
At first I tried just keeping a list of planets involved in the conjunction.
So if I see Mars and Jupiter close together, I'd make a list [mars,
jupiter], and then if I see Venus and Mars on the same date, I search
through all the current conjunction lists and see if either Venus or
Mars is already in a list, and if so, add the other one. But that got
out of hand quickly. What if my conjunction list looks like
[ [mars, venus], [jupiter, saturn] ] and then I see there's also
a conjunction between Mars and Jupiter? Oops -- how do you merge
those two lists together?
The solution to taking all these pairs and turning them into a list
of groups that are all connected actually lies in graph theory: each
conjunction pair, like [mars, venus], is an edge, and the trick is to
find all the connected edges. But turning my list of conjunction pairs
into a graph so I could use a pre-made graph theory algorithm looked
like it was going to be more code -- and a lot harder to read and less
maintainable -- than making a bunch of custom Python classes.
I eventually ended up with three classes:
ConjunctionPair, for a single conjunction observed between two bodies
on a single date;
Conjunction, a collection of ConjunctionPairs covering as many bodies
and dates as needed;
and ConjunctionList, the list of all Conjunctions currently active.
That let me write methods to handle merging multiple conjunction
events together if they turned out to be connected, as well as a
method to summarize the event in a nice, readable way.
So predicting conjunctions ended up being a lot more code than I
expected -- but only because of the problem of presenting it neatly
to the user. As always, user interface represents the hardest part
of coding.
The working script is on github at
conjunctions.py.
Tags: astronomy, science, programming, python
[
19:57 Jul 31, 2014
More science/astro |
permalink to this entry |
]
Wed, 23 Jul 2014
Part 1: Basic Planetary Visibility
All through the years I was writing the planet observing column for
the San Jose Astronomical Association, I was annoyed at the lack of places
to go to find out about upcoming events like conjunctions, when two or
more planets are close together in the sky. It's easy to find out
about conjunctions in the next month, but not so easy to find sites
that will tell you several months in advance, like you need if you're
writing for a print publication (even a club newsletter).
For some reason I never thought about trying to calculate it myself.
I just assumed it would be hard, and wanted a source that could
spoon-feed me the predictions.
The best source I know of is the
RASC Observer's Handbook,
which I faithfully bought every year and checked each month so I could
enter that month's events by hand. Except for January and February, when I
didn't have the next year's handbook yet by the time my column went
to press and I was on my own.
I have to confess, I was happy to get away from that aspect of the
column when I moved.
In my new town, I've been helping the local nature center with their
website. They had some great pages already, like a
What's
Blooming Now? page that keeps track
of which flowers are blooming now and only shows the current ones.
I've been helping them extend it by adding features like showing only
flowers of a particular color, separating the data into CSV databases
so it's easier to add new flowers or butterflies, and so forth.
Eventually we hope to build similar databases of birds, reptiles and
amphibians.
And recently someone suggested that their astronomy page could use
some help. Indeed it could -- it hadn't been updated in about five years.
So we got to work looking for a source of upcoming astronomy events
we could use as a data source for the page, and we found sources for
a few things, like moon phases and eclipses, but not much.
Someone asked about planetary conjunctions, and remembering
how I'd always struggled to find that data, especially in months when
I didn't have the RASC handbook yet, I got to wondering about
calculating it myself.
Obviously it's possible to calculate when a planet will
be visible, or whether two planets are close to each other in the sky.
And I've done some programming with
PyEphem before, and found
it fairly easy to use. How hard could it be?
Note: this article covers only the basic problem of predicting when
a planet will be visible in the evening.
A followup article will discuss the harder problem of conjunctions.
Calculating planet visibility with PyEphem
The first step was figuring out when planets were up.
That was straightforward. Make a list of the easily visible planets
(remember, this is for a nature center, so people using the page
aren't expected to have telescopes):
import ephem

planets = [
    ephem.Moon(),
    ephem.Mercury(),
    ephem.Venus(),
    ephem.Mars(),
    ephem.Jupiter(),
    ephem.Saturn()
    ]
Then we need an observer with the right latitude, longitude and
elevation. Elevation is apparently in meters, though they never bother
to mention that in the PyEphem documentation:
observer = ephem.Observer()
observer.name = "Los Alamos"
observer.lon = '-106.2978'
observer.lat = '35.8911'
observer.elevation = 2286  # meters, though the docs don't actually say
Then we loop over the date range for which we want predictions.
For a given date d, we're going to need to know the time of sunset,
because we want to know which planets will still be up after nightfall.
observer.date = d
sunset = observer.previous_setting(sun)
Then we need to loop over planets and figure out which ones are visible.
It seems like a reasonable first approach to declare that any planet
that's visible after sunset and before midnight is worth mentioning.
Now, PyEphem can tell you directly the rising and setting times of a planet
on a given day. But I found it simplified the code if I just checked
the planet's altitude at sunset and again at midnight. If either one
of them is "high enough", then the planet is visible that night.
(Fortunately, here in the mid latitudes we don't have to
worry that a planet will rise after sunset and then set again before
midnight. If we were closer to the arctic or antarctic circles, that
would be a concern in some seasons.)
min_alt = 10. * math.pi / 180.
for planet in planets:
    observer.date = sunset
    planet.compute(observer)
    if planet.alt > min_alt:
        print planet.name, "is already up at sunset"
Easy enough for sunset. But how do we set the date to midnight on
that same night? That turns out to be a bit tricky with PyEphem's
date class. Here's what I came up with:
    midnight = list(observer.date.tuple())
    midnight[3:6] = [7, 0, 0]
    observer.date = ephem.date(tuple(midnight))
    planet.compute(observer)
    if planet.alt > min_alt:
        print planet.name, "will rise before midnight"
What's that 7 there? That's Greenwich Mean Time when it's midnight in
our time zone. It's hardwired because this is for a web site meant for
locals. Obviously, for a more general program, you should get the time
zone from the computer and add accordingly, and you should also be
smarter about daylight savings time and such. The PyEphem documentation,
fortunately, gives you tips on how to deal with time zones.
(In practice, though, the rise and set times of planets on a given
day doesn't change much with time zone.)
And now you have your predictions of which planets will be visible
on a given date. The rest is just a matter of writing it out into
your chosen database format.
In the next article, I'll cover planetary and lunar
conjunctions -- which were superficially very simple, but turned out
to have some tricks that made the programming harder than I expected.
Tags: astronomy, science, programming, python
[
21:32 Jul 23, 2014
More science/astro |
permalink to this entry |
]
Wed, 16 Jul 2014
![[Arduino intervalometer]](http://shallowsky.com/blog/images/hardware/img_6213-450.jpg) While testing my
automated critter
camera, I was getting lots of false positives caused by clouds
gathering and growing and then evaporating away. False positives
are annoying, but I discovered that it's fun watching the clouds grow
and change in all those photos
... which got me thinking about time-lapse photography.
While testing my
automated critter
camera, I was getting lots of false positives caused by clouds
gathering and growing and then evaporating away. False positives
are annoying, but I discovered that it's fun watching the clouds grow
and change in all those photos
... which got me thinking about time-lapse photography.
First, a disclaimer: it's easy and cheap to just buy an
intervalometer. Search for timer remote control
or intervalometer and you'll find plenty of options for
around $20-30. In fact, I ordered one.
But, hey, it's not here yet, and I'm impatient.
And I've always wanted to try controlling a camera from an Arduino.
This seemed like the perfect excuse.
Why an Arduino rather than a Raspberry Pi or BeagleBone? Just because
it's simpler and cheaper, and this project doesn't need much compute
power. But everything here should be applicable to any microcontroller.
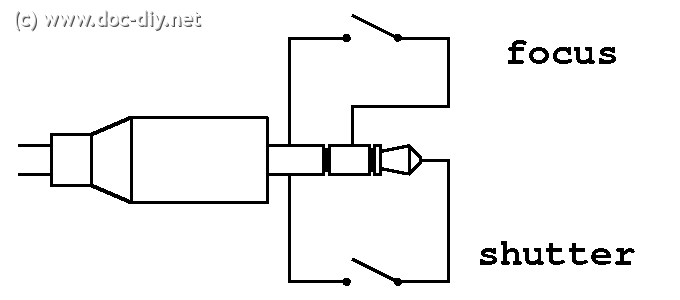
My Canon Rebel Xsi has a fairly simple wired remote control plug:
a standard 2.5mm stereo phone plug.
I say "standard" as though you can just walk into Radio Shack and buy
one, but in fact it turned out to be surprisingly difficult, even when
I was in Silicon Valley, to find them. Fortunately, I had found some,
several years ago, and had cables already wired up waiting for an experiment.
The outside connector ("sleeve") of the plug is ground.
Connecting ground to the middle ("ring") conductor makes the camera focus,
like pressing the shutter button halfway; connecting ground to the center
("tip") conductor makes it take a picture.
I have a wired cable release that I use for astronomy and spent a few
minutes with an ohmmeter verifying what did what, but if you don't
happen to have a cable release and a multimeter there are plenty of
Canon
remote control pinout diagrams on the web.
Now we need a way for the controller to connect one pin of the remote
to another on command.
There are ways to simulate that with transistors -- my
Arduino-controlled
robotic shark project did that. However, the shark was about a $40
toy, while my DSLR cost quite a bit more than that. While I
did find several people on the web saying they'd used transistors with
a DSLR with no ill effects, I found a lot more who were nervous about
trying it. I decided I was one of the nervous ones.
The alternative to transistors is to use something like a relay. In a relay,
voltage applied across one pair of contacts -- the signal from the
controller -- creates a magnetic field that closes a switch and joins
another pair of contacts -- the wires going to the camera's remote.
But there's a problem with relays: that magnetic field, when it
collapses, can send a pulse of current back up the wire to the controller,
possibly damaging it.
There's another alternative, though. An opto-isolator works like a
relay but without the magnetic pulse problem. Instead of a magnetic
field, it uses an LED (internally, inside the chip where you can't see it)
and a photo sensor. I bought some opto-isolators a while back and had
been looking for an excuse to try one. Actually two: I needed one for
the focus pin and one for the shutter pin.
How do you choose which opto-isolator to use out of the gazillion
options available in a components catalog? I don't know, but when I
bought a selection of them a few years ago, it included a 4N25, 4N26
and 4N27, which seem to be popular and well documented, as well as a
few other models that are so unpopular I couldn't even find a
datasheet for them. So I went with the 4N25.
Wiring an opto-isolator is easy. You do need a resistor across the inputs
(presumably because it's an LED).
380Ω
is apparently a good value for the 4N25, but
it's not critical. I didn't have any 380Ω but I had a bunch of
330Ω so that's what I used. The inputs (the signals from the Arduino)
go between pins 1 and 2, with a resistor; the outputs (the wires to the
camera remote plug) go between pins 4 and 5, as shown in
the diagram on this
Arduino
and Opto-isolators discussion, except that I didn't use any pull-up
resistor on the output.
Then you just need a simple Arduino program to drive the inputs.
Apparently the camera wants to see a focus half-press before it gets
the input to trigger the shutter, so I put in a slight delay there,
and another delay while I "hold the shutter button down" before
releasing both of them.
Here's some Arduino code to shoot a photo every ten seconds:
int focusPin = 6;
int shutterPin = 7;

int focusDelay = 50;
int shutterOpen = 100;
int betweenPictures = 10000;

void setup()
{
    pinMode(focusPin, OUTPUT);
    pinMode(shutterPin, OUTPUT);
}

void snapPhoto()
{
    digitalWrite(focusPin, HIGH);
    delay(focusDelay);
    digitalWrite(shutterPin, HIGH);
    delay(shutterOpen);
    digitalWrite(shutterPin, LOW);
    digitalWrite(focusPin, LOW);
}

void loop()
{
    delay(betweenPictures);
    snapPhoto();
}
Naturally, since then we haven't had any dramatic clouds, and the
lightning storms have all been late at night after I went to bed.
(I don't want to leave my nice camera out unattended in a rainstorm.)
But my intervalometer seemed to work fine in short tests.
Eventually I'll make some actual time-lapse movies ... but that will
be a separate article.
Tags: arduino, hardware, photography, intervalometer, time-lapse, maker
[
18:31 Jul 16, 2014
More hardware |
permalink to this entry |
]
Sat, 12 Jul 2014
![[White throated woodrat in a trap]](http://shallowsky.com/nature/woodrat/img_6165c.jpg) One great thing about living in the country: the wildlife.
I love watching animals and trying to photograph them.
One great thing about living in the country: the wildlife.
I love watching animals and trying to photograph them.
One down side of living in the country: the wildlife.
Mice in the house! Pack rats in the shed and the crawlspace!
We found out pretty quickly that we needed to learn about traps.
We looked at traps at the local hardware store. Dave assumed we'd get
simple snap-traps, but I wanted to try other options first.
I'd prefer to avoid killing if I don't have to, especially killing in
what sounds like a painful way.
They only had one live mousetrap. It was a flimsy plastic thing,
and we were both skeptical that it would work.
We made a deal: we'd try two of them for a week or two, and when (not
if) they didn't work, then we'd get some snap-traps.
We baited the traps with peanut butter and left them in the areas where
we'd seen mice. On the second morning, one of the traps had
been sprung, and sure enough, there was a mouse inside! Or at least a
bit of fur, bunched up at the far inside end of the trap.
We drove it out to open country across the highway, away from houses.
I opened the trap, and ... nothing.
I looked in -- yep, there was still a furball in there. Had we somehow
killed it, even in this seemingly humane trap?
I pointed the open end down and shook the trap. Nothing came out.
I shook harder, looked again, shook some more.
And suddenly the mouse burst out of the plastic box
and went HOP-HOP-HOPping across the grass away from us,
bounding like a tiny kangaroo over tufts of grass,
leaving us both giggling madly.
The entertainment alone was worth the price of the traps.
Since then we've seen no evidence of mice inside, and neither of the
traps has been sprung again. So our upstairs and downstairs mice must
have been the same mouse.
But meanwhile, we still had a pack rat problem (actually, probably,
white-throated woodrats, the creature that's called a pack rat locally).
Finding no traps for sale at the hardware store, we went to Craigslist,
where we found a retired wildlife biologist just down the road
selling three live Havahart rat traps. (They also had some raccoon-sized
traps, but the only raccoon we've seen has stayed out in the yard.)
We bought the traps, adjusted one a bit where its trigger mechanism
was bent, baited them with peanut butter and set them in likely locations.
About four days later, we had our first captive little brown furball.
Much smaller than some of the woodrats we've seen; probably just a youngster.
![[White throated woodrat bounding away]](http://shallowsky.com/nature/woodrat/img_6168c.jpg) We drove quite a bit farther than we had for the mouse. Woodrats can
apparently range over a fairly wide area, and we didn't want to let it
go near houses. We hiked a little way out on a trail, put the trap down
and opened both doors. The woodrat looked up, walked to one open end
of the trap, decided that looked too scary; walked to the other open
end, decided that looked too scary too; and retreated back to the
middle of the trap.
We drove quite a bit farther than we had for the mouse. Woodrats can
apparently range over a fairly wide area, and we didn't want to let it
go near houses. We hiked a little way out on a trail, put the trap down
and opened both doors. The woodrat looked up, walked to one open end
of the trap, decided that looked too scary; walked to the other open
end, decided that looked too scary too; and retreated back to the
middle of the trap.
We had to tilt and shake the trap a bit, but eventually the woodrat
gathered up its courage, chose a side, darted out and
HOP-HOP-HOPped away into the bunchgrass, just like the mouse had.
No reference I've found says anything about woodrats hopping,
but the mouse did that too.
I guess hopping is just what you do when you're a rodent suddenly set free.
I was only able to snap one picture before it disappeared.
It's not in focus,
but at least I managed to catch it with both hind legs off the ground.
Tags: nature, woodrat, pack rat, trap
[
12:05 Jul 12, 2014
More nature |
permalink to this entry |
]
Tue, 08 Jul 2014
![[Big mouse cursor from Comix theme]](http://shallowsky.com/blog/images/screenshots/big-cursor.jpg) My new home office with the big picture windows and the light
streaming in come with one downside: it's harder to see my screen.
My new home office with the big picture windows and the light
streaming in come with one downside: it's harder to see my screen.
A sensible person would, no doubt, keep the shades drawn when working,
or move the office to a nice dim interior room without any windows.
But I am not sensible and I love my view of the mountains, the gorge
and the birds at the feeders. So accommodations must be made.
The biggest problem is finding the mouse cursor. When I first
sit down at my machine, I move my mouse wildly around looking for any
motion on the screen. But the default cursors, in X and in most
windows, are little subtle black things. They don't show up at all.
Sometimes it takes half a minute to figure out where the mouse pointer is.
(This wasn't helped by a recent bug in Debian Sid where the USB mouse
would disappear entirely, and need to be unplugged from USB and
plugged back in before the computer would see it. I never did find a
solution to that, and for now I've downgraded from Sid to Debian testing
to make my mouse work. I hope they fix the bug in Sid eventually,
rather than porting whatever "improvement" caused the bug to more
stable versions. Dealing with that bug trained me so that when I can't
see the mouse cursor, I always wonder whether I'm just not seeing it,
or whether it really isn't there because the kernel or X has lost
track of the mouse again.)
What I really wanted was bigger mouse cursor icons in bright colors
that are visible against any background. This is possible, but it
isn't documented at all. I did manage to get much better cursors,
though different windows use different systems.
So I wrote up what I learned.
It ended up too long for a blog post, so I put it on a separate page:
X Cursor
Themes for big and contrasty mouse cursors.
It turned out to be fairly complicated. You can replace the existing
cursor font, or install new cursor "themes" that many (but not all)
apps will honor. You can change theme name and size (if you choose a
scalable theme), and some apps will honor that. You have to specify
theme and size separately for GTK apps versus other apps. I don't know
what KDE/Qt apps do.
I still have a lot of unanswered questions. In particular, I was unable
to specify a themed cursor for xterm windows, and for non text areas
in emacs and firefox, and I'd love to know how to do that.
But at least for now, I have a great big contrasty blue mouse cursor that
I can easily see, even when I have the shades on the big windows open
and the light streaming in.
Tags: X11, linux
[
10:25 Jul 08, 2014
More linux |
permalink to this entry |
]
Thu, 03 Jul 2014
![[PIR sensor]](http://shallowsky.com/images/night-vision/img_6122.jpg) In my last crittercam installment,
the
NoIR night-vision crittercam, I was having trouble with false positives,
where the camera would trigger repeatedly after dawn as leaves moved
in the wind and the morning shadows marched across the camera's field of view.
I wondered if a passive infra-red (PIR) sensor would be the answer.
In my last crittercam installment,
the
NoIR night-vision crittercam, I was having trouble with false positives,
where the camera would trigger repeatedly after dawn as leaves moved
in the wind and the morning shadows marched across the camera's field of view.
I wondered if a passive infra-red (PIR) sensor would be the answer.
I got one, and the answer is: no. It was very easy to hook up, and
didn't cost much, so it was a worthwhile experiment; but it gets
nearly as many false positives as camera-based motion detection.
It isn't as sensitive to wind, but as the ground and the foliage heat
up at dawn, the moving shadows are just as much a problem as they were
with image-based motion detection.
Still, I might be able to combine the two, so I figure it's worth
writing up.
Reading inputs from the HC-SR501 PIR sensor
![[PIR sensor pins]](http://shallowsky.com/images/night-vision/img_6124.jpg)
The PIR sensor I chose was the common HC-SR501 module.
It has three pins -- Vcc, ground, and signal -- and two potentiometer
adjustments.
It's easy to hook up to a Raspberry Pi because it can take 5 volts
in on its Vcc pin, but its signal is 3.3v (a digital signal -- either
motion is detected or it isn't), so you don't have to fool with
voltage dividers or other means to get a 5v signal down to the 3v
the Pi can handle.
I used GPIO pin 7 for signal, because it's right on the corner of the
Pi's GPIO header and easy to find.
There are two ways to track a digital signal like this. Either you can
poll the pin in an infinfte loop:
import time
import RPi.GPIO as GPIO

pir_pin = 7
sleeptime = 1

GPIO.setmode(GPIO.BCM)
GPIO.setup(pir_pin, GPIO.IN)

while True:
    if GPIO.input(pir_pin):
        print "Motion detected!"
    time.sleep(sleeptime)
or you can use interrupts: tell the Pi to call a function whenever it
sees a low-to-high transition on a pin:
import time
import RPi.GPIO as GPIO

pir_pin = 7
sleeptime = 300

def motion_detected(pir_pin):
    print "Motion Detected!"

GPIO.setmode(GPIO.BCM)
GPIO.setup(pir_pin, GPIO.IN)

GPIO.add_event_detect(pir_pin, GPIO.RISING, callback=motion_detected)

while True:
    print "Sleeping for %d sec" % sleeptime
    time.sleep(sleeptime)
Obviously the second method is more efficient. But I already had a
loop set up checking the camera output and comparing it against
previous output, so I tried that method first, adding support to my
motion_detect.py
script. I set up the camera pointing at the wall, and, as root, ran the script
telling it to use a PIR sensor on pin 7, and the local and remote
directories to store photos:
# python motion_detect.py -p 7 /tmp ~pi/shared/snapshots/
and whenever I walked in front of the camera, it triggered and took
a photo. That was easy!
Reliability problems with add_event_detect
So easy that I decided to switch to the more efficient interrupt-driven
model. Writing the code was easy, but I found it triggered more often:
if I walked in front of the camera (and stayed the requisite 7 seconds
or so that it takes raspistill to get around to taking a photo),
when I walked back to my desk, I would find two photos, one showing my
feet and the other showing nothing. It seemed like it was triggering
when I got there, but also when I left the scene.
A bit of web searching indicates this is fairly common: that with RPi.GPIO
a lot of people see triggers on both rising and falling edges -- e.g. when
the PIR sensor starts seeing motion, and when it stops seeing motion
and goes back to its neutral state -- when they've asked for just
GPIO.RISING. Reports for this go back to 2011.
On the other hand, it's also possible that instead of seeing a GPIO
falling edge, what was happening was that I was getting multiple calls
to my function while I was standing there, even though the RPi hadn't
finished processing the first image yet. To guard against that, I put
a line at the beginning of my callback function that disabled further
callbacks, then I re-enabled them at the end of the function after the
Pi had finished copying the photo to the remote filesystem. That reduced
the false triggers, but didn't eliminate them entirely.
Oh, well, The sun was getting low by this point, so I stopped
fiddling with the code and put the camera out in the yard with a pile
of birdseed and peanut suet nuggets in front of it. I powered on,
sshed to the Pi and ran the motion_detect script, came back inside
and ran a tail -f on the output file.
I had dinner and worked on other things, occasionally checking the
output -- nothing! Finally I sshed to the Pi and ran ps aux
and discovered the script was no longer running.
I started it again, this time keeping my connection to the Pi active
so I could see when the script died. Then I went outside to check the
hardware. Most of the peanut suet nuggets were gone -- animals had
definitely been by. I waved my hands in front of the camera a few
times to make sure it got some triggers.
Came back inside -- to discover that Python had gotten a segmentation
fault. It turns out that nifty GPIO.add_event_detect() code isn't all
that reliable, and can cause Python to crash and dump core. I ran it
a few more times and sure enough, it crashed pretty quickly every time.
Apparently GPIO.add_event_detect needs a bit more debugging,
and isn't safe to use in a program that has to run unattended.
Back to polling
Bummer! Fortunately, I had saved the polling version of my program, so
I hastily copied that back to the Pi and started things up again.
I triggered it a few times with my hand, and everything worked fine.
In fact, it ran all night and through the morning, with no problems
except the excessive number of false positives, already mentioned.
![[piñon mouse]](http://shallowsky.com/images/night-vision/snap-2014-06-26-23-33-24-400.jpg) False positives weren't a problem at all during the night. I'm fairly
sure the problem happens when the sun starts hitting the ground. Then
there's a hot spot that marches along the ground, changing position in
a way that's all too obvious to the infra-red sensor.
False positives weren't a problem at all during the night. I'm fairly
sure the problem happens when the sun starts hitting the ground. Then
there's a hot spot that marches along the ground, changing position in
a way that's all too obvious to the infra-red sensor.
I may try cross-checking between the PIR sensor and image changes from
the camera. But I'm not optimistic about that working: they both get
the most false positives at the same times, at dawn and dusk when the
shadow angle is changing rapidly. I suspect I'll have to find a
smarter solution, doing some image processing on the images as well
as cross-checking with the PIR sensor.
I've been uploading photos from my various tests here:
Tests of the
Raspberry Pi Night Vision Crittercam.
And as always, the code is on
github:
scripts/motioncam with some basic documentation on my site:
motion-detect.py:
a motion sensitive camera for Raspberry Pi or other Linux machines.
(I can't use github for the documentation because I can't seem to find
a way to get github to display html as anything other than source code.)
Tags: crittercam, hardware, raspberry pi, nature, photography, maker
[
20:13 Jul 03, 2014
More hardware |
permalink to this entry |
]