Shallow Thoughts : : Jun
Akkana's Musings on Open Source Computing and Technology, Science, and Nature.
Fri, 29 Jun 2012
![[Young and fierce alligator lizard]](http://shallowsky.com/blog/images/dragonliz.jpg)
A short hike today to Lake Ranch above Los Gatos gave us nice views
of three killdeer, a duck family with six ducklings, a hunting egret
and a host of other birds. But on the way back, we met an unusual
little fellow on the trail.
It was a young alligator lizard, one of the smallest I've seen -- which
is still fairly sizeable for a lizard, maybe eight or ten inches long
including the long slim tail.
In typical alligator lizard fashion,
it was lying motionless on the trail. So in typical Dave and Akkana
fashion, we whipped out our cameras and switched into macro mode.
Alligator lizards are normally very placid. It's hard to get them to
move under any circumstances, as long as you don't touch them.
You can shoot photos from all angles,
get the camera right up where you have to shoot a panorama to get the
whole tail in, move around to the other side and get a different angle,
and the lizard won't move.
Imagine our surprise, then, when the little one opened its mouth and
started threatening us!
Dave pulled back his camera (it's his a new toy, so I was letting him
shoot the up-close macros while I stayed what I thought was a
comfortable foot away) and the beast turned on me and started
advancing, mouth still open. I snapped a few shots while pulling back
slowly. Then he made a rush for me.
I pulled my camera, and fingers, up out of his reach -- supposedly
alligator lizards can bite, though it's hard to see any evidence of
teeth in the photos -- and he rushed my shoes. I lifted the foot he
was headed for, and he darted under my shoe, turned on a dime and
skittered toward Dave's hiking shoe. But I guess when he got there he
didn't find it quite as vulnerable as he'd hoped, so he turned again
and ran off toward the side of the trail, leaving us stunned -- and
doubled over with laughter.
![[Young and fierce alligator lizard]](http://shallowsky.com/nature/reptiles/img_6096T.jpg)
I actually tried to shoot a video of his advance, but once he rushed
me I was too busy getting out of his way and missed most of the action.
Evidently I'm not quite ready to shoot those National Geo documentaries.
That's a bit of dry leaf on his forehead, in case you're wondering.
Here's what Dave was doing that got the little lizard annoyed.
The adult alligator lizards we see don't mind that a bit ... honest!
Tags: nature, reptiles, lizard
[
22:01 Jun 29, 2012
More nature |
permalink to this entry |
]
Mon, 25 Jun 2012
Some time ago, I wrote about my explorations into the options for
driving
motors from an Arduino.
Motor shields worked well -- but they cost around $50 each, more than
the Arduino itself. That's fine for a single one, but I'm teaching an
Arduino workshop (this Thursday!) for high school girls, and I needed
something I could buy more cheaply so I could get more of them.
(Incidentally, if any women in the Bay Area want to help with the
workshop this Thursday, June 28 2012,
I could definitely use a few more helpers! Please drop me an email.)
What I found on the web and on the Arduino IRC channel was immensely
confusing to someone who isn't an electronics expert -- most people
recommended things like building custom H-bridge circuits out of zener
diodes.
![[Simple Arduino h-bridge (half-bridge) circuit]](http://shallowsky.com/arduino/class/hbridge-dual-motor_bb.jpg) But it's not that complicated after all.
I got the help I needed from ITP Physical Computing's
DC Motor
Control Using an H-Bridge.
It turns out you can buy a chip called an SN754410 that implements an
H-bridge circuit -- including routing a power source to the motors
while keeping the Arduino's power supply isolated -- for under $2.
I ordered my
SN754410
chips from Jameco and they arrived the next day.
But it's not that complicated after all.
I got the help I needed from ITP Physical Computing's
DC Motor
Control Using an H-Bridge.
It turns out you can buy a chip called an SN754410 that implements an
H-bridge circuit -- including routing a power source to the motors
while keeping the Arduino's power supply isolated -- for under $2.
I ordered my
SN754410
chips from Jameco and they arrived the next day.
(Technically, the SN754410 is a "quad half-bridge" rather than an "dual
h-bridge". In practice I'm not sure of the difference. There's another
chip, the L298, which is a full h-bridge and is also cheap to buy --
but it's a bit harder to use because the pins are wonky and it doesn't
plug in directly to a breadboard unless you bend the pins around.
I decided to stick with the SN754410;
but the L298 might be better for high-powered motors.)
Now, the SN754410 isn't as simple to use as a motor shield. It has a
lot of wires -- for two motors, you'll need six Arduino output pins,
plus a 5v reference and ground, the four wires to the two motors,
and the two wires to the motor power supply. Here's the picture
of the wiring, made with Fritzing.
![[Half-bridge circuit on breadboard]](http://shallowsky.com/blog/images/hardware/halfbridge-spider.jpg) With all those wires, I didn't want to make the girls wire them up
themselves -- it's way too easy to make a mistake and connect the wrong
pin (as I found when doing my own testing). So I've wired up several of
them on mini-breadboards so they'll be more or less ready to use.
They look like little white mutant spiders with all the wires going
everywhere.
With all those wires, I didn't want to make the girls wire them up
themselves -- it's way too easy to make a mistake and connect the wrong
pin (as I found when doing my own testing). So I've wired up several of
them on mini-breadboards so they'll be more or less ready to use.
They look like little white mutant spiders with all the wires going
everywhere.
A simple library for half-bridge motor control
The programming for the SN754410 is a bit less simple than motor shields
as well. For each motor, you need an enable pin on the Arduino -- the
analog signal that controls the motor's speed, so it needs to be one
of the Arduino's PWM output pins, 9, 10 or 11 -- plus two logic pins,
which can be any of the digital output pins.
To spin the motor in one direction, set
the first logic pin high and the second low; to spin in the other
direction, reverse the pins, with the first one low and the second one high.
That's simple enough to program -- but I didn't look forward to trying
to explain it to a group of high school students with basically no
programming experience.
To make it simpler for them, I wrote a drop-in library that simplifies
the code quite a bit. It defines a Motor object that you can initialize
with the pins you'll be using -- the enable pin first, then the two logic pins.
Initialize them in setup() like this:
#include

Motor motors[2] = { Motor(9, 2, 3), Motor(10, 4, 5) };

void setup()
{
    motors[0].init();
    motors[1].init();
}
Then from your loop() function, you can make calls like this:
    motors[0].setSpeed(128);
    motors[1].setSpeed(-85);
Setting a negative speed will tell the library to reverse the logic pins
so the motor spins the opposite direction.
I hope this will make motors easier to deal with for the girls who
choose to try them. (We'll be giving them a choice of projects, so
some of them may prefer to make light shows with LEDs, or
music with piezo buzzers.)
You can get the code for the HalfBridge library, and a sample sketch
that uses it, at
my
Arduino github repository
Cheap and easy motor control -- and I have a fleet of toy cars to
connect to them. I hope this ends up being a fun workshop!
Tags: arduino, hardware, education, programming, maker
[
22:32 Jun 25, 2012
More hardware |
permalink to this entry |
]
Sat, 16 Jun 2012
I ran ubuntu-bug to report a bug. After collecting some
dependency info, the program asked me if I wanted to load the bug
report page in a browser. Of course I did -- but it launched chromium,
where I don't have any of my launchpad info loaded, rather than firefox.
So how do you change the default browser in Ubuntu?
The program that controls that, and lots of similar defaults,
is update-alternatives.
update-alternatives with no arguments gives a long usage statement that
isn't too clear. You need to know the various category names ("groups")
before you can do much. Here's how to get a list of all the groups:
update-alternatives --get-selections
But that's still a long list. To find the entries that might be pointing
to chrome or chromium, I narrowed it down:
update-alternatives --get-selections | grep chrom
That narrowed it down:
x-www-browser and gnome-www-browser both pointed
to chromium. So let's try to change that to firefox:
$ update-alternatives --set gnome-www-browser /usr/local/firefox11/firefox
update-alternatives: error: alternative /usr/local/firefox11/firefox for gnome-www-browser not registered, not setting.
Whoops! The problem here is that I'm running a firefox installed from
Mozilla.org, not the one that comes with Ubuntu.
What if I want to make that my default browser?
What does it mean for an application to be "registered"?
Well, no one seems to have documented that.
I found it discussed briefly here:
What is Ubuntu's Definition of a “Registered Application”?,
but the only solutions seemed to involve hand-editing desktop files to
add icons, and there's no easy way to figure out how much of
the desktop file it needs. That sounded way too complicated.
Thanks to Lyz and Maco for the real answer: skip update-alternatives
entirely, and change the symbolic links in /etc/alternatives by hand.
$ sudo rm /etc/alternatives/gnome-www-browser
$ sudo ln -s /usr/local/firefox11/firefox /etc/alternatives/gnome-www-browser
$ sudo rm /etc/alternatives/x-www-browser
$ sudo ln -s /usr/local/firefox11/firefox /etc/alternatives/x-www-browser
That was much simpler, and worked fine: now applications that need to
call up a browser will use firefox instead of chromium.
Tags: ubuntu, debian, linux
[
17:04 Jun 16, 2012
More linux |
permalink to this entry |
]
Sat, 09 Jun 2012
My epub Books folder is starting to look like my physical bookshelf at
home -- huge and overflowing with books I hope to read some day.
Mostly free books from the wonderful
Project Gutenberg and
DRM-free books from publishers and authors who support that model.
With the Nook's standard library viewer that's impossible to manage.
All you can do is sort all those books alphabetically by title or author
and laboriously page through, some five books to a page, hoping the
one you want will catch your eye. Worse, sometimes books show up in
the author view but don't show up in the title view, or vice versa.
I guess Barnes & Noble think nobody keeps more than ten or so
books on their shelves.
Fortunately on my rooted Nook I have the option of using better
readers, like FBreader and Aldiko, that let me sort by tags.
If I want to read something about the Civil War, or Astronomy, or just
relax with some Science Fiction, I can browse by keyword.
Well, in theory. In practice, tagging of ebooks is inconsistent
and not very useful.
For instance, the Gutenberg tags for Othello are:
- Tragedies
- Othello (Fictitious character) -- Drama
- Jealousy -- Drama
- Interracial marriage -- Drama
- Venice (Italy) -- Drama
- Muslims -- Drama
while the tags for Vanity Fair are
- Satire
- England -- Fiction
- Married women -- Fiction
- Female friendship -- Fiction
- Social classes -- Fiction
- British -- Europe -- Fiction
- Waterloo, Battle of, Waterloo, Belgium, 1815 -- Fiction
The Prince and the Pauper's tag list looks like:
- Edward VI, King of England, 1537-1553 -- Fiction
- Impostors and imposture -- Fiction
- Social classes -- Fiction
- Poor children -- Fiction
- Lookalikes -- Fiction
- Princes -- Fiction
- Boys -- Fiction
- London (England) -- Fiction
- Historical fiction
while Captains Courageous looks like
- Sea stories
- Saltwater fishing -- Fiction
- Children of the rich -- Fiction
- Bildungsromans
- Fishing boats -- Fiction
- Teenage boys -- Fiction
- Rescues -- Fiction
- Fishers -- Fiction
- Grand Banks of Newfoundland -- Fiction
I can understand wanting to tag details like this, but
few of those tags are helpful when I'm browsing books on
my little handheld device. I can't imagine sitting
down to read and thinking,
"Let's see, what books do I have on Interracial marriage? Or Saltwater
fishing? No, on second thought I'd rather read some fiction set in the
time of Edward VI, King of England, 1537-1553."
And of course, with over 90 books loaded on my ebook readers, it means
I have hundreds of entries in my tags list,
with few of them including more than one book.
Clearly what I needed to do was to change the tags on my ebooks.
Viewing and modifying epub tags
That ought to be simple, right? But ebooks are still a very young
technology, and there's surprisingly little software devoted to them.
Calibre can probably do it if you don't mind maintaining your whole
book collection under calibre; but I like to be able to work on files
one at a time or in small groups. And I couldn't find a program that
would let me do that.
What to do? Well, epub is a fairly simple XML format, right?
So modifying it with Python shouldn't that hard.
Managing epub in Python
An epub file is a collection of XML files packaged in a zip archive.
So I unzipped one of my epub books and poked around. I found the tags
in a file called content.opf, inside a <metadata> tag.
They look like this:
<dc:subject>Science fiction</dc:subject>
So I could use Python's
zipfile module
to access the content.opf file inside the zip archive, then use the
xml.dom.minidom
parser to get to the tags. Writing a script to display existing tags
was very easy.
What about replacing the old, unweildy tag list with new, simple tags?
It's easy enough to add nodes in Python's minidom.
So the trick is writing it back to the epub file.
The zipfile module doesn't have a way to modify a zip file
in place, so I created a new zip archive and copied files from the
old archive to the new one, replacing content.opf with a new
version.
Python's difficulty with character sets in XML
But I hit a snag in writing the new content.opf.
Python's XML classes have a toprettyxml() method to write the contents
of a DOM tree. Seemed simple, and that worked for several ebooks ...
until I hit one that contained a non-ASCII character. Then Python threw
a UnicodeEncodeError: 'ascii' codec can't encode character
u'\u2014' in position 606: ordinal not in range(128).
Of course, there are ways (lots of them) to encode that output string --
I could do
ozf.writestr(info, dom.toprettyxml().encode(encoding, 'xmlcharrefreplace'))
,
or
writestr(info, dom.toprettyxml(encoding=encoding)
Except ... what should I pass as the encoding?
The
content.opf file started with its encoding:
<?xml version='1.0' encoding='UTF-8'?>
but Python's minidom offers no way to get that information.
In fact, none of Python's XML parsers seem to offer this.
Since you need a charset to avoid the UnicodeEncodeError,
the only options are (1) always use a fixed charset, like utf-8,
for content.opf, or (2) open content.opf and parse the
charset line by hand after Python has already parsed the rest of the file.
Yuck! So I chose the first option ... I can always revisit that if the utf-8
in content.opf ever causes problems.
The final script
Charset difficulties aside, though, I'm quite pleased with my epubtags.py
script. It's very handy to be able to print tags on any .epub file,
and after cleaning up the tags on my ebooks, it's great to be
able to browse by category in FBreader. Here's the program:
epubtag.py.
Tags: ebook, programming, python
[
13:05 Jun 09, 2012
More programming |
permalink to this entry |
]
Wed, 06 Jun 2012
![[Transit of Venus, June 5 2012]](http://shallowsky.com/images/venustransit/earlyhandheld/img_5440T.jpg) After a heart-stopping day of rain on Monday, Tuesday, the day of the
Venus
transit astronomers have been anticipating for decades,
dawned mostly clear.
After a heart-stopping day of rain on Monday, Tuesday, the day of the
Venus
transit astronomers have been anticipating for decades,
dawned mostly clear.
For the 3 pm ingress, Dave and I set up in the backyard -- a 4.5-inch
Newtonian, a Takahashi FS102, and an 80mm f/6 refractor with an
eyepiece projection camera mount. I'd disliked the distraction during
the annular eclipse of switching between eyepiece and camera mount,
and was looking forward to having a dedicated camera scope this time.
Venus is big! There wasn't any trouble seeing it once it started its
transit. I was surprised at how slowly it moved -- so much slower than
a Mercury transit, though it shouldn't have been a surprise, since I
knew the event would take the rest of the evening, and wouldn't be
finished until well past our local sunset.
The big challenge of the day was to see the aureole -- the arc of Venus'
atmosphere standing out from the sun. With the severely windy weather
and turbulent air (lots of cumulus clouds) I wasn't hopeful. But
as Venus reached the point where only about 1/3 of its disk remained
outside the sun, the aureole became visible as a faint arc.
We couldn't see it in the 4.5-inch, and it definitely isn't visible
in the poorly-focused photos from the 80mm, but in the FS102 it
was definitely there.
About those poorly focused pictures: I hadn't used the 80mm, an Orion
Express, for photography before. It turned out its 2-inch Crayford
focuser, so nice for visual use, couldn't hold the weight of
a camera. With the sun high overhead, as soon as I focused,
the focuser tube would start to slide downward and I couldn't lock it.
I got a few shots through the 80mm, but had better luck holding a
point-and-shoot camera to the eyepiece of the FS102.
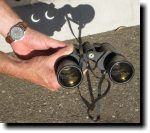
Time for experiments
![[Binocular projection of Venus transit]](http://shallowsky.com/images/venustransit/earlyhandheld/img_5430T.jpg) Once the excitement of ingress was over,
there was time to try some experiments. I'd written about binocular
projection as a way anyone, without special equipment, could watch
the transit; so I wanted to make sure that worked. I held my cheap
binoc (purchased for $35 many years ago at Big 5) steady on top
of a tripod -- I never have gotten around to making a tripod mount
for it; though if I'd wanted a more permanent setup, duct tape would
have worked.
Once the excitement of ingress was over,
there was time to try some experiments. I'd written about binocular
projection as a way anyone, without special equipment, could watch
the transit; so I wanted to make sure that worked. I held my cheap
binoc (purchased for $35 many years ago at Big 5) steady on top
of a tripod -- I never have gotten around to making a tripod mount
for it; though if I'd wanted a more permanent setup, duct tape would
have worked.
I couldn't see much projecting against the ground,
and it was too windy to put a piece of paper or cardboard down, but
an old whiteboard made a perfect solar projection screen. There was n
trouble at all seeing Venus and some of the larger sunspots projected
onto the whiteboard.
As the transit went on, we settled down to a routine of popping
outside the office every now and then to check on the transit.
Very civilized. But the transit lasted until past sunset, and our
western horizon is blocked by buildings.
I wanted some sunset shots. So we took a break for dinner, then drove
up into the hills to look for a place with a good ocean view.
The sunset expedition
Our first idea, a pullout off Highway 9,
had looked promising in Google Earth but turned out to have trees
and a hill (that somehow hadn't shown up in Google Earth) blocking
the sunset. So back up highway 9 and over to Russian Ridge, where
I remembered a trail entrance on the western side of the ridge that
might serve. Sure enough, it gave us a great sunset view. There was
only parking space for one car, but fortunately that's all we needed.
And we weren't the only transit watchers there -- someone else had
hiked in from the main parking lot carrying a solar filter, so we
joined him on the hillside as we waited for sunset.
![[Mak 90 with solar filter]](http://shallowsky.com/images/venustransit/sunset-ps/img_5447T.jpg) I'd brought the 80mm refractor for visual observing and the 90 Mak
for camerawork. I didn't have a filter for the Mak, but Dave had some
Baader solar film, so earlier in the afternoon I'd whipped up a filter.
A Baskin-Robbins ice cream container lid turned out to be the perfect
size. Well, almost perfect -- it was just a trifle too large, but some
pads cut from an old mouse pad and taped inside the lid made it fit
perfectly. Dave used the Baader film, some foam and masking tape to
make a couple of filters for his binocular.
I'd brought the 80mm refractor for visual observing and the 90 Mak
for camerawork. I didn't have a filter for the Mak, but Dave had some
Baader solar film, so earlier in the afternoon I'd whipped up a filter.
A Baskin-Robbins ice cream container lid turned out to be the perfect
size. Well, almost perfect -- it was just a trifle too large, but some
pads cut from an old mouse pad and taped inside the lid made it fit
perfectly. Dave used the Baader film, some foam and masking tape to
make a couple of filters for his binocular.
The sun sank through a series of marine cloud layers. Through the scopes
it looked more like Jupiter than the sun, with Jupiter's banding -- and Venus'
silhouette even looked like the shadow of one of Jupiter's moons.
![[off-axis aperture stops from ice cream containers]](http://shallowsky.com/images/venustransit/sunset-ps/img_5476T.jpg) Finally the sun got so low, and so obscured by clouds, that it seemed
safe to take the solar filter off the 90mm camera rig. (Of course, we
kept the solar filters on the other scope and binocular for visual observing.)
But even at the camera's fastest shutter speed, 1/4000, the sun came out
vastly overexposed with 90mm of aperture feeding it at f/5.6.
Finally the sun got so low, and so obscured by clouds, that it seemed
safe to take the solar filter off the 90mm camera rig. (Of course, we
kept the solar filters on the other scope and binocular for visual observing.)
But even at the camera's fastest shutter speed, 1/4000, the sun came out
vastly overexposed with 90mm of aperture feeding it at f/5.6.
I had suspected that might be a problem, so I'd prepared a couple of
off-axis stops for the Mak, to cover most of the aperture leaving only a
small hole open. Again, BR ice cream containers turned out to be
perfect. I painted the insides flat black to eliminate reflections,
then cut holes in the ends -- one about the size of a quarter, the
other quite a bit larger. It turned out I didn't use the larger stop
at all, and it would have been handy to have one smaller than the
quarter-sized one -- even with that stop, the sun was overexposed at
first even at 1/4000 and I had to go back to the solar filter for a while.
![[Venus transit at sunset]](http://shallowsky.com/images/venustransit/sunset-dslr/img_5463T.jpg)
![[Venus transit at sunset]](http://shallowsky.com/images/venustransit/sunset-dslr/img_5460T.jpg) I was happy with the results, though -- I got a nice series of sunset
photos complete with Venus silhouette.
I was happy with the results, though -- I got a nice series of sunset
photos complete with Venus silhouette.
More clouds rolled in as we packed up, providing a gorgeous
blue-and-pink sunset sky backdrop for our short walk back to the car.
What a lovely day for such a rare celestial event!
Photos here:
Venus Transit, June 5 2012.
Tags: astronomy, science, photography
[
12:48 Jun 06, 2012
More science/astro |
permalink to this entry |
]
Fri, 01 Jun 2012
![[Venus transit 2004 from Chicago. Copyright © 2004 by Bill Arnett]](http://ephemeris.sjaa.net/1206/venus2004.jpg) June 5 brings the last Venus transit until 2117, when Venus will pass
across the face of the sun -- the second of the only two Venus
transits any of us will see in our lives. (The first,
pictured in this lovely image from Bill
Arnett, was in 2004, visible on the east coast of the US but not
visible here in California.)
June 5 brings the last Venus transit until 2117, when Venus will pass
across the face of the sun -- the second of the only two Venus
transits any of us will see in our lives. (The first,
pictured in this lovely image from Bill
Arnett, was in 2004, visible on the east coast of the US but not
visible here in California.)
Venus is just a small spot against the vastness of the sun -- the skies
won't dim like in an eclipse, and you need equipment to see it.
So why should a non-astronomer care?
Mostly because it's so rare.
Venus transits happen in pairs with more than a century
between successive pairs: the last transit before 2004 was in 1882,
and the next one after this week's won't happen until 2117. The entire
20th century passed without a single Venus transit.
They're historically interesting, too. It was in 1663 that Scottish
mathematician James Gregory proposed that you could calculate the
distance to the Sun by measuring a Venus transit, by observing
at many different places on earth and
measuring
parallax.
Edmund Halley (of Halley's Comet fame) tried this method during the
Mercury transit of 1676, but since Mercury is so much closer to the
sun and farther from us, the results weren't good enough.
Unfortunately, Halley died in 1742, too early for the Venus
transit of 1761.
But lots of other astronomers were ready, mounting expeditions that year to
Siberia, Norway, Newfoundland and Madagascar (some of these expeditions
were major adventures, and several books have been written about them).
They followed up in 1769 with expeditions to Hudson Bay, Baja
California, Norway, St Petersburg, Philadelphia...
and the first voyage of Captain Cook to Tahiti, where they
observed the transit at a location that's still called "Point Venus" today.
![[Black drop effect]](http://upload.wikimedia.org/wikipedia/commons/thumb/3/30/Venustransit_2004-06-08_07-44.jpg/250px-Venustransit_2004-06-08_07-44.jpg)
Alas, their measurements weren't as accurate as they had hoped.
The exact times of a Venus transit turn out to be difficult to measure
due to the dreaded
black drop effect,
where the black circle of Venus can seem to elongate into a teardrop
shape as it "tears away" from the edge of the sun. The effect seems
to be caused by blurring from our own atmosphere (poor seeing)
combined with telescope diffraction. So the steadier your seeing is,
and the bigger and better your optics, the less likely you are to see
the black drop.
How to see the transit
First, if you don't have a telescope of your own, don't despair --
head to your local astronomy club. Here in the bay area there are
dozens of clubs, and just about all of them have public star parties
planned for the Venus transit. There are events planned at local
science museums, planetaria and schools as well.
A few bay area links:
San Jose Astronomical Association,
Peninsula Astronomical Society,
San Francisco Sidewalk
Astronomers,
San Francisco Amateur Astronomers,
or any of the others on the AANC's list of
Amateur
Astronomy Clubs in Northern California
or the
SF
Chronicle's list of astronomy clubs.
And the Hubble
Space Telescope will be watching the transit by looking at
light reflected off the moon.
But suppose you're viewing it on your own?
Of course, this being a solar event, you can't look at it directly --
you need a filter or other apparatus.
No need for a fancy H-alpha filter -- a white light solar filter is
fine, the kind that covers the aperture of the telescope.
(Don't use the kind that screw into the eyepiece! They can overheat
and crack while you're looking through them.)
You don't need a big telescope. I used an
Orion solar filter
on my little 80mm f/7 refractor for the last Mercury transit and it
worked great. And Venus is much larger than Mercury, at about 50 arcseconds
versus Mercury's 12 (the sun is half a degree, or 30 arcminutes).
So if you've seen a Mercury transit, you can imagine how much easier
and more spectacular a Venus transit can be.
If you use binoculars, either make sure that you have solar filters
for both sides, or keep one side covered at all times. If your telescope
has a finderscope, keep it covered.
If you can't find a solar filter in time for the transit,
you can set up your telescope to project the sun's image onto a white
board or sheet of paper. (This is how Jeremiah Horrocks made the first
known Venus transit observation.)
Use a cheap, low powered eyepiece for this:
the eyepiece will get hot, and you don't want to risk damaging a
fancy eyepiece. Be careful with solar projection -- make sure nobody
nearby can walk between the telescope and the surface you're using as
a projection screen, or place their hands or eyes in the light path.
A web search for solar projection will uncover other tips.
 You can project the sun's image with binoculars, too, so don't feel
left out if you don't have a telescope. You'll definitely want
a tripod mount. I tried binocular projection during last month's
annular eclipse,
and found it very fiddly to hold the binoculars just right.
Don't count on being able to hold them steady while also looking for
Venus on the projected image.
If you don't have a tripod adapter (try
Orion), cobble something together
with duct tape and a block of wood, or whatever you have handy.
You can project the sun's image with binoculars, too, so don't feel
left out if you don't have a telescope. You'll definitely want
a tripod mount. I tried binocular projection during last month's
annular eclipse,
and found it very fiddly to hold the binoculars just right.
Don't count on being able to hold them steady while also looking for
Venus on the projected image.
If you don't have a tripod adapter (try
Orion), cobble something together
with duct tape and a block of wood, or whatever you have handy.
And do try to get a good white surface to project onto. Concrete worked
well enough for the solar eclipse, but you'll want better resolution
for Venus.
Timeline
When does this all happen?
Seen from the bay area,
Venus begins its ingress onto the disc of the sun on 3:06 PDT on the
afternoon of June 5. The transit continues until after the sun
sets at 8:26. So we won't get to see egress. Venus's exit from the face
of the sun, but it's the mirror image of what we'll see at ingress.
Ingress has two parts: first contact, when the edge of Venus's disk
first touches the outside of the sun's disk, and "internal ingress" or
second contact, when Venus's disk is fully inside that of the
sun. Second contact is the most interesting period of the transit,
since it's when the "black drop effect" occurs.
![[Venus transit aureole by Lorenzo Comolli [Gruppo Astronomico Tradatese] and the VT-2004 programme]](http://vt2004.astro.cz/fotogalerie/www.vt-2004.org/photos/images/vt-photo-01-loco-icon.jpg) And if you have a good telescope and filter and you're blessed with
especially good seeing around the time of second contact, try looking
for the aureole, an arc of light just outside of the solar disk
made by the refraction of sunlight through Venus's atmosphere.
Amazingly, the aureole has the same surface brightness as the sun's
surface, and is said to be possible to see even through a solar
filter. That's something you'll never see in a Mercury transit!
(Follow the link on the image to see Lorenzo Comolli's amazing
aureole photo in more detail, along with other great aureole images
courtesy of the VT-2004 programme.)
And if you have a good telescope and filter and you're blessed with
especially good seeing around the time of second contact, try looking
for the aureole, an arc of light just outside of the solar disk
made by the refraction of sunlight through Venus's atmosphere.
Amazingly, the aureole has the same surface brightness as the sun's
surface, and is said to be possible to see even through a solar
filter. That's something you'll never see in a Mercury transit!
(Follow the link on the image to see Lorenzo Comolli's amazing
aureole photo in more detail, along with other great aureole images
courtesy of the VT-2004 programme.)
Here's the time table for the bay area (from the table on NASA's
eclipse website):
| First contact: | 3:06:20
|
| Internal ingress: | 3:23:56
|
| Maximum transit: | 6:25:30
|
| Sunset: | 8:26
|
At first contact, the sun will still be high for bay area observers,
60° up. By maximum transit the pair will have sunk to 21°,
still plenty high enough to see the spectacle. Photographers will want to
wait around for sunset for a chance at some spectacular photos, like
the Bill Arnett photo at the top of this article, taken from Chicago.
Want more details or times from other locations?
transitofvenus.org
has plenty of links, as does Everything
you need to know about next week’s Transit of Venus.
Stay safe, and enjoy this once-in-a-lifetime event!
Tags: astronomy, science
[
13:04 Jun 01, 2012
More science/astro |
permalink to this entry |
]
![[Young and fierce alligator lizard]](http://shallowsky.com/nature/reptiles/dragonliz.jpg)
![[Young and fierce alligator lizard]](http://shallowsky.com/nature/reptiles/img_6096.jpg)
![[Binocular projection of Venus transit]](http://shallowsky.com/images/venustransit/?pic=earlyhandheld/img_5430.jpg)
![[Mak 90 with solar filter]](http://shallowsky.com/images/venustransit/?pic=sunset-ps/img_5447.jpg)
![[off-axis aperture stops from ice cream containers]](http://shallowsky.com/images/venustransit/?pic=sunset-ps/img_5476.jpg)
![[Venus transit at sunset]](http://shallowsky.com/images/venustransit/?pic=sunset-dslr/img_5463.jpg)
![[Venus transit at sunset]](http://shallowsky.com/images/venustransit/?pic=sunset-dslr/img_5460.jpg)
