Shallow Thoughts : : 2018
Akkana's Musings on Open Source Computing and Technology, Science, and Nature.
Fri, 28 Dec 2018
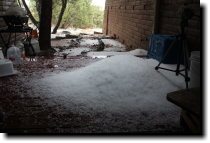
![[Snow world]](http://shallowsky.com/blog/images/post-xmas-snow/img_9999.jpg) The morning after Christmas we woke up to a beautiful white world,
with snow still coming down.
The morning after Christmas we woke up to a beautiful white world,
with snow still coming down.
Shoveling is a drag, but still, the snowy landscape is so beautiful,
and still such a wonderful novelty for ex-Californians.
This morning we awoke to much the same view,
except the snow was deeper -- 8-12 inches, quite a lot for White Rock.
![[Roof glacier hanging]](http://shallowsky.com/blog/images/post-xmas-snow/img_9994.jpg) We also had the usual amusement of Roof Glaciers: as the mat of snow
gradually slides off the metal roof, it hangs off the edge, gradually
curling, until finally the weight is great enough that it breaks off
and falls. Definitely an amusing sight from inside, and fun from
outside too (a few years ago I made
time-lapse
movies of the roof glaciers).
We also had the usual amusement of Roof Glaciers: as the mat of snow
gradually slides off the metal roof, it hangs off the edge, gradually
curling, until finally the weight is great enough that it breaks off
and falls. Definitely an amusing sight from inside, and fun from
outside too (a few years ago I made
time-lapse
movies of the roof glaciers).
![[Sunny New Mexican snow world]](http://shallowsky.com/blog/images/post-xmas-snow/img_0003.jpg) And then, this being New Mexico, the sun came out, so even while
snowflakes continued to swirl down we got a bright sunny sparkly snow vista.
And then, this being New Mexico, the sun came out, so even while
snowflakes continued to swirl down we got a bright sunny sparkly snow vista.
Yesterday, the snow stopped falling by afternoon, so Raspberry Pi Club
had its usual Thursday meeting. But the second storm came in hours
earlier than predicted, and driving home from Pi Club was a bit icy. I
wasn't looking forward to the drive up to PEEC and back tonight in a
heavier snowstorm for our planetarium talk; but PEEC has closed the
Nature Center today on account of snow, which means that tonight's
planetarium talk is also canceled. We'll reschedule, probably next quarter.
Happy Holidays, everyone, whether you're huddling inside watching the
snow, enjoying sunny weather, or anything in between. Stay warm,
and walk in beauty.
Tags: nature, snow, glacier
[
12:28 Dec 28, 2018
More misc |
permalink to this entry |
]
Fri, 21 Dec 2018
It's been a while since my last blog post. Partly that's because I've
been busy with other things, like a welding class, learning a lot of
great new techniques. But it's also because I've been trying to
keep typing to a minimum (not easy for me) because of a thumb problem.
It's called "trigger thumb" and apparently is caused by a tendon
that gets stuck in its sheath. It can be caused by repetitive motion,
but in my case I just woke up with it one day, after a day when I
hadn't been doing anything particularly hand-intensive.
Cortisone injections and surgery are the usual treatment.
I may yet try cortisone, but the number of such injections you
can get are severely limited (like, twice in a lifetime),
and the surgery didn't sound appealing,
so I wanted to try other approaches first.
Some discussions I found mentioned splinting. I tried splinting it
with a popsicle stick and tape, but a straight splint made
it much worse: keeping it straight made it want to stay straight, and
after removing the splint it was quite painful to try to bend it.
For weeks it just kept getting worse.
But I finally found something that helped: a bent splint.
I glued two pieces of popsicle stick together at an angle, and
at bedtime I taped them to my thumb so it stayed a little bent overnight.
That helped quite a bit. But it was a pain to set up and tended to come loose.
I wanted something I could just slip on and off, without going through
all that tape, that wouldn't come loose. Preferably with an adjustable angle.
![[trigger thumb splint v.1: steel]](http://shallowsky.com/blog/images/thumbsplint/img_3095.jpg) So I cut some strips of steel, got out the welder and made myself
a bent splint.
It's tough to weld thin pieces with the MIG welder, and
I melted it in places. But it worked amazingly well. I lined it with
some Moleskin, and after a few days with it, the thumb definitely
started to feel better. The tendon was still popping, but it hurt
a lot less and I could start using my hand again. And the metal splint
let me adjust how much my thumb was bent,
which wasn't true at all with the popsicle stick approach.
So I cut some strips of steel, got out the welder and made myself
a bent splint.
It's tough to weld thin pieces with the MIG welder, and
I melted it in places. But it worked amazingly well. I lined it with
some Moleskin, and after a few days with it, the thumb definitely
started to feel better. The tendon was still popping, but it hurt
a lot less and I could start using my hand again. And the metal splint
let me adjust how much my thumb was bent,
which wasn't true at all with the popsicle stick approach.
Plus, it had a neat sort of Spanish Inquisition/Hannibal Lecter look.
It looks like a torture device, but really, it's amazingly comfortable.
The only problem: it was heavy. I could feel it dragging down
on my thumb all the time. I wished it was a little lighter.
![[trigger thumb splint v.2: brass]](http://shallowsky.com/blog/images/thumbsplint/img_3108.jpg) The hardware store sells strips of brass that looked like just the ticket.
But you can't MIG weld brass, only steel.
Good thing I was taking that welding class!
I asked the instructor, and he brought in some carbon-bronze filler
rod and showed me how to "TIG braze". It's difficult and fiddly:
brass melts very easily, and the trick is to get the base metal hot,
then bring in the filler rod and blip the TIG pedal just enough to
melt the rod so it flows in without melting the base metal.
While my instructor made it look easy,
when I tried it myself I always ended up getting the
temperature too hot and melting some of the brass.
The hardware store sells strips of brass that looked like just the ticket.
But you can't MIG weld brass, only steel.
Good thing I was taking that welding class!
I asked the instructor, and he brought in some carbon-bronze filler
rod and showed me how to "TIG braze". It's difficult and fiddly:
brass melts very easily, and the trick is to get the base metal hot,
then bring in the filler rod and blip the TIG pedal just enough to
melt the rod so it flows in without melting the base metal.
While my instructor made it look easy,
when I tried it myself I always ended up getting the
temperature too hot and melting some of the brass.
So my splint looks a bit ragged in spots.
Still, the finished product works wonderfully, and it's quite a bit
lighter than its steel cousin. Dave thinks it still looks Hannibal
Lecterish, but that doesn't bother me. I skipped the Moleskin this time:
it's comfy enough without it, and it's a lot easier to slip the
splint on and off.
I'm still trying to spend less time typing until my thumb heals
completely. But with the splint, and occasional ice packs, it's
improving, doesn't hurt any more, and I'm hoping I can get by without
cortisone.
And besides, isn't it more fun to weld up your own medical
equipment? (Don't tell the AMA!)
Tags: health, welding
[
16:37 Dec 21, 2018
More misc |
permalink to this entry |
]
Sun, 28 Oct 2018
Last night, as we drove home from the
Pumpkin Glow
-- one of Los Alamos's best annual events, a night exhibition of
dozens of carved pumpkins all together in one place -- I noticed a
glow on the horizon right around Truchas Peak and wondered if the moon
was going to rise that far north.
Sure enough, I saw the first sliver of the moon poking over the peak
as we passed the airport. "We may get an extended moonrise tonight",
I said, realizing that as the moon rose, we'd be descending the
"Main Hill Road", as that section of NM 502 is locally known, so we'd
get lower with respect to the mountains even as the moon got higher.
Which would win?
As it turns out, neither. The change of angle during the descent down
the Main Hill Road exactly matches the rate of moonrise, so the size
of the moon's sliver stayed almost exactly the same during the whole
descent, until we got down to the "Y" where a nearby mesa blocked our
view entirely. By the time we could see the moon again, it was just
freeing itself of the mountains.
Neat! Made me think of The Little Prince: his home asteroid B6-12
(no, that's not a real asteroid desgination) was small enough that by
moving his chair, he could watch sunset over and over again.
I'm a sucker for moonrises -- and now I know how I can make them last
longer!
Tags: moon, moonrise
[
19:32 Oct 28, 2018
More science/astro |
permalink to this entry |
]
Sun, 21 Oct 2018
![[Sparrow ID page]](http://shallowsky.com/blog/images/screenshots/sparrowpage.jpg) I was filing an eBird report the other day, dutifully cataloging
the first junco of the year and the various other birds that have
been hanging around, when a sparrow flew into my binocular field.
A chipping sparrow? Probably ... but this one wasn't so clearly marked.
I was filing an eBird report the other day, dutifully cataloging
the first junco of the year and the various other birds that have
been hanging around, when a sparrow flew into my binocular field.
A chipping sparrow? Probably ... but this one wasn't so clearly marked.
I always have trouble telling the dang sparrows apart. When I open the
bird book, I always have to page through dozens of pages of sparrows
that are never seen in this county, trying to figure out which one
looks most like what I'm seeing.
I used to do that with juncos, but then I made a local copy of a
wonderful comparison photo Bob Walker published a couple years ago
on the PEEC blog:
Bird
of the Week – The Dark-eyed Junco. (I also have the same sort of
crib sheet for the
Raspberry
Pi GPIO pins.)
Obviously I needed a similar crib sheet for sparrows.
So I collected the best publically-licensed images I could find on the web,
and made Sparrows
of Los Alamos County, with comparison images close together
so I can check them quickly before the bird flies away.
If you live somewhere else so the Los Alamos County list isn't quite
what you need, you're welcome to use the code to make your
own version.
Tags: nature, birds, sparrows
[
19:18 Oct 21, 2018
More nature |
permalink to this entry |
]
Sat, 13 Oct 2018
![[Packing tape rabbit]](http://shallowsky.com/blog/images/humor/img_2940.jpg) I had to mail a package recently, and finished up a roll of packing tape.
I had to mail a package recently, and finished up a roll of packing tape.
I hadn't realized before I removed the tape roll from its built-in
dispenser that packing tape was dispensed by rabbits.
Tags: humor
[
20:11 Oct 13, 2018
More humor |
permalink to this entry |
]
Sun, 23 Sep 2018
Someone asked me about my Javascript
Jupiter code, and whether it used PyEphem. It doesn't, of course,
because it's Javascript, not Python (I wish there was something
as easy as PyEphem for Javascript!); instead it uses code from the book
Astronomical Formulae for Calculators by Jean Meeus.
(His better known Astronomical Algorithms, intended for
computers rather than calculators, is actually harder to use for
programming because Astronomical Algorithms is written
for BASIC and the algorithms are relatively hard to translate into other
languages, whereas Astronomical Formulae for Calculators concentrates
on explaining the algorithms clearly, so you can punch them into a
calculator by hand, and this ends up making it fairly easy to
implement them in a modern computer language as well.)
Anyway, the person asking also mentioned JPL's page
HORIZONS Ephemerides
page, which I've certainly found useful at times.
Years ago, I tried emailing the site maintainer asking if they might
consider releasing the code as open source; it seemed like a
reasonable request, given that it came from a government agency
and didn't involve anything secret. But I never got an answer.
![[SpiceyPy example: Cassini's position]](http://shallowsky.com/blog/images/screenshots/spiceypy-cassini.jpg) But going to that page today, I find that code is now available!
What's available is a massive toolkit called SPICE
(it's all in capitals but there's no indication what it might stand for.
It comes from NAIF, which is NASA's Navigation and Ancillary
Information Facility).
But going to that page today, I find that code is now available!
What's available is a massive toolkit called SPICE
(it's all in capitals but there's no indication what it might stand for.
It comes from NAIF, which is NASA's Navigation and Ancillary
Information Facility).
SPICE allows for accurate calculations of all sorts of solar system
quantities, from the basic solar system bodies like planets to
all of NASA's active and historical public missions.
It has bindings for quite a few languages, including C.
The official list doesn't include Python, but there's a third-party Python
wrapper called SpiceyPy
that works fine.
The tricky part of programming with SPICE is that most of the code is
hidden away in "kernels" that are specific to the objects and quantities
you're calculating. For any given program you'll probably need to
download at least four "kernels", maybe more. That wouldn't be a
problem except that there's not much help for figuring out which
kernels you need and then finding them. There are lots of SPICE
examples online but few of them tell you which kernels they need,
let alone where to find them.
After wrestling with some of the examples, I learned some tricks for
finding kernels, at least enough to get the basic examples working.
I've collected what I've learned so far into a new GitHub repository:
NAIF SPICE Examples.
The README there explains what I know so far about getting kernels;
as I learn more, I'll update it.
SPICE isn't easy to use, but it's probably much more accurate than
simpler code like PyEphem or my Meeus-based Javascript code, and it
can calculate so many more objects. It's definitely something
worth knowing about for anyone doing solar system simulations.
Tags: programming, python, astronomy
[
16:43 Sep 23, 2018
More programming |
permalink to this entry |
]
Sun, 16 Sep 2018
The laser printers we bought recently can print on both sides of the
page. Nice feature! I've never had access to a printer that can do
that before.
But that requires figuring out how to tell the printer to do the right
thing. Reading the man page for lp, I spotted the sides option:
print -o sides=two-sided-long-edge. But that doesn't work by itself.
Adding -n 2 looked like the way to go, but
nope! That gives you one sheet that has page 1 on both sides, and a
second sheet that has page 2 on both sides. Because of course that's
what a normal person would want. Right.
The real answer, after further research and experimentation,
turned out to be the collate=true option:
lp -o sides=two-sided-long-edge -o collate=true -d printername file
Tags: linux, cmdline, printing
[
11:05 Sep 16, 2018
More linux |
permalink to this entry |
]
Mon, 03 Sep 2018
Continuing the discussion of USB networking from a Raspberry Pi Zero
or Zero W (Part
1: Configuring an Ethernet Gadget and
Part
2: Routing to the Outside World): You've connected your Pi Zero to another
Linux computer, which I'll call the gateway computer, via a micro-USB cable.
Configuring the Pi end is easy. Configuring the gateway end is easy as
long as you know the interface name that corresponds to the gadget.
ip link gave a list of several networking devices;
on my laptop right now they include lo, enp3s0, wlp2s0 and enp0s20u1.
How do you tell which one is the Pi Gadget?
When I tested it on another machine, it showed up as
enp0s26u1u1i1. Even aside from my wanting to script it, it's
tough for a beginner to guess which interface is the right one.
Try dmesg
Sometimes you can tell by inspecting the output of dmesg | tail.
If you run dmesg shortly after you initialized the gadget (either by
plugging the USB cable into the gateway computer, you'll see some
lines like:
[  639.301065] cdc_ether 3-1:1.0 enp0s20u1: renamed from usb0
[ 9458.218049] usb 3-1: USB disconnect, device number 3
[ 9458.218169] cdc_ether 3-1:1.0 enp0s20u1: unregister 'cdc_ether' usb-0000:00:14.0-1, CDC Ethernet Device
[ 9462.363485] usb 3-1: new high-speed USB device number 4 using xhci_hcd
[ 9462.504635] usb 3-1: New USB device found, idVendor=0525, idProduct=a4a2
[ 9462.504642] usb 3-1: New USB device strings: Mfr=1, Product=2, SerialNumber=0
[ 9462.504647] usb 3-1: Product: RNDIS/Ethernet Gadget
[ 9462.504660] usb 3-1: Manufacturer: Linux 4.14.50+ with 20980000.usb
[ 9462.506242] cdc_ether 3-1:1.0 usb0: register 'cdc_ether' at usb-0000:00:14.0-1, CDC Ethernet Device, f2:df:cf:71:b9:92
[ 9462.523189] cdc_ether 3-1:1.0 enp0s20u1: renamed from usb0
(Aside: whose bright idea was it that it would be a good idea to rename
usb0 to enp0s26u1u1i1, or wlan0 to wlp2s0? I'm curious exactly who finds
their task easier with the name enp0s26u1u1i1 than with usb0. It
certainly complicated all sorts of network scripts and howtos when the
name wlan0 went away.)
Anyway, from inspecting that dmesg output you can probably figure out
the name of your gadget interface. But it would be nice to have
something more deterministic, something that could be used from a script.
My goal was to have a shell function in my .zshrc, so I could type
pigadget and have it set everything up automatically.
How to do that?
A More Deterministic Way
First, the name starts with en, meaning it's an ethernet interface,
as opposed to wi-fi, loopback, or various other types of networking
interface. My laptop also has a built-in ethernet interface,
enp3s0, as well as lo0,
the loopback or "localhost" interface, and wlp2s0,
the wi-fi chip, the one that used to be called wlan0.
Second, it has a 'u' in the name. USB ethernet interfaces start with
en and then add suffixes to enumerate all the hubs involved.
So the number of 'u's in the name tells you how many hubs are involved;
that enp0s26u1u1i1 I saw on my desktop had two hubs in the way,
the computer's internal USB hub plus the external one sitting on my desk.
So if you have no USB ethernet interfaces on your computer,
looking for an interface name that starts with 'en' and has at least
one 'u' would be enough. But if you have USB ethernet, that
won't work so well.
Using the MAC Address
You can get some useful information from the MAC address,
called "link/ether" in the ip link output.
In this case, it's f2:df:cf:71:b9:92, but -- whoops! --
the next time I rebooted the Pi, it became ba:d9:9c:79:c0:ea.
The address turns out to be
randomly
generated and will be different every time. It is possible to set
it to a fixed value, and that thread has some suggestions on how,
but I think they're out of date, since they reference a kernel module
called g_ether whereas the module on my updated Raspbian
Stretch is called cdc_ether. I haven't tried.
Anyway, random or not, the MAC address also has one useful property:
the first octet (f2 in my first example)
will always have the '2' bit set, as an indicator that it's a "locally
administered" MAC address rather than one that's globally unique.
See the Wikipedia page
on MAC addressing for details on the structure of MAC addresses.
Both f2 (11110010 in binary) and ba (10111010 binary) have the
2 (00000010) bit set.
No physical networking device, like a USB ethernet dongle, should have
that bit set; physical devices have MAC addresses that indicate what
company makes them. For instance, Raspberry Pis with networking, like
the Pi 3 or Pi Zero W, have interfaces that start with b8:27:eb.
Note the 2 bit isn't set in b8.
Most people won't have any USB ethernet devices connected that have
the "locally administered" bit set. So it's a fairly good test for
a USB ethernet gadget.
Turning That Into a Shell Script
So how do we package that into a pipeline so the shell -- zsh, bash or
whatever -- can check whether that 2 bit is set?
First, use ip -o link to print out information about all
network interfaces on the system.
But really you only need the ones starting with en and
containing a u. Splitting out the u isn't easy at this
point -- you can check for it later -- but you can at least limit it to lines
that have en after a colon-space. That gives output like:
$ ip -o link | grep ": en"
5: enp3s0:  mtu 1500 qdisc pfifo_fast state DOWN mode DEFAULT group default qlen 1000\    link/ether 74:d0:2b:71:7a:3e brd ff:ff:ff:ff:ff:ff
8: enp0s20u1:  mtu 1500 qdisc noop state DOWN mode DEFAULT group default qlen 1000\    link/ether f2:df:cf:71:b9:92 brd ff:ff:ff:ff:ff:ff
Within that, you only need two pieces: the interface name (the second word)
and the MAC address (the 17th word). Awk is a good tool for picking
particular words out of an output line:
$ ip -o link | grep ': en' | awk '{print $2, $17}'
enp3s0: 74:d0:2b:71:7a:3e
enp0s20u1: f2:df:cf:71:b9:92
The next part is harder: you have to get the shell to loop over those
output lines, split them into the interface name and the MAC address,
then split off the second character of the MAC address and test it
as a hexadecimal number to see if the '2' bit is set. I suspected that
this would be the time to give up and write a Python script, but no,
it turns out zsh and even bash can test bits:
ip -o link | grep en | awk '{print $2, $17}' | \
    while read -r iff mac; do
        # LON is a numeric variable containing the digit we care about.
        # The "let" is required so LON will be a numeric variable,
        # otherwise it's a string and the bitwise test fails.
        let LON=0x$(echo $mac | sed -e 's/:.*//' -e 's/.//')

        # Is the 2 bit set? Meaning it's a locally administered MAC
        if ((($LON & 0x2) != 0)); then
            echo "Bit is set, $iff is the interface"
        fi
    done
Pretty neat! So now we just need to package it up into a shell function
and do something useful with $iff when you find one with the bit set:
namely, break out of the loop, call ip a add and
ip link set to enable networking to the Raspberry Pi
gadget, and enable routing so the Pi will be able to get to
networks outside this one. Here's the final function:
# Set up a Linux box to talk to a Pi0 using USB gadget on 192.168.0.7:
pigadget() {
    iface=''

    ip -o link | grep en | awk '{print $2, $17}' | \
        while read -r iff mac; do
            # LON is a numeric variable containing the digit we care about.
            # The "let" is required so zsh will know it's numeric,
            # otherwise the bitwise test will fail.
            let LON=0x$(echo $mac | sed -e 's/:.*//' -e 's/.//')

            # Is the 2 bit set? Meaning it's a locally administered MAC
            if ((($LON & 0x2) != 0)); then
                iface=$(echo $iff | sed 's/:.*//')
                break
            fi
        done

    if [[ x$iface == x ]]; then
        echo "No locally administered en interface:"
        ip a | egrep '^[0-9]:'
        echo Bailing.
        return
    fi

    sudo ip a add 192.168.7.1/24 dev $iface
    sudo ip link set dev $iface up

    # Enable routing so the gadget can get to the outside world:
    sudo sh -c 'echo 1 > /proc/sys/net/ipv4/ip_forward'
    sudo iptables -t nat -A POSTROUTING -o eth0 -j MASQUERADE
}
Tags: raspberry pi, linux, networking
[
18:41 Sep 03, 2018
More linux |
permalink to this entry |
]
Fri, 31 Aug 2018
I wrote some time ago about how to use a
Raspberry
Pi over USB as an "Ethernet Gadget". It's a handy way to talk to
a headless Pi Zero or Zero W if you're somewhere where it doesn't already
have a wi-fi network configured.
However, the setup I gave in that article doesn't offer a way for the
Pi Zero to talk to the outside world. The Pi is set up to use the
machine on the other end of the USB cable for routing and DNS, but that
doesn't help if the machine on the other end isn't acting as a router
or a DNS host.
A lot of the ethernet gadget tutorials I found online
explain how to do this on Mac and Windows, but it was tough to find
an example for Linux. The best I found was for Slackware,
How
to connect to the internet over USB from the Raspberry Pi Zero,
which should work on any Linux, not just Slackware.
Let's assume you have the Pi running as a gadget and you can talk to it,
as discussed in the previous article, so you've run:
sudo ip a add 192.168.7.1/24 dev enp0s20u1
sudo ip link set dev enp0s20u1 up
substituting your network number and the interface name that the Pi
created on your Linux machine, which you can find in
dmesg | tail or
ip link. (In Part 3
I'll talk more about how to find the right interface name
if it isn't obvious.)
At this point, the network is up and you should be able to ping the Pi
with the address you gave it, assuming you used a static IP:
ping 192.168.7.2
If that works, you can ssh to it, assuming you've enabled ssh.
But from the Pi's end, all it can see is your machine; it can't
get out to the wider world.
For that, you need to enable IP forwarding and masquerading:
sudo sh -c 'echo 1 > /proc/sys/net/ipv4/ip_forward'
sudo iptables -t nat -A POSTROUTING -o eth0 -j MASQUERADE
Now the Pi can route to the outside world, but it still doesn't have
DNS so it can't get any domain names. To test that, on the gateway machine
try pinging some well-known host:
$ ping -c 2 google.com
PING google.com (216.58.219.110) 56(84) bytes of data.
64 bytes from mia07s25-in-f14.1e100.net (216.58.219.110): icmp_seq=1 ttl=56 time=78.6 ms
64 bytes from mia07s25-in-f14.1e100.net (216.58.219.110): icmp_seq=2 ttl=56 time=78.7 ms

--- google.com ping statistics ---
2 packets transmitted, 2 received, 0% packet loss, time 1001ms
rtt min/avg/max/mdev = 78.646/78.678/78.710/0.032 ms
Take the IP address from that -- e.g. 216.58.219.110 -- then go to a shell
on the Pi and try ping -c 2 216.58.219.110, and you should
see a response.
DNS with a Public DNS Server
Now all you need is DNS. The easy way is to use one of the free DNS
services, like Google's 8.8.8.8. Edit /etc/resolv.conf and add
a line like
nameserver 8.8.8.8
and then try pinging some well-known hostname.
If it works, you can make that permanent by editing /etc/resolv.conf,
and adding this line:
name_servers=8.8.8.8
Otherwise you'll have to do it every time you boot.
Your Own DNS Server
But not everyone wants to use public nameservers like 8.8.8.8.
For one thing, there are privacy implications: it means you're telling
Google about every site you ever use for any reason.
Fortunately, there's an easy way around that, and you don't even
have to figure out how to configure bind/named. On the gateway box,
install dnsmasq, available through your distro's repositories.
It will use whatever nameserver you're already using on that machine,
and relay it to other machines like your Pi that need the information.
I didn't need to configure it at all; it worked right out of the box.
In the next article, Part 3:
more about those crazy interface names (why is it
enp0s20u1 on my laptop but enp0s26u1u1i1 on my desktop?),
how to identify which interface is the gadget by using its MAC,
and how to put it all together into a shell function so you can
set it up with one command.
Tags: raspberry pi, linux, networking
[
15:25 Aug 31, 2018
More linux |
permalink to this entry |
]
Thu, 23 Aug 2018
I try to
avoid Grub2
on my Linux machines, for reasons I've discussed before.
Even if I run it, I usually block it from auto-updating /boot since that
tends to overwrite other operating systems.
But on a couple of my Debian machines, that has meant needing to notice
when a system update has installed a new kernel, so I can update the
relevant boot files. Inevitably, I fail to notice, and end up running
an out of date kernel.
But didn't Debian use to have a /boot/vmlinuz that always
linked to the latest kernel? That was such a good idea: what happened
to that?
I'll get to that. But before I found out, I got sidetracked trying to
find a way to check whether my kernel was up-to-date, so I could have
it warn me of out-of-date kernels when I log in.
That turned out to be fairly easy using uname and a little shell
pipery:
# Is the kernel running behind?
kernelvers=$(uname -a | awk '{ print $3; }')
latestvers=$(cd /boot; ls -1 vmlinuz-* | sort --version-sort | tail -1 | sed 's/vmlinuz-//')
if [[ $kernelvers != $latestvers ]]; then
    echo "======= Running kernel $kernelvers but $latestvers is available"
else
    echo "The kernel is up to date"
fi
I put that in my .login. But meanwhile I discovered that that
/boot/vmlinuz link still exists -- it just isn't enabled
by default for some strange reason. That, of course, is the right
way to make sure you're on the latest kernel, and you can do it with the
linux-update-symlinks command.
linux-update-symlinks
is called automatically when you install a new kernel -- but by
default it updates symlinks in the root directory, /, which isn't
much help if you're trying to boot off a separate /boot
partition.
But you can configure it to notice your /boot partition.
Edit /etc/kernel-img.conf and change link_in_boot
to yes:
link_in_boot = yes
Then linux-update-symlinks will automatically update the
/boot/vmlinuz link whenever you update the kernel,
and whatever bootloader you prefer can point to that image.
It also updates /boot/vmlinuz.old to point to the previous kernel
in case you can't boot from the new one.
Update: To get linux-update-symlinks to update symlinks to reflect
the current kernel, you need to reinstall the package for the current kernel,
e.g. apt-get install --reinstall linux-image-4.18.0-3-amd64.
Just apt-get install --reinstall linux-image-amd64 isn't enough.
Tags: linux, debian, shell
[
20:14 Aug 23, 2018
More linux/kernel |
permalink to this entry |
]
Fri, 17 Aug 2018
Over the years I've picked up a couple of cellphone stands as
conference giveaways. A stand is a nice idea, especially if you
like to read news articles during mealtime, but the stands I've
tried never seem to be quite what I want. Either they're not
adjustable, or they're too bulky or heavy to want to carry them
around all the time.
A while back, I was browsing on ebay looking for something better
than the ones I have. I saw a few that looked like they might be
worth trying, but then it occurred to me: I could make one pretty
easily that would work better than anything I'd found for sale.
I started with plans that involved wire and a hinge -- the hinge so
the two sides of the stand would fold together to fit in a purse or
pocket -- and spent a few hours trying different hinge options.I
wasn't satisfied, though. And then I realized: all I had to do was
bend the wire into the shape I needed. Voilà -- instant
lightweight adjustable cellphone stand.
And it has worked great. I've been using it for months and it's much
better than any of the prefab stands I had before.
Bend a piece of wire
![[Bent wire]](http://shallowsky.com/blog/images/cellphone-stand/img_2635.jpg)
I don't know where this wire came from: it was in my spare-metal-parts
collection. You want something a little thinner than coathanger wire,
so you can bend it relatively easily; "baling wire" or "rebar wire"
is probably about right.
Bend the tips around
![[Tips adjusted to fit your phone's width]](http://shallowsky.com/blog/images/cellphone-stand/img_2638.jpg)
Adjust the curve so it's big enough that your cellphone will fit in
the crook of the wires.
Bend the back end down, and spread the two halves apart
![[Bend the back end down]](http://shallowsky.com/blog/images/cellphone-stand/img_2639.jpg)
Adjust so it fits your phone
![[Instant cellphone stand]](http://shallowsky.com/blog/images/cellphone-stand/img_2640.jpg)
Coat the finished stand with rubberized coating (available at
your local hardware store in either dip or spray-on varieties)
so it won't slide around on tables and won't scratch anything.
The finished product is adjustable to any angle you need -- so you
can adjust it based on the lighting in any room -- and you can fold
the two halves together to make it easy to carry.
Tags: hardware, hack
[
12:06 Aug 17, 2018
More hardware |
permalink to this entry |
]
Sun, 12 Aug 2018
About three weeks ago, a Debian (testing) update made a significant
change on my system: it added a 30-minute suspend timeout. If I left
the machine unattended for half an hour, it would automatically go
to sleep.
What's wrong with that? you ask. Why not just let it sleep if you're
going to be away from it that long?
But sometimes there's a reason to leave it running. For instance, I
might want to track an ongoing discussion in IRC, and occasionally
come back to check in. Or, more important, a long-running job that
doesn't require user input, like a system backup, or ripping a CD.
or testing a web service.
None of those count as "activity" to keep the system awake: only
mouse and keyboard motions count.
There are lots of pages that point to the file
/etc/systemd/logind.conf, where you can find commented-out
lines like
#IdleAction=ignore
#IdleActionSec=30min
The comment at the top of the file says that these are the defaults
and references the logind.conf man page. Indeed, man logind.conf
says that setting IdleAction=ignore should prevent annything from happening,
and that setting IdleActionSec=120min should lead to a longer delay.
Alas, neither is true. This file is completely ignored as far as I can
tell, and I don't know why it's there, or where the 30 minute setting
is coming from.
What actually did work was in
Debian's Suspend wiki page.
I was skeptical since the page hasn't been updated since Debian Jessie
(Stretch, the successor to Jessie, has been out for more than a year
now) and the change I was seeing just happened in the last month.
I was also leery because the only advice it gives is
"For systems which should never attempt any type of suspension, these
targets can be disabled at the systemd level". I do suspend my system,
frequently; I just don't want it to happen unless I tell it to, or with
a much longer timeout than 30 minutes.
But it turns out the command it suggests does work:
sudo systemctl mask sleep.target suspend.target hibernate.target hybrid-sleep.target
and it doesn't disable suspending entirely: I can still suspend manually,
it just disables autosuspend. So that's good enough.
Be warned: the page says next:
Then run systemctl restart systemd-logind.service or reboot.
It neglects to mention that restarting systemd-logind.service
will kill your X session, so don't run that command if you're
in the middle of anything.
It would be nice to know where the 30-second timeout had been coming
from, so I could enable it after, say, 90 or 120 minutes. A timeout
sounds like a good thing, if it's something the user can configure.
But like so many systemd functions, no one who writes documentation
seems to know how it actually works, and those who know aren't telling.
Tags: linux, systemd
[
13:36 Aug 12, 2018
More linux |
permalink to this entry |
]
Wed, 08 Aug 2018
We're still not getting the regular thunderstorms one would normally
expect in the New Mexico monsoon season, but at least we're getting
a little relief from the drought.
Last Saturday we had a fairly impressive afternoon squall. It only
lasted about ten minutes but it dumped over an inch of rain and hail
in that time.
("Over an inch" means our irritating new weather station stopped
recording at exactly 1.0 even though we got some more rain after that,
making us suspect that it has some kind of built-in "that can't be right!"
filter. It reads in hundredths of an inch and it's hard to believe that
we didn't even get another .01 after that.)
 It was typical New Mexico hail -- lentil-sized, not like the
baseballs we heard about in Colorado Springs a few days later that
killed some zoo animals. I hear this area does occasionally
get big hailstones, but it's fortunately rare.
It was typical New Mexico hail -- lentil-sized, not like the
baseballs we heard about in Colorado Springs a few days later that
killed some zoo animals. I hear this area does occasionally
get big hailstones, but it's fortunately rare.
There was enough hail on the ground to make for wintry snow scenes,
and we found an enormous pile of hailstones on our back deck
that persisted through the next day (that deck is always shady).
Of course, the hail out in the yard disappeared in under half an hour
once the New Mexico sun came out.
 But before that, as soon as the squall ended, we went out to walk the
property and take a look the "snow" and in particular at "La Cienega"
or "the swamp", our fanciful name for an area down at the bottom of
the hill where water collects and there's a little willow grove.
There was indeed water there -- covered with a layer of
floating hail -- but on the way down we also had a new "creek" with
several tributaries, areas where the torrent carved out little
streambeds.
But before that, as soon as the squall ended, we went out to walk the
property and take a look the "snow" and in particular at "La Cienega"
or "the swamp", our fanciful name for an area down at the bottom of
the hill where water collects and there's a little willow grove.
There was indeed water there -- covered with a layer of
floating hail -- but on the way down we also had a new "creek" with
several tributaries, areas where the torrent carved out little
streambeds.
It's fun to have our own creek ... even if it's only for part of a day.
More photos: August
hailstorm.
Tags: nature
[
19:28 Aug 08, 2018
More nature |
permalink to this entry |
]
Sun, 29 Jul 2018
In my several recent articles about building Firefox from source,
I omitted one minor change I made, which will probably sound a bit silly.
A self-built Firefox thinks its name is "Nightly", so, for example,
the Help menu includes About Nightly.
Somehow I found that unreasonably irritating. It's not
a nightly build; in fact, I hope to build it as seldom as possible,
ideally only after a git pull when new versions are released.
Yet Firefox shows its name in quite a few places, so you're constantly
faced with that "Nightly". After all the work to build Firefox,
why put up with that?
To find where it was coming from,
I used my recursive grep alias which skips the obj- directory plus
things like object files and metadata. This is how I define it in my .zshrc
(obviously, not all of these clauses are necessary for this Firefox
search), and then how I called it to try to find instances of
"Nightly" in the source:
gr() {
  find . \( -type f -and -not -name '*.o' -and -not -name '*.so' -and -not -name '*.a' -and -not -name '*.pyc' -and -not -name '*.jpg' -and -not -name '*.JPG' -and -not -name '*.png' -and -not -name '*.xcf*' -and -not -name '*.gmo' -and -not -name '.intltool*' -and -not -name '*.po' -and -not -name 'po' -and -not -name '*.tar*' -and -not -name '*.zip' -or -name '.metadata' -or -name 'build' -or -name 'obj-*' -or -name '.git' -or -name '.svn' -prune \) -print0 | xargs -0 grep $* /dev/null
}

gr Nightly | grep -v '//' | grep -v '#' | grep -v isNightly  | grep test | grep -v task | fgrep -v .js | fgrep -v .cpp | grep -v mobile >grep.out
Even with all those exclusions, that still ends up printing
an enormous list. But it turns out all the important hits
are in the browser directory, so you can get away with
running it from there rather than from the top level.
I found a bunch of likely files that all had very similar
"Nightly" lines in them:
- browser/branding/nightly/branding.nsi
- browser/branding/nightly/configure.sh
- browser/branding/nightly/locales/en-US/brand.dtd
- browser/branding/nightly/locales/en-US/brand.ftl
- browser/branding/nightly/locales/en-US/brand.properties
- browser/branding/unofficial/configure.sh
- browser/branding/unofficial/locales/en-US/brand.dtd
- browser/branding/unofficial/locales/en-US/brand.properties
- browser/branding/unofficial/locales/en-US/brand.ftl
Since I didn't know which one was relevant, I changed each of them to
slightly different names, then rebuilt and checked to see which names
I actually saw while running the browser.
It turned out that
browser/branding/unofficial/locales/en-US/brand.dtd
is the file that controls the application name in the Help menu
and in Help->About -- though the title of the
About window is still "Nightly" and I haven't found what controls that.
branding/unofficial/locales/en-US/brand.ftl controls the
"Nightly" references in the Edit->Preferences window.
I don't know what all the others do.
There may be other instances of "Nightly" that appear elsewhere in the app,
the other files, but I haven't seen them yet.
Past Firefox building articles:
Building Firefox Quantum;
Building Firefox for ALSA (non PulseAudio) Sound;
Firefox Quantum: Fixing Ctrl W (or other key bindings).
Tags: firefox, web, build, programming
[
18:23 Jul 29, 2018
More tech/web |
permalink to this entry |
]
Mon, 23 Jul 2018
We've been in the depths of a desperate drought.
Last year's monsoon season never happened, and then the winter snow season
didn't happen either.
Dave and I aren't believers in tropical garden foliage that requires
a lot of water; but even piñons and junipers and other native
plants need some water.
You know it's bad when you find yourself carrying a watering can down
to the cholla and prickly pear to keep them alive.
This year, the Forest Service closed all the trails for about a month
-- too much risk of one careless cigarette-smoking hiker, or at least I think
that was the reason (they never really explained it) -- and most the other
trail agencies followed suit. But then in early July,
the forecasts started predicting the monsoon at last.
We got some cloudy afternoons, some humid days (what qualifies
as humid in New Mexico, anyway -- sometimes all the way up to 40%),
and the various agencies opened their trails again. Which came as
a surprise, because those clouds and muggy days didn't actually include
any significant rain. Apparently mere air humidity is enough to
mitigate a lot of the fire risk?
Tonight the skies finally let loose. When the thunder and lightning
started in earnest, a little after dinner, Dave and I went out to the
patio to soak in the suddenly cool and electric air and some spectacular
lightning bolts while watching the hummingbirds squabble over territory.
We could see rain to the southwest, toward Albuquerque, and more rain
to the east, toward the Sangres, but nothing where we were.
Then a sound began -- a distant humming/roaring, like the tires of a
big truck passing on the road. "Are we hearing rain approaching?" we both
asked at the same time. Since moving to New Mexico we're familiar with
being able to see rain a long way away; and of course everyone has
heard rain as it falls around them, either as a light pitter-patter
or the louder sound from a real storm; but we'd never been able to
hear the movement of a rainstorm as it gradually moved toward us.
Sure enough, the sound got louder and louder, almost unbearably loud
-- and then suddenly we were inundated with giant-sized drops, blowing
way in past the patio roof to where we were sitting.
I've heard of rain dances, and songs sung to bring the rain,
but I didn't know it could sing back.
We ran for the door, not soon enough.
But that was okay; we didn't mind getting drenched.
After a drought this long, water from the sky is cause only for celebration.
The squall dumped over a third of an inch in only a few minutes.
(This according to our shiny new weather station with a sensitive
tipping-bucket rain gauge that measures in hundredths of an inch.)
Then it eased up to a light drizzle for a while, the lightning moved
farther away, and we decided it was safe to run down the trail to
"La Cienega" (Spanish for swamp) at the bottom of the property and
see if any water had accumulated. Sure enough! Lake La Senda (our
humorous moniker for a couple of little puddles that sometimes persist
as long as a couple of days) was several inches deep. Across the road,
we could hear a canyon tree frog starting to sing his ratchety song --
almost more welcome than the sound of the rain itself.
As I type this, we're reading a touch over half an inch and we're
down to a light drizzle.
The thunder has receded but there's still plenty of lightning.
More rain! Keep it coming!
Tags: weather
[
20:38 Jul 23, 2018
More nature |
permalink to this entry |
]
Fri, 20 Jul 2018
Such a classic Linux story.
For a video I'll be showing during tonight's planetarium presentation
(Sextants,
Stars, and Satellites: Celestial Navigation Through the Ages, for
anyone in the Los Alamos area),
I wanted to get HDMI audio working from my laptop, running Debian Stretch.
I'd done that once before on this laptop
(HDMI
Presentation Setup Part I and
Part
II) so I had some instructions to follow; but while aplay -l
showed the HDMI audio device, aplay -D plughw:0,3
didn't play anything and alsamixer and alsamixergui
only showed two devices, not the long list of devices I was used to seeing.
Web searches related to Linux HDMI audio all pointed to pulseaudio,
which I don't use,
and I was having trouble finding anything for plain ALSA without pulse.
In the old days, removing pulseaudio used to be the cure
for practically every Linux audio problem. But I thought to myself,
It's been a couple years since I actually tried pulse, and people have
told me it's better now. And it would be a relief to have pulseaudio
working so things like Firefox would Just Work. Maybe I should try
installing it and see what happens.
So I ran an aptitude search pulseaudio to find the
package name I'd need to install. Imagine my surprise when it turned
out that it was already installed!
So I did some more web searching to find out how to talk to pulse and
figure out how to enable HDMI, or un-mute it, or whatever it was I needed.
But to no avail: everything I found was stuff like "In the Ubuntu
audio panel, do this". The few pages I found that listed commands
to run didn't help -- the commands all gave errors.
Running short on time,
I reverted to the old days: aptitude purge pulseaudio.
Rebooted to make sure the audio system was reset,
ran alsamixergui
and sure enough, there were all my normal devices, including the IEC958 device
for HDMI, which was indeed muted. I unmuted it, tried the video again --
and music blasted from my TV's speakers.
I'm sure there are machines where pulseaudio works. There are even
a few people who have audio setups complicated enough to need
something like pulseaudio. But in 2018, just as in 2006,
aptitude purge pulseaudio is the easiest solution
to a Linux sound problem.
Tags: linux, audio, pulseaudio, hdmi, speaking
[
14:17 Jul 20, 2018
More linux |
permalink to this entry |
]
Sun, 15 Jul 2018
or: How Sausage is Made
I'm a big fan of the League of Women Voters. Really.
State and local Leagues do amazing work. They publish and distribute
those non-partisan Voter Guides you've probably seen before each election.
They register new voters, and advocate for voting rights and better
polling access for everybody, including minorities and poor people.
They advocate on lots of other issues too, like redistricting,
transparency, the influence of money in politics, and health care.
I've only been involved with the League for a few years; although my
grandmother was active in her local League as far back as I can
remember, somehow it didn't occur to me to get involved until I moved
to a small town where it was more obvious what a difference the
local League made.
So, local and state Leagues are great.
But after returning from my second LWV national convention, I find
myself wondering how all this great work manages to come out of an
organization that has got to be the most undemocratic, conniving
political body I've ever been involved with.
I have separate write-ups of the
caucuses
and other program sessions I attended at this year's convention,
for other LWV members wanting to know what they missed. But the
Plenary sessions are where the national League's business is
conducted, and I felt I should speak publicly about how they're run.
In case there's any confusion, this article describes my personal
reactions to the convention's plenary sessions. I am speaking
only for myself, not for any state or local league.
The 2018 National Convention Plenary Sessions
I didn't record details of every motion;
check the Convention
2018 Daily Briefing if you care. (You might think there would be
a published official record of the business conducted at the
national convention; good luck on finding it.)
The theme of the convention, printed as a banner on many
pages of the convention handbook, was Creating a More Perfect
Democracy. It should have been: Democracy: For Everyone Else.
Friday Plenary
In case you're unfamiliar with the term (as I was), "Plenary" means
full or complete, from the Latin plenus, full. A plenary
session is a session of a conference which all members of all parties
are to attend. It doesn't seem to imply voting, though that's how
the LWVUS uses the term.
After the national anthem, the welcome by a designated local official, a
talk, an opening address, acceptance of various committee reports, and
so on, the tone of the convention was set with the adoption of the
convention rules.
A gentleman from the Oregon state League (LWVOR) proposed a motion
that would have required internal decisions to be able to be
questioned as part of convention business. This would include the
controversial new values statement. There had been discussion of the
values statement before the convention, establishing that many people
disagreed with it and wanted a vote.
LWVUS president Chris Carson wasn't having any of it.
First, she insisted, the correct parliamentary way to do this was
to vote to approve the rest of the rules, not including this one.
That passed easily. Then she stated that the motion on the table would
require a 2/3 vote, because it was an amendment to the rules which had
just passed. (Never mind that she had told us we were voting to pass
all the rules except that one).
The Oregon delegate who had made the motion protested that the first
paragraph of the convention rules on page 27 of the handbook clearly
stated that amendment of the rules only requires a simple majority.
Carson responded that would have been true before the
convention rules were adopted, but now that we'd voted to adopt them,
it now required a 2/3 vote to amend them due to some other rule
somewhere else, not in the handbook. She was adamant that the motion
could not now pass with a simple majority.
The Oregon delegate was incredulous.
"You mean that if I'd known you were going to do this, I should have
protested voting on adopting the rules before voting on the motion?"
The room erupted in unrest. Many people wanted to speak, but after
only a couple, Carson unilaterally cut off further discussion. But
then, after a lot of muttering with her Parliamentarian, she announced
that she would take a show-of-hands vote on whether to approve her
ruling requiring the 2/3 vote. She allowed only three people to speak
on that motion (the motion to accept her ruling) and then called the
question herself.
The vote was fairly close but was ruled to be in favor of her ruling,
meaning that the original motion would require a 2/3 vote. When we
finally voted on the original motion it looked roughly equal, not 2/3
in favor -- so the motion to allow debate on the values statement failed.
(We never did find out what this mysterious other rule was that
supposedly mandated the 2/3 vote. The national convention has an
official Parliamentarian sitting on the podium, as well as
parliamentary assistants sitting next to each microphone in the
audience, but somehow there's nobody who does much of a job of keeping
track of what's going on or can state the rules under which we're
operating. Several times during the three days of plenary, Carson and her
parliamentarian lost track of things, for instance, saying she'd hear
two pro and two con comments but actually calling three pro and one
con.)
I notice in the daily briefing, this whole fracas is summarized as,
"The motion was defeated by a hand vote."
Officer "Elections"
With the rules adopted by railroad,
we were next presented with the slate of candidates for national positions.
That sounds like an election but it's not.
During discussion of the previous motion, one national board member
speaking against the motion (or for Carson's 2/3 ruling, I can't
remember which) said "You elected us, so you should trust us."
That spawned some audience muttering, too.
See, in case there's any confusion, delegates at the convention do not
actually get to vote for candidates. We're presented with a complete
slate of candidates chosen by the nominating committee (for whom we
also do not vote), and the only option is to vote yes or no on the
whole slate "by acclamation".
There is one moment where it is possible to make a
nomination from the floor. If nominated, such a nominee has one minute
to make her case to the delegates before the final vote. Since there's
obviously no chance, there are seldom any floor nominees, and
on the rare occasion someone tries, they invariably lose.
Now, I understand that it's not easy getting volunteers for leadership
positions in nonprofit organizations. It's fairly common, in local
organizations, that you can't fill out all the available positions and
have to go begging for people to fill officer positions, so you'll
very often see a slate of officers proposed all at once. But in the
nationwide LWVUS? In the entire US, in the (hundreds of thousands? I
can't seem to find any membership figures, though I found a history
document that says there were 157,000 members in the 1960s) of LWV
members nationwide, there are not enough people interested in being a
national officer that there couldn't be a competitive election?
Really?
Though, admittedly ... after watching the sausage being made, I'm not
sure I'd want to be part of that.
Not Recommended Items
Of course, the slate of officers was approved. Then we moved on to
"Not Recommended Items". How that works: in the run-up to the
convention, local Leagues propose areas the National board should
focus on during the upcoming two years. The National board decides
what they care about, and marks the rest as as "Not recommended".
During the Friday plenary session, delegates can vote to reconsider
these items.
I knew that because I'd gone to
the Abolish
the Electoral College caucus the previous evening, and that was
the first of the not-recommended items proposed for consideration.
It turned out there were two similar motions: the "Abolish the
Electoral College" proposal and the "Support the National Popular Vote
Compact" proposal, two different approaches to eliminating the
electoral college. The NPV is achievable -- quite a few states have
already signed, totalling 172 electoral votes of the 270 that would be
needed to bring the compact into effect. The "Abolish" side, on the
other hand, would require a Constitutional amendment which would have
to be ratified even by states that currently have a big advantage due
to the electoral college. Not going to happen.)
Both proposals got enough votes to move on to consideration at
Saturday's plenary, though. Someone proposed that the two groups
merged their proposals, and met with the groups after the session,
but alas, we found out on Saturday that they never came to agreement.
One more proposal that won consideration was one to advocate for
implementation of the Equal Rights Amendment should it be ratified.
A nice sentiment that everyone agreed with, and harmless since it's
not likely to happen.
Friday morning "Transformation Journey" Presentation and Budget Discussion
I didn't take many notes on this, except during the
presentation of the new IT manager, who made noise about reduced
administrative burden for local Leagues and improving access to
data for Leagues at all levels. These are laudable goals and badly
needed, though he didn't go into any detail about how any of was going
to work. Since it was all vague high-level hand waving I won't bother
to write up my notes (ask me if you want to see them).
The only reason I have this section here is for the sharp-eyed person
who asked during the budget discussion, "What's this line item about
'mailing list rental?'"
Carson dismissed that worry -- Oh, don't worry, there are no members
on that list. That's just a list of donors who aren't members.
Say what?
People who donate to the LWVUS, if they aren't members,
get their names on a mailing list that the League then sells?
Way to treat your donors with respect.
I wish nonprofits would get a clue. There are so many charities that
I'd like to donate to if I could do so without resigning myself to
a flood of paper in my mailbox every day for the rest of my life.
If nonprofits had half a lick of sense, they would declare "We
will never give your contact info to anyone else", and offer "check
this box to be excluded even from our own pleas for money more than
once or twice a year." I'd be so much more willing to donate.
Saturday Plenary
The credentials committee reported:
delegates present represented 762 Leagues, with 867 voting delegates
from 49 states plus the District of Columbia. That's out of 1709
eligible voting delegates -- about half. Not surprising given the
expense of the convention. I'm told there have been proposals in past
years to change the rules to make it possible to vote without
attending convention, but no luck so far.
Consideration of not-recommended items:
the abolition of the electoral college failed.
Advocacy for the National Popular Vote Compact passed.
So the delegates agreed with me on which of the two is achievable.
Too bad the Electoral Abolition people weren't willing to compromise
and merge their proposal with the NPV one.
The ERA proposal passed overwhelmingly.
Rosie Rios, 43rd Treasurer of the US, gave a terrific talk on, among
other things, the visibility of women on currency, in public art
and in other public places, and what that means for girls growing up.
I say a little more about her talk in my
Caucus Summary.
We had been scheduled to go over the bylaws before Rios' talk, but
that plan had been revised because there was an immigration protest
(regarding the separation of children from parents) scheduled some
distance north of the venue, and a lot of delegates wanted to go.
So the revised plan, we'd been told Friday, was to have Rios' talk and
then adjourn and discuss the bylaws on Sunday.
Machinations
What actually happened: Carson asked for a show of hands of people who
wanted to go to the protest, which looked like maybe 60% of the room.
She dismissed those people with well wishes.
Then she looked over the people still in the room and said, "It looks
like we might still have a quorum. Let's count."
I have no idea what method they used to count the people sitting in
the room, or what count they arrived at: we weren't told, and none of
this is mentioned in the daily summary linked at the top of this article.
But somehow she decided we still had a quorum, and announced that we
would begin discussion of the bylaws.
The room erupted in angry murmurs -- she had clearly stated before
dismissing the other delegates that we were done for the day and
would not be discussing the bylaws until Sunday.
"It's appalling", one of our delegation, a first-timer, murmured.
Indeed.
But the plenary proceeded.
We voted to pass the first bylaws proposal, an uncontroversial one that
merely clarified some wording, and I'm sure the intent was to sneak
the second proposal through as well -- a vague proposal making it
easier to withdraw recognition from a state or local league --
but enough delegates remained who had actually read the proposals and
weren't willing to let it by without discussion.
On the other hand, the discussion didn't come to anything.
A rewording amendment that I'm told had been universally agreed to at
the Bylaws caucus the previous evening failed to go through because
too many of the people who understood the issue were away at the protest.
The amendment failed, so even though we ran out of time and had to
stop before voting on the proposal, the amended wording had already
failed and couldn't be reconsidered on Sunday when the discussion
was resumed.
(In case you're curious, this strategy is also how Pluto got demoted
from being a planet. The IAU did almost exactly the same thing as the
LWVUS, waiting until most of the voting members were out of the room
before presenting the proposal to a small minority of delegates.
Astronomers who were at the meeting but out of the room for the Pluto
vote have spoken out, saying the decision was a bad one and makes
little sense scientifically.)
Sunday Plenary
There's not much to say about Sunday. The bylaws proposal was still
controversial, especially since half the delegation never had the
chance to vote on the rewording proposal; the vote required a "card
vote", meaning rather than counting hands or voices, delegates passed
colored cards to the aisles to be counted. This was the only card vote
of the convention.
Accessibility note: I was surprised to note that the voting cards
were differentiated only by color; they didn't have anything
like "yes" or "no" printed on them. I wonder how many colorblind
delegates there were in that huge roomful of people who couldn't
tell the cards apart.
The rest of Sunday's voting was on relatively unimportant,
uncontroversial measures, ending with a bunch of
proclamations that don't actually change anything.
Those easily passed, rah, rah. We're against gun violence, for the
ERA, against the electoral college, for pricing carbon emissions, for
reproductive rights and privacy, and for climate change assessments
that align with scientific principles. Nobody proposed anything about
apple pie but I'm sure we would have been for that too.
And thus ended the conference and we all headed off to lunch or the
airport. Feeling frustrated, a bit dirtied and not exactly fired up
about Democracy.
Up:
LWV National Convention, June-July 2018, Chicago