Shallow Thoughts : : photo
Akkana's Musings on Open Source Computing and Technology, Science, and Nature.
Mon, 17 Jul 2023
![[Clouds and mesa shadows from Anderson Overlook]](https://shallowsky.com/blog/images/clouds/PXL_20230514_235319715T.jpg) While driving back down the hill after an appointment, I had to stop
at Anderson Overlook to snap a few photos of the clouds and their shadows
on the mesa.
While driving back down the hill after an appointment, I had to stop
at Anderson Overlook to snap a few photos of the clouds and their shadows
on the mesa.
In a Robert B. Parker novel I read many years ago, a character, musing
on the view from a rich guy's house, comments, "I hear that after a while,
it's just what you see out the window."
Dave and I make fun of that line all the time.
Maybe it's true in Boston, but in New Mexico, I never get tired of the
view and the endlessly changing light and shadow.
I know people who have lived here fifty years or more and still aren't
tired of it.
Tags: nature, photography
[
20:12 Jul 17, 2023
More photo |
permalink to this entry |
]
Tue, 15 Nov 2022
I've long been wanting an "action camera" to shoot mountain biking, and
maybe R/C plane, videos.
![[Akaso V50x on handlebars]](https://shallowsky.com/blog/images/bike-cameras/img_6173.jpg) Last week I ordered an Akaso V50x.
Everybody seems to agree that Akaso offers the best bang-for-the-buck, but
choosing among Akaso's large and varied collection of models isn't easy,
especially since there aren't many comparisons between the V50 line
and the Brave line. The V50x was well-liked by most reviewers,
and gets high praise for its digital stabilization ("6-axis", which
apparently means three axes of translation plus three gyro-driven
rotation axes).
Last week I ordered an Akaso V50x.
Everybody seems to agree that Akaso offers the best bang-for-the-buck, but
choosing among Akaso's large and varied collection of models isn't easy,
especially since there aren't many comparisons between the V50 line
and the Brave line. The V50x was well-liked by most reviewers,
and gets high praise for its digital stabilization ("6-axis", which
apparently means three axes of translation plus three gyro-driven
rotation axes).
I worried, though, that all the sample V50X videos I found on YouTube
were severely underexposed, and I had written it off my list until I
stumbled upon a review that listed all the V50x Settings options and I
learned it offers exposure compensation (which it calls "Exposure
value").
In the few days I've had the Akaso I've been fairly impressed.
The stabilization is indeed very good — if anything, it's
almost too good,
Read more ...
Tags: video, bike, MTB
[
17:46 Nov 15, 2022
More photo |
permalink to this entry |
]
Sun, 08 Jan 2017
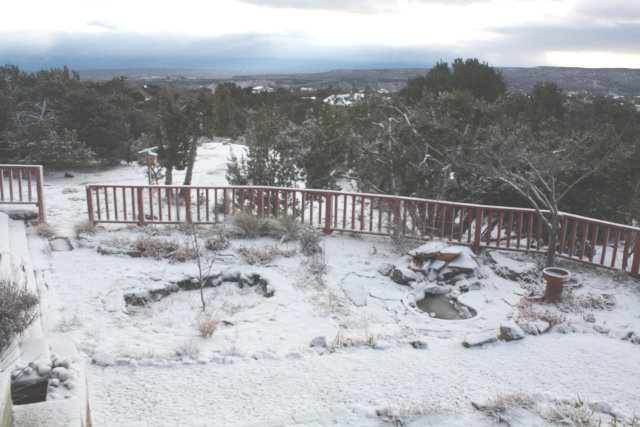
![[Snowy view of the Rio Grande from Overlook]](http://shallowsky.com/images/snow-lameelk/img_0856.jpg)
The snowy days here have been so pretty, the snow contrasting with the
darkness of the piñons and junipers and the black basalt.
The light fluffy crystals sparkle in a rainbow of colors when they
catch the sunlight at the right angle, but I've been unable to catch
that effect in a photo.
We've had some unusual holiday visitors, too, culminating in this
morning's visit from a huge bull elk.
![[bull elk in the yard]](http://shallowsky.com/images/snow-lameelk/bullelk.jpg) Dave came down to make coffee and saw the elk in the garden right next
to the window. But by the time I saw him, he was farther out in the
yard. And my DSLR batteries were dead, so I grabbed the point-and-shoot
and got what I could through the window.
Dave came down to make coffee and saw the elk in the garden right next
to the window. But by the time I saw him, he was farther out in the
yard. And my DSLR batteries were dead, so I grabbed the point-and-shoot
and got what I could through the window.
Fortunately for my photography the elk wasn't going anywhere in any hurry.
He has an injured leg, and was limping badly.
He slowly made his way down the hill and into the neighbors' yard.
I hope he returns. Even with a limp that bad, an elk that size
has no predators in White Rock, so as long as he stays off the nearby
San Ildefonso reservation (where hunting is allowed) and manages to
find enough food, he should be all right. I'm tempted to buy some
hay to leave out for him.
![[Sunset light on the Sangre de Cristos]](http://shallowsky.com/images/snow-lameelk/img_0851T.jpg) Some of the sunsets have been pretty nice, too.
Some of the sunsets have been pretty nice, too.
A few more photos.
Tags: nature, photography
[
19:48 Jan 08, 2017
More photo |
permalink to this entry |
]
Sun, 25 Dec 2016
Excellent Xmas to all!
We're having a white Xmas here..
Dave and I have been discussing how "Merry Christmas" isn't
alliterative like "Happy Holidays". We had trouble coming up with a
good C or K adjective to go with Christmas, but then we hit on the
answer: Have an Excellent Xmas! It also has the advantage of
inclusivity: not everyone celebrates the birth of Christ, but Xmas is
a secular holiday of lights, family and gifts, open to people of all
belief systems.
 Meanwhile:
I spent a couple of nights recently learning how to photograph Xmas
lights and farolitos.
Meanwhile:
I spent a couple of nights recently learning how to photograph Xmas
lights and farolitos.
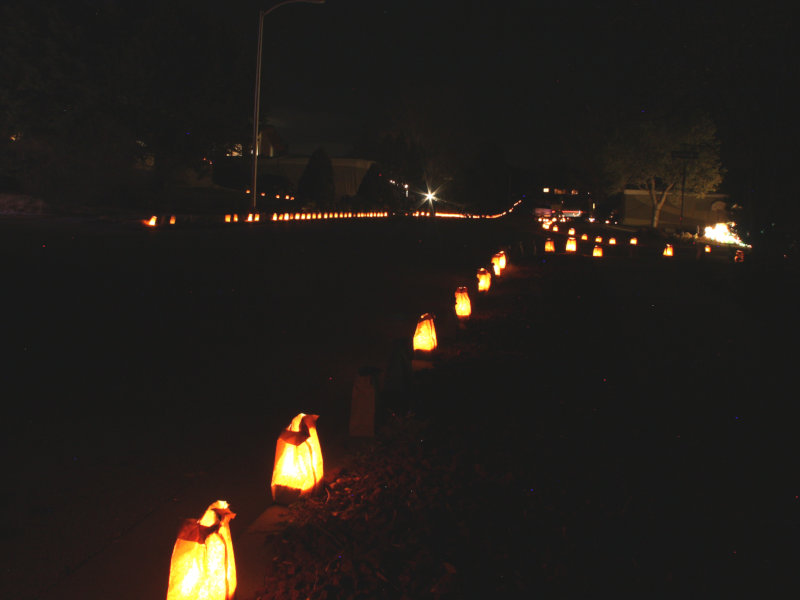
Farolitos, a New Mexico Christmas tradition, are paper bags, weighted
down with sand, with a candle inside. Sounds modest, but put a row of
them alongside a roadway or along the top of a typical New Mexican
adobe or faux-dobe and you have a beautiful display of lights.
They're also known as luminarias in southern New Mexico, but
Northern New Mexicans insist that a luminaria is a bonfire, and the
little paper bag lanterns should be called farolitos.
They're pretty, whatever you call them.
Locally, residents of several streets in Los Alamos and White Rock set
out farolitos along their roadsides for a few nights around Christmas,
and the county cooperates by turning off streetlights on those
streets. The display on Los Pueblos in Los Alamos is a zoo, a slow
exhaust-choked parade of cars that reminds me of the Griffith Park
light show in LA. But here in White Rock the farolito displays are
a lot less crowded, and this year I wanted to try photographing them.
Canon bugs affecting night photography
I have a little past experience with night photography. I went through
a brief astrophotography phase in my teens (in the pre-digital phase,
so I was using film and occasionally glass plates). But I haven't done
much night photography for years.
That's partly because I've had problems taking night shots with my
current digital SLRcamera, a Rebel Xsi (known outside the US as a
Canon 450d). It's old and modest as DSLRs go, but I've resisted
upgrading since I don't really need more features.
Except maybe when it comes to night photography. I've tried shooting
star trails, lightning shots and other nocturnal time exposures, and
keep hitting a snag: the camera refuses to take a photo. I'll be in
Manual mode, with my aperture and shutter speed set, with the lens in
Manual Focus mode with Image Stabilization turned off. Plug in the
remote shutter release, push the button ... and nothing happens except
a lot of motorized lens whirring noises. Which shouldn't be happening
-- in MF and non-IS mode the lens should be just sitting there intert,
not whirring its motors. I couldn't seem to find a way to convince it
that the MF switch meant that, yes, I wanted to focus manually.
It seemed to be primarily a problem with the EF-S 18-55mm kit lens;
the camera will usually condescend to take a night photo with my other
two lenses. I wondered if the MF switch might be broken, but then I
noticed that in some modes the camera explicitly told me I was in
manual focus mode.
I was almost to the point of ordering another lens just for night
shots when I finally hit upon the right search terms and found,
if not the reason it's happening, at least an excellent workaround.
Back Button Focus
I'm so sad that I went so many years without knowing about Back Button Focus.
It's well hidden in the menus, under Custom Functions #10.
Normally, the shutter button does a bunch of things. When you press it
halfway, the camera both autofocuses (sadly, even in manual focus mode)
and calculates exposure settings.
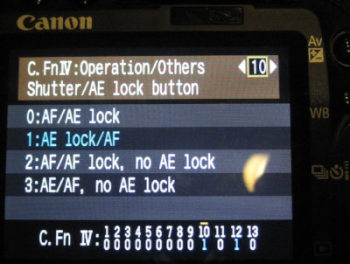 But there's a custom function that lets you separate the focus and
exposure calculations. In the Custom Functions menu option #10
(the number and exact text will be different on different Canon models,
but apparently most or all Canon DSLRs have this somewhere),
the heading says: Shutter/AE Lock Button.
Following that is a list of four obscure-looking options:
But there's a custom function that lets you separate the focus and
exposure calculations. In the Custom Functions menu option #10
(the number and exact text will be different on different Canon models,
but apparently most or all Canon DSLRs have this somewhere),
the heading says: Shutter/AE Lock Button.
Following that is a list of four obscure-looking options:
- AF/AE lock
- AE lock/AF
- AF/AF lock, no AE lock
- AE/AF, no AE lock
The text before the slash indicates what the shutter button, pressed
halfway, will do in that mode; the text after the slash is what
happens when you press the * or AE lock button on the
upper right of the camera back (the same button you use to zoom out
when reviewing pictures on the LCD screen).
The first option is the default: press the shutter button halfway to
activate autofocus; the AE lock button calculates and locks exposure settings.
The second option is the revelation: pressing the shutter button halfway
will calculate exposure settings, but does nothing for focus. To focus,
press the * or AE button, after which focus will be locked. Pressing
the shutter button won't refocus. This mode is called "Back button focus"
all over the web, but not in the manual.
Back button focus is useful in all sorts of cases.
For instance, if you want to autofocus once then keep the same focus
for subsequent shots, it gives you a way of doing that.
It also solves my night focus problem: even with the bug (whether it's
in the lens or the camera) that the lens tries to autofocus even in
manual focus mode, in this mode, pressing the shutter won't trigger that.
The camera assumes it's in focus and goes ahead and takes the picture.
Incidentally, the other two modes in that menu apply to AI SERVO mode
when you're letting the focus change constantly as it follows a moving
subject. The third mode makes the * button lock focus and stop
adjusting it; the fourth lets you toggle focus-adjusting on and off.
Live View Focusing
There's one other thing that's crucial for night shots: live view
focusing. Since you can't use autofocus in low light, you have to do
the focusing yourself. But most DSLR's focusing screens aren't good
enough that you can look through the viewfinder and get a reliable
focus on a star or even a string of holiday lights or farolitos.
Instead, press the SET button (the one in the middle of the
right/left/up/down buttons) to activate Live View (you may have to
enable it in the menus first). The mirror locks up and a preview of
what the camera is seeing appears on the LCD. Use the zoom button (the
one to the right of that */AE lock button) to zoom in; there are two
levels of zoom in addition to the un-zoomed view. You can use the
right/left/up/down buttons to control which part of the field the
zoomed view will show. Zoom all the way in (two clicks of the +
button) to fine-tune your manual focus. Press SET again to exit
live view.
It's not as good as a fine-grained focusing screen, but at least
it gets you close. Consider using relatively small apertures, like f/8,
since it will give you more latitude for focus errors. Yyou'll be
doing time exposures on a tripod anyway, so a narrow aperture just
means your exposures have to be a little longer than they otherwise
would have been.
After all that, my Xmas Eve farolitos photos turned out mediocre.
We had a storm blowing in, so a lot of the candles had blown out.
(In the photo below you can see how the light string on the left
is blurred, because the tree was blowing around so much during the
30-second exposure.)
But I had fun, and maybe I'll go out and try again tonight.

An excellent X-mas to you all!
Tags: photography
[
12:30 Dec 25, 2016
More photo |
permalink to this entry |
]
Tue, 03 Feb 2015
![[Roof glacier as it slides off the roof]](http://shallowsky.com/blog/images/snow/img_1899.jpg) A few days ago, I wrote about
the snowpack we
get on the roof during snowstorms:
A few days ago, I wrote about
the snowpack we
get on the roof during snowstorms:
It doesn't just sit there until it gets warm enough to melt and run
off as water. Instead, the whole mass of snow moves together,
gradually, down the metal roof, like a glacier.
When it gets to the edge, it still doesn't fall; it somehow stays
intact, curling over and inward, until the mass is too great and it
loses cohesion and a clump falls with a Clunk!
The day after I posted that, I had a chance to see what happens as the
snow sheet slides off a roof if it doesn't have a long distance
to fall. It folds gracefully and gradually, like a sheet.
![[Underside of a roof glacier]](http://shallowsky.com/blog/images/snow/img_1901.jpg)
![[Underside of a roof glacier]](http://shallowsky.com/blog/images/snow/img_1887.jpg) The underside as they slide off the roof is pretty interesting, too,
with varied shapes and patterns in addition to the imprinted pattern
of the roof.
The underside as they slide off the roof is pretty interesting, too,
with varied shapes and patterns in addition to the imprinted pattern
of the roof.
But does it really move like a glacier? I decided to set up a camera
and film it on the move. I set the Rebel on a tripod with an AC power
adaptor, pointed it out the window at a section of roof with a good
snow load, plugged in the intervalometer I bought last summer, located
the manual to re-learn how to program it, and set it for a 30-second
interval. I ran that way for a bit over an hour -- long enough that
one section of ice had detached and fallen and a new section was
starting to slide down. Then I moved to another window and shot a series
of the same section of snow from underneath, with a 40-second interval.
I uploaded the photos to my workstation and verified that they'd
captured what I wanted. But when I stitched them into a movie, the
way I'd used for my
time-lapse
clouds last summer, it went way too fast -- the movie was over in
just a few seconds and you couldn't see what it was doing. Evidently
a 30-second interval is far too slow for the motion of a roof glacier
on a day in the mid-thirties.
But surely that's solvable in software? There must be a way to get avconv
to make duplicates of each frame, if I don't mind that the movie come
out slightly jump. I read through the avconv manual, but it wasn't
very clear about this. After a lot of fiddling and googling and help
from a more expert friend, I ended up with this:
avconv -r 3 -start_number 8252 -i 'img_%04d.jpg' -vcodec libx264 -r 30 timelapse.mp4
In avconv, -r specifies a frame rate for the next file, input or
output, that will be specified. So -r 3 specifies the
frame rate for the set of input images, -i 'img_%04d.jpg';
and then the later -r 30 overrides that 3 and sets a new
frame rate for the output file, -timelapse.mp4. The start
number is because the first file in my sequence is named img_8252.jpg.
30, I'm told, is a reasonable frame rate for movies intended to be watched
on typical 60FPS monitors; 3 is a number I adjusted until the glacier in
the movie moved at what seemed like a good speed.
The movies came out quite interesting! The main movie, from the top,
is the most interesting; the one from the underside is shorter.
I wish I had a time-lapse of that folded sheet I showed above ...
but that happened overnight on the night after I made the movies.
By the next morning there wasn't enough left to be worth setting up
another time-lapse. But maybe one of these years I'll have a chance to
catch a sheet-folding roof glacier.
Tags: photography, time-lapse, glacier, snow
[
19:46 Feb 03, 2015
More photo |
permalink to this entry |
]
Thu, 08 Jan 2015
A recent
Slashdot
discussion on image tagging and organization a while back
got me thinking about putting image tags inside each image,
in its metadata.
Currently, I use my MetaPho
image tagger to update a file named Tags in the same directory as
the images I'm tagging. Then I have a script called
fotogr
that searches for combinations of tags in these Tags files.
That works fine. But I have occasionally wondered if I
should also be saving tags inside the images themselves, in case I
ever want compatibility with other programs. I decided I should at
least figure out how that would work, in case I want to add it to
MetaPho.
I thought it would be simple -- add some sort of key in the images's
EXIF tags. But no -- EXIF has no provision for tags or keywords.
But JPEG (and some other formats) supports lots of tags besides EXIF.
Was it one of the XMP tags?
Web searching only increased my confusion; it seems that there is
no standard for this, but there have been lots of pseudo-standards
over the years. It's not clear what tag most programs read, but my
impression is that the most common is the
"Keywords" IPTC tag.
Okay. So how would I read or change that from a Python program?
Lots of Python libraries can read EXIF tags, including Python's own
PIL library -- I even wrote a few years ago about
reading
EXIF from PIL. But writing it is another story.
Nearly everybody points to pyexiv2,
a fairly mature library that even has a well-written
pyexiv2 tutorial.
Great! The only problem with it is that the pyexiv2 front page has a big
red Deprecation warning saying that it's being replaced by GExiv2.
With a link that goes to a nonexistent page; and Debian doesn't seem
to have a package for GExiv2, nor could I find a tutorial on it anywhere.
Sigh. I have to say that pyexiv2 sounds like a much better bet for now
even if it is supposedly deprecated.
Following the tutorial, I was able to whip up a little proof of concept
that can look for an IPTC Keywords tag in an existing image, print out
its value, add new tags to it and write it back to the file.
import sys
import pyexiv2

if len(sys.argv) < 2:
    print "Usage:", sys.argv[0], "imagename.jpg [tag ...]"
    sys.exit(1)

metadata = pyexiv2.ImageMetadata(sys.argv[1])
metadata.read()

newkeywords = sys.argv[2:]

keyword_tag = 'Iptc.Application2.Keywords'
if keyword_tag in metadata.iptc_keys:
    tag = metadata[keyword_tag]
    oldkeywords = tag.value
    print "Existing keywords:", oldkeywords
    if not newkeywords:
        sys.exit(0)
    for newkey in newkeywords:
        oldkeywords.append(newkey)
    tag.value = oldkeywords
else:
    print "No IPTC keywords set yet"
    if not newkeywords:
        sys.exit(0)
    metadata[keyword_tag] = pyexiv2.IptcTag(keyword_tag, newkeywords)

tag = metadata[keyword_tag]
print "New keywords:", tag.value

metadata.write()
Does that mean I'm immediately adding it to MetaPho? No. To be honest,
I'm not sure I care very much, since I don't have any other software
that uses that IPTC field and no other MetaPho user has ever asked for it.
But it's nice to know that if I ever have a reason to add it, I can.
Tags: tagging, metapho, programming, python
[
10:28 Jan 08, 2015
More photo |
permalink to this entry |
]
Thu, 02 Oct 2014
![[double rainbow]](http://shallowsky.com/doublerainbow/img_9703.jpg)
The wonderful summer thunderstorm season here seems to have died down.
But while it lasted, we had some spectacular double rainbows.
And I kept feeling frustrated when I took the SLR outside only to find
that my 18-55mm kit lens was nowhere near wide enough to capture it.
I could try
stitching
it together as a panorama, but panoramas of rainbows turn out to
be quite difficult -- there are no clean edges in the photo to tell
you where to join one image to the next, and automated programs like
Hugin won't even try.
There are plenty of other beautiful vistas here too -- cloudscapes,
mesas, stars. Clearly, it was time to invest in a wide-angle lens. But
how wide would it need to be to capture a double rainbow?
All over the web you can find out that a rainbow has a radius of 42
degrees, so you need a lens that covers 84 degrees to get the whole thing.
But what about a double rainbow? My web searches came to naught.
Lots of pages talk about double rainbows, but Google wasn't finding
anything that would tell me the angle.
I eventually gave up on the web and went to my physical bookshelf,
where Color and Light in Nature gave me a nice table
of primary and secondary rainbow angles of various wavelengths of light.
It turns out that 42 degrees everybody quotes is for light of 600 nm
wavelength, a blue-green or cyan color. At that wavelength, the
primary angle is 42.0° and the secondary angle is 51.0°.
Armed with that information, I went back to Google and searched for
double rainbow 51 OR 102 angle and found a nice Slate
article on a
Double
rainbow and lightning photo. The photo in the article, while
lovely (lightning and a double rainbow in the South Dakota badlands),
only shows a tiny piece of the rainbow, not the whole one I'm hoping
to capture; but the article does mention the 51-degree angle.
Okay, so 51°×2 captures both bows in cyan light.
But what about other wavelengths?
A typical eye can see from about 400 nm (deep purple)
to about 760 nm (deep red). From the table in the book:
| Wavelength | Primary | Secondary
|
|---|
| 400 | 40.5° | 53.7°
|
| 600 | 42.0° | 51.0°
|
| 700 | 42.4° | 50.3°
|
Notice that while the primary angles get smaller with shorter
wavelengths, the secondary angles go the other way. That makes sense
if you remember that the outer rainbow has its colors reversed from
the inner one: red is on the outside of the primary bow, but the
inside of the secondary one.
So if I want to photograph a complete double rainbow in one shot,
I need a lens that can cover at least 108 degrees.
What focal length lens does that translate to?
Howard's
Astronomical Adventures has a nice focal length calculator.
If I look up my Rebel XSi on Wikipedia to find out that other
countries call it a 450D, and plug that in to the calculator, then
try various focal lengths (the calculator offers a chart but it didn't
work for me), it turns out that I need an 8mm lens, which will give me
an 108° 26‘ 46" field of view -- just about right.
![[Double rainbow with the Rokinon 8mm fisheye]](http://shallowsky.com/doublerainbow/img_6492-640.jpg) So that's what I ordered -- a Rokinon 8mm fisheye. And it turns out to
be far wider than I need -- apparently the actual field of view in
fisheyes varies widely from lens to lens, and this one claims to have
a 180° field. So the focal length calculator isn't all that useful.
At any rate, this lens is plenty wide enough to capture those double
rainbows, as you can see.
So that's what I ordered -- a Rokinon 8mm fisheye. And it turns out to
be far wider than I need -- apparently the actual field of view in
fisheyes varies widely from lens to lens, and this one claims to have
a 180° field. So the focal length calculator isn't all that useful.
At any rate, this lens is plenty wide enough to capture those double
rainbows, as you can see.
About those books
By the way, that book I linked to earlier is apparently out of print
and has become ridiculously expensive. Another excellent book on
atmospheric phenomena is
Light
and Color in the Outdoors by Marcel Minnaert
(I actually have his earlier version, titled
The
Nature of Light and Color in the Open Air). Minnaert doesn't
give the useful table of frequencies and angles, but he has lots
of other fun and useful information on rainbows and related phenomena,
including detailed instructions for making rainbows indoors if you
want to measure angles or other quantities yourself.
Tags: nature, photography, rainbow
[
13:37 Oct 02, 2014
More photo |
permalink to this entry |
]
Fri, 15 Aug 2014
![[Time-lapse clouds movie on youtube]](https://i.ytimg.com/vi/JgQ4RQTvMuI/mqdefault.jpg) A few weeks ago I wrote about building a simple
Arduino-driven
camera intervalometer to take repeat photos with my DSLR.
I'd been entertained by watching the clouds build and gather and dissipate
again while I stepped through all the false positives in my
crittercam,
and I wanted to try capturing them intentionally so I could make cloud
movies.
A few weeks ago I wrote about building a simple
Arduino-driven
camera intervalometer to take repeat photos with my DSLR.
I'd been entertained by watching the clouds build and gather and dissipate
again while I stepped through all the false positives in my
crittercam,
and I wanted to try capturing them intentionally so I could make cloud
movies.
Of course, you don't have to build an Arduino device.
A search for timer remote control or intervalometer
will find lots of good options around $20-30. I bought one
so I'll have a nice LCD interface rather than having to program an
Arduino every time I want to make movies.
Setting the image size
Okay, so you've set up your camera on a tripod with the intervalometer
hooked to it. (Depending on how long your movie is, you may also want
an external power supply for your camera.)
Now think about what size images you want.
If you're targeting YouTube, you probably want to use one of
YouTube's
preferred settings, bitrates and resolutions, perhaps 1280x720 or
1920x1080. But you may have some other reason to shoot at higher resolution:
perhaps you want to use some of the still images as well as making video.
For my first test, I shot at the full resolution of the camera.
So I had a directory full of big ten-megapixel photos with
filenames ranging from img_6624.jpg to img_6715.jpg.
I copied these into a new directory, so I didn't overwrite the originals.
You can use ImageMagick's mogrify to scale them all:
mogrify -scale 1280x720 *.jpg
I had an additional issue, though: rain was threatening and I didn't
want to leave my camera at risk of getting wet while I went dinner shopping,
so I moved the camera back under the patio roof. But with my fisheye lens,
that meant I had a lot of extra house showing and I wanted to crop
that off. I used GIMP on one image to determine the x, y, width and height
for the crop rectangle I wanted.
You can even crop to a different aspect ratio from your target,
and then fill the extra space with black:
mogrify img_6624.jpg -crop 2720x1450+135+315 -scale 1280 -gravity center -background black -extent 1280x720 *.jpg
If you decide to rescale your images to an unusual size, make sure
both dimensions are even, otherwise avconv will complain that
they're not divisible by two.
Finally: Making your movie
I found lots of pages explaining how to stitch
together time-lapse movies using mencoder, and a few
using ffmpeg. Unfortunately, in Debian, both are deprecated.
Mplayer has been removed entirely.
The ffmpeg-vs-avconv issue is apparently a big political war, and
I have no position on the matter, except that Debian has come down
strongly on the side of avconv and I get tired of getting nagged at
every time I run a program. So I needed to figure out how to use avconv.
I found some pages on avconv, but most of them didn't actually work.
Here's what worked for me:
avconv -f image2 -r 15 -start_number 6624 -i 'img_%04d.jpg' -vcodec libx264 time-lapse.mp4
Update: I don't know where that -f image2 came from -- ignore it.
And avconv can take an input and an output frame rate; they're
both specified with -r, and the only way input and output are
distinguished is their position in the command line. So a more
appropriate command might be something like this:
avconv -r 15 -start_number 6624 -i 'img_%04d.jpg' -vcodec libx264 -r 30 time-lapse.mp4
using 30 as a good output frame rate for people viewing on 60fps monitors.
Adjust the input frame rate, the -r 15, as needed to control the speed
of your time-lapse video.
Adjust the start_number and filename appropriately for the files you have.
Avconv produces an mp4 file suitable for uploading to youtube.
So here is my little test movie:
Time Lapse Clouds.
Tags: photography, time-lapse
[
12:05 Aug 15, 2014
More photo |
permalink to this entry |
]
![[Clouds and mesa shadows from Anderson Overlook]](https://shallowsky.com/blog/images/clouds/PXL_20230514_235319715.jpg) While driving back down the hill after an appointment, I had to stop
at Anderson Overlook to snap a few photos of the clouds and their shadows
on the mesa.
While driving back down the hill after an appointment, I had to stop
at Anderson Overlook to snap a few photos of the clouds and their shadows
on the mesa.
![[Snowy view of the Rio Grande from Overlook]](http://shallowsky.com/images/snow-lameelk/?pic=img_0856.jpg)
![[bull elk in the yard]](http://shallowsky.com/images/snow-lameelk/?pix=bullelk.jpg)
![[Underside of a roof glacier]](http://shallowsky.com/blog/images/snow/img_1910.jpg)


![[Double rainbow with the Rokinon 8mm fisheye]](http://shallowsky.com/doublerainbow/?pic=img_6492.jpg)