I'm not sure where they got that idea; more science-leaning resources, like
Universe Today
and
Science Alert,
say 2024 is an "off" year for the Leonids,
with an expected Zenithal Hourly Rate (ZHR) of 15-20 meteors per hour
even with ideal conditions, which we don'e have because of an
almost-full moon.
I'm sorry, but I have no eclipse photos to share. I messed that up.
But I did get to see totality.
For the April 8, 2024 eclipse, Dave and I committed early to Texas.
Seemed like that was where the best long-range forecasts were.
In the last week before the eclipse, the forecasts were no longer
looking so good. But I've heard so many stories of people driving around
trying to chase holes in the clouds, only to be skunked,
while people who stayed put got a better view.
We decided to stick with our plan, which was to stay in San Angelo
(some 190 miles off the centerline) the night before,
get up fairly early and drive to somewhere near the centerline.
The path for the Oct 14, 2023 annular eclipse passed right over my house.
What luck!
We'd driven a few hours to see the
last annular eclipse,
in 2012, from Red Bluff, CA.
The opportunity to see one from home, without needing to drive anywhere,
was not to be missed.
The Tau Herculids come from periodic Comet 73P/Schwassmann-Wachmann, which
in 1995, began to break up, creating lots of debris scattered across
its orbit. It's hard to know exactly where the fragments ended up ...
but comet experts like Don Machholz think there's a good chance
that we'll be passing through an unusually dense clump of particles
when we cross 73P's orbit this year.
I'm not a big meteor watcher — I find most meteor showers
distinctly underwhelming. But in November 2001 (I think that's the right year),
I was lucky enough to view the Leonid meteor storm from
Fremont Peak, near San Juan Bautista, CA.
A couple of years ago, Dave and I acquired an H-alpha solar scope.
Neither of us had been much of a solar observer.
We'd only had white-light filters: filters you put over the
front of a regular telescope to block out most of the sun's light
so you can see sunspots.
H-alpha filters are a whole different beast:
you can see prominences, those huge arcs of fire that reach out into
space for tens of thousands of miles, many times the size of the Earth.
And you can also see all sorts of interesting flares and granulation
on the surface of the sun, something only barely hinted at in
white-light images.
I have another PEEC Planetarium talk coming up in a few weeks,
a talk on the
summer solstice
co-presenting with Chick Keller on Fri, Jun 18 at 7pm MDT.
I'm letting Chick do most of the talking about archaeoastronomy
since he knows a lot more about it than I do, while I'll be talking
about the celestial dynamics -- what is a solstice, what is the sun
doing in our sky and why would you care, and some weirdnesses relating
to sunrise and sunset times and the length of the day.
And of course I'll be talking about the analemma, because
just try to stop me talking about analemmas whenever the topic
of the sun's motion comes up.
But besides the analemma, I need a lot of graphics of the earth
showing the terminator, the dividing line between day and night.
Monday was the last night it's been clear enough to see Comet Neowise.
I shot some photos with the Rebel, but I haven't quite figured out
the alignment and stacking needed for decent astrophotos, so I don't
have much to show. I can't even see the ion tail.
The interesting thing about Monday besides just getting to see
the comet was the never-ending train of satellites.
Comet C/2020 F3 NEOWISE continues to improve, and as of Tuesday night
it has moved into the evening sky (while also still being visible in
the morning for a few more days).
I caught it Tuesday night at 9:30 pm. The sky was still a bit bright,
and although the comet was easy in binoculars, it was a struggle to see
it with the unaided eye. However, over the next fifteen minutes the sky
darkened, and it looked pretty good by 9:50, considering the partly
cloudy sky. I didn't attempt a photograph; this photo is from Sunday morning,
in twilight and with a bright moon.
I've learned not to get excited when I read about a new comet. They're
so often a disappointment. That goes double for comets in the morning
sky: I need a darned good reason to get up before dawn.
But the chatter among astronomers about the current comet, C2020 F3
NEOWISE, has been different. So when I found myself awake at 4 am,
I grabbed some binoculars and went out on the deck to look.
And I was glad I did. NEOWISE is by far the best comet I've seen
since Hale-Bopp. Which is not to say it's in Hale-Bopp's class --
certainly not. But it's easily visible to the unaided eye, with a
substantial several-degree-long tail. Even in dawn twilight. Even
with a bright moon. It's beautiful!
Update: the morning after I wrote that,
I did
get a photo,
though it's not nearly as good as Dbot3000's that's shown here.
When I was in grade school -- probably some time around 7th grade -- I
happened upon an article in Scientific American about the Anasazi Sun
Dagger on Fajada
Butte in Chaco Canyon. On the solstices and equinoxes, a thin
dagger of light is positioned just right so that it moves across a
spiral that's carved into the rock.
I was captivated. What an amazing sight it must be, I thought.
I wondered if ordinary people were allowed to go see it.
Well, by the time I was old enough to do my own traveling, the answer
was pretty much no. Too many people were visiting Fajada Butte ...
Galen Gisler, our master of Planetarium Tricks,
presented something strange and cool in his planetarium show last Friday.
He'd been looking for a way to visualize
the "Venus Pentagram", a regularity where Venus'
inferior conjunctions -- the point where Venus is approximately
between Earth and the Sun -- follow a cycle of five.
If you plot the conjunction positions, you'll see a pentagram,
and the sixth conjunction will be almost (but not quite) in the
same place where the first one was.
Supposedly many ancient civilizations supposedly knew about this
pattern, though as Galen noted (and I'd also noticed when researching
my Stonehenge talk), the evidence is sometimes spotty.
Galen's latest trick: he moved the planetarium's observer location
up above the Earth's north ecliptic pole. Then he told the planetarium to
looked back at the Earth and lock the observer's position so it
moves along with the Earth; then he let the planets move in fast-forward,
leaving trails so their motions were plotted.
The result was fascinating to watch. You could see the Venus pentagram
easily as it made its five loops toward Earth, and the loops of all
the other planets as their distance from Earth changed over the course
of both Earth's orbits and theirs.
You can see the patterns they make at right, with the Venus pentagram
marked (click on the image for a larger version).
Venus' orbit is white, Mercury is yellow, Mars is red.
If you're wondering why Venus' orbit seems to go inside Mercury's,
remember: this is a geocentric model, so it's plotting distance from
Earth, and Venus gets both closer to and farther from Earth than Mercury does.
He said he'd shown this to the high school astronomy club and their
reaction was, "My, this is complicated." Indeed.
It gives insight into what a difficult problem geocentric astronomers
had in trying to model planetary motion, with their epicycles and
other corrections.
Of course that made me want one of my own. It's neat to watch it in
the planetarium, but you can't do that every day.
So: Python, Gtk/Cairo, and PyEphem. It's pretty simple, really.
The goal is to plot planet positions as viewed from high
above the north ecliptic pole: so for each time step, for each planet,
compute its right ascension and distance (declination doesn't matter)
and convert that to rectangular coordinates. Then draw a colored line
from the planet's last X, Y position to the new one. Save all the
coordinates in case the window needs to redraw.
At first I tried using Skyfield, the Python library which is supposed
to replace PyEphem (written by the same author). But Skyfield, while
it's probably more accurate, is much harder to use than PyEphem.
It uses SPICE kernels
(my blog post
on SPICE, some SPICE
examples and notes), which means there's no clear documentation or
list of which kernels cover what. I tried the kernels mentioned in the
Skyfield documentation, and after running for a while the program
died with an error saying its model for Jupiter in the de421.bsp kernel
wasn't good beyond 2471184.5 (October 9 2053).
Rather than spend half a day searching for other SPICE kernels,
I gave up on Skyfield and rewrote the program to use PyEphem,
which worked beautifully and amazed me with how much faster it was: I
had to rewrite my GTK code to use a timer just to slow it down to
where I could see the orbits as they developed!
It's fun to watch; maybe not quite as spacey as Galen's full-dome view
in the planetarium, but a lot more convenient.
You need Python 3, PyEphem and the usual GTK3 introspection modules;
on Debian-based systems I think the python3-gi-cairo package
will pull in most of them as dependencies.
I'm jazzed about this show. I think it'll be the most fun
planetarium show we've given so far.
We'll be showing a variety of lunarfeatures:
maria, craters, mountains, rilles, domes, catenae and more.
For each one, we'll discuss what the feature actually is and how it
was created, where to see good examples on the moon,
and -- the important part -- where you can go on Earth,
and specifically in the Western US,
to see a similar feature up close.
Plus: a short flyover of some of the major features using the
full-dome planetarium. Some features, like Tycho, the
Straight Wall, Reiner Gamma, plus lots of rilles, look really great
in the planetarium.
If you can't get to the moon yourself,
this is the next best thing!
The Hitchhiker's Guide to the Moon:
7pm at the PEEC nature center. Admission is free.
Come find out how to explore the moon without leaving your home planet!
The Mercury transit is over. But we learned some interesting things.
I'd seen Mercury transits before, but this is the first time we had an
H-alpha scope (a little 50mm Coronado PST) in addition to a white light
filter (I had my 102mm refractor set up with the Orion white-light filter).
As egress approached, Dave was viewing in the H-alpha while I was on
the white light scope. When I saw the black-drop effect at third
contact, Mercury was still nowhere near the edge in the H-alpha:
the H-alpha shows more of the solar atmosphere so the sun's image
is noticably bigger.
This was the point when we realized that we should have expected this
and been timing and recording. Alas, it was too late.
Mercury was roughly 60% out in the white light filter -- just past the
point where the "bite" it made in the limb of the sun -- by the time
Dave called out third contact. We guessed it was roughly a minute,
but that could be way off.
For fourth contact, Dave counted roughly 45 seconds between when I
couldn't see Mercury any more and when he lost track of it. This is
pretty rough, because it was windy, seeing was terrible and there
was at least a 15-second slop when I wasn't sure if I could any
indentation in the limb; I'm sure it was at least as hard in the
Coronado, which was running at much lower magnification.
So we had a chance to do interesting science and we flubbed it.
And the next chance isn't til 2032; who knows if we'll still be
actively observing then.
I wanted to at least correlate those two numbers: 45 seconds and
60% of a Mercury radius.
Mercury is about 10" (arcseconds) right now. That was easy to find.
But how fast does it move? I couldn't find anything about that,
searching for terms like mercury transit angular speed OR velocity.
I tried to calculate it with PyEphem but got a number that was orders of
magnitude off. Maybe I'll figure it out for a later article, but I wanted
to get this posted quickly.
I didn't spend much time trying photography. I got a couple afocal snaps with
my pocket digital camera through the white-light scope that worked out pretty well.
I wasn't sure that would work for the Coronado: the image is fairly dim.
The snaps I did get show Mercury, though none of the interesting detail
like faculae and the one tiny prominence that was visible. But the
interesting thing is the color. To the eye, the H-alpha scope image is
a slightly orangy red, but in the digital camera it came out a
startling purplish pink. This may be due to the digital camera's filters
passing some IR, confusing the algorithms that decide how to shift the color.
Of course, I could have adjusted the color in GIMP back to the real color,
but I thought it was more interesting to leave it the hue it came out
of the camera. (I did boost contrast and run an unsharp mask filter, to
make it easier to see Mercury.)
Anyway, fun and unexpectedly edifying! I wish we had another transit
happening sooner than 2032.
Mercury Transit 2006, photo by Brocken Inaglory
Next Monday, November 11, is a transit of Mercury across the sun.
Mercury transits aren't super rare -- not once- or twice-in-a-lifetime
events like
Venus
transits -- but they're not that common, either.
The last Mercury transit was in 2016; the next one won't happen til 2032.
This year's transit isn't ideal for US observers. The transit will
already be well underway by the time the sun rises, at least in the
western US. Here in New Mexico (Mountain time), the sun rises with
Mercury transiting, and the transit lasts until 11:04 MST.
Everybody else, check
timeanddate's
Mercury Transit page for your local times.
Mercury is small, unfortunately, so it's not an easy thing to see
without magnification. Of course, you know that
you should never look at the sun without an adequate filter.
But even if you have safe "eclipse glasses", it may be tough to
spot Mercury's small disk against the surface of the sun.
One option is to take some binoculars and use them to project an image.
Point the big end of the binoculars at the sun, and the small end at
a white surface, preferably leaning so it's perpendicular to the sun.
I don't know if binocular projection will give a big enough image
to show Mercury, so a very smooth and white background, tilted so
it's perpendicular to the sun, will help.
(Don't be tempted to stick eclipse glasses in front of a
binocular or telescope and look through the eyepiece! Stick to
projection unless you have filters specifically intended for
telescopes or binoculars.)
Of course, a telescope with a safe solar filter is the best way to see a
transit. If you're in the Los Alamos area, I hear the Pajarito
Astronomers are planning to set up telescopes at Overlook Park.
They don't seem to have announced it in any of the papers yet, but
I see it listed on the
Pajarito Astronomers
website.
There's also an event planned at the high school where the students
will be trying to time Mercury's passage, but I don't know if
that's open to the public. Elsewhere in the world, check with your local
astronomy club for Mercury transit parties: I'm sure most clubs have
something planned.
I was discussing the transit with a couple of local astronomers earlier
this week, and one of them related it to the search for exoplanets.
One of the main methods of detecting exoplanets is to measure the dimming
of a star's light as a planet crosses its face.
For instance, in
55 Cancri e,
you can see a dimming as the planet crosses the star's face, and a
much more subtle dimming when the planet disappears behind the star.
As Mercury crosses the Sun's face, it blocks some of the sun's light
in the same way. By how much?
The radius of Mercury is 0.0035068 solar radii, and the dimming is
proportional to area so it should be 0.00350682, or
0.0000123, a 0.00123% dimming. Not very much!
But it looks like in the 55 Cancri e case, they're detecting dips
of around .001% -- it seems amazing that you could detect a planet
as small as Mercury this way (and certainly the planet is much bigger
in the case of 55 Cancri e) ... but maybe it's possible.
Anyway, it's fun to think about exoplanets as you watch tiny Mercury
make its way across the face of the Sun.
Wherever you are, I hope you get a chance to look!
Every time the media invents a new moon term -- super blood black wolf
moon, or whatever -- I roll my eyes.
First, this ridiculous "supermoon" thing is basically undetectable to
the human eye. Here's an image showing the relative sizes of the absolute
closest and farthest moons. It's easy enough to tell when you see the
biggest and smallest moons side by side, but when it's half a degree
in the sky, there's no way you'd notice that one was bigger or smaller
than average.
And then, talking about the ridiculous moon name phenom with some
friends, I realized I could play this game too.
So I spent twenty minutes whipping up my own
Silly Moon Name Generator.
It's super simple -- it just uses Linux' built-in dictionary, with no sense
of which words are common, or adjectives or nouns or what.
Of course it would be funnier with a hand-picked set of words,
but there's a limit to how much time I want to waste on this.
You can add a parameter ?nwords=5 (or whatever number)
if you want more or fewer words than four.
How Does It Work?
Random phrase generators like this are a great project for someone
just getting started with Python.
Python is so good at string manipulation that it makes this sort
of thing easy: it only takes half a page of code to do something fun.
So it's a great beginner project that most people would probably find
more rewarding than cranking out Fibonacci numbers (assuming you're not a
Fibonacci
geek like I am).
For more advanced programmers, random phrase generation can still be a
fun and educational project -- skip to the end of this article for ideas.
For the basics, this is all you need: I've added comments explaining
the code.
import random


def hypermoon(filename, nwords=4):
    '''Return a silly moon name with nwords words,
       each taken from a word list in the given filename.
    '''
    fp = open(filename)
    lines = fp.readlines()

    # A list to store the words to describe the moon:
    words = []
    for i in range(nwords):    # This will be run nwords times
        # Pick a random number between 0 and the number of lines in the file:
        whichline = random.randint(0, len(lines))

        # readlines() includes whitespace like newline characters.
        # Use whichline to pull one line from the file, and use
        # strip() to remove any extra whitespace:
        word = lines[whichline].strip()

        # Append it to our word list:
        words.append(word)

    # The last word in the phrase will be "moon", e.g.
    # super blood wolf black pancreas moon
    words.append("moon")

    # ' '.join(list) combines all the words with spaces between them
    return ' '.join(words)


# This is called when the program runs:
if __name__ == '__main__':
    random.seed()

    print(hypermoon('/usr/share/dict/words', 4))
A More Compact Format
In that code example,
I expanded everything to try to make it clear for beginning programmers.
In practice, Python lets you be a lot more terse, so the way
I actually wrote it was more like:
def hypermoon(filename, nwords=4):
    with open(filename, encoding='utf-8') as fp:
        lines = fp.readlines()

    words = [ lines[random.randint(0, len(lines))].strip()
              for i in range(nwords) ]
    words.append('moon')
    return ' '.join(words)
There are three important differences (in bold):
Opening a file using "with" ensures the file will be closed properly
when you're done with it. That's not important in this tiny example, but
it's a good habit to get into.
I specify the 'utf-8' encoding when I open the file because when I
ran it as a web app, it turned out the web server used the ASCII
encoding and I got Python errors because there are accented characters
in the dictionary somewhere. That's one of those Python annoyances
you get used to when going beyond the beginner level.
The way I define words all in one line (well, it's conceptually
one long line, though I split it into two so each line stays under 72
characters) is called a list comprehension. It's a nice compact
alternative to defining an empty list [] and then
calling append() a bunch of times, like I did in the
first example.
Initially they might seem harder to read, but list comprehensions can
actually make code clearer once you get used to them.
A Python Driven Web Page
Finally, to make it work as a web page, I added the CGI module.
That isn't really a beginner thing so I won't paste it here,
but you can see the CGI version at
hypermoon.py
on GitHub.
I should mention that there's some debate over CGI in Python.
The movers and shakers in the Python community don't approve of CGI,
and there's a plan to remove it from upcoming Python versions.
The alternative is to use technologies like Flask or Django.
while I'm a fan of Flask and have used it for several projects,
it's way overkill for something like this, mostly because of all
the special web server configuration it requires (and Django is
far more heavyweight than Flask). In any case,
be aware that the CGI module may be removed from Python's standard
library in the near future. With any luck, python-cgi will still be
available via pip install or as Linux distro packages.
More Advanced Programmers: Making it Funnier
I mentioned earlier that I thought the app would be a lot funnier with
a handpicked set of words. I did that long, long ago with my
Star Party
Observing Report Generator (written in Perl; I hadn't yet
started using Python back in 2001). That's easy and fun if you
have the time to spare, or a lot of friends contributing.
You could instead use words taken from a set of input documents.
For instance, only use words that appear in Shakespeare's plays, or
in company mission statements, or in Wikipedia articles about dog breeds
(this involves some web scraping, but Python is good at that too;
I like
BeautifulSoup).
Or you could let users contribute their own ideas for good words to use,
storing the user suggestions in a database.
Another way to make the words seem more appropriate and less random
might be to use one of the many natural language packages for Python,
such as NLTK, the Natural Language Toolkit. That way, you could
control how often you used adjectives vs. nouns, and avoid using verbs
or articles at all.
Random word generators seem like a silly and trivial programming
exercise -- because they are! But they're also a fun starting
point for more advanced explorations with Python.
Dave and I will be presenting a free program on Stonehenge at the Los
Alamos Nature Center tomorrow, June 14.
The nature center has a list of programs people have asked for, and
Stonehenge came up as a topic in our quarterly meeting half a year ago.
Remembering my seventh grade fascination
with Stonehenge and its astronomical alignments -- I discovered
Stonehenge Decoded at the local library, and built a desktop
model showing the stones and their alignments -- I volunteered.
But after some further reading, I realized that not all of those
alignments are all they're cracked up to be and that there might not
be much of astronomical interest to talk about, and I un-volunteered.
But after thinking about it for a bit, I realized that "not all
they're cracked up to be" makes an interesting topic in itself.
So in the next round of planning, I re-volunteered; the result is
tomorrow night's presentation.
The talk will include a lot of history of Stonehenge and its construction,
and a review of some other important or amusing henges around the world.
But this article is on the astronomy, or lack thereof.
The Background: Stonehenge Decoded
Stonehenge famously aligns with the summer solstice sunrise, and
that's when tens of thousands of people flock to Salisbury, UK to
see the event. (I'm told that the rest of the time, the monument is
fenced off so you can't get very close to it, though I've never had
the opportunity to visit.)
Curiously, archaeological evidence suggests that the summer solstice
wasn't the big time for prehistorical gatherings at Stonehenge; the
time when it was most heavily used was the winter solstice, when there's
a less obvious alignment in the other direction. But never mind that.
In 1963, Gerald Hawkins wrote an article in Nature, which he
followed up two years later with a book entitled Stonehenge Decoded.
Hawkins had access to an IBM 7090, capable of a then-impressive
100 Kflops (thousand floating point operations per second; compare
a Raspberry Pi 3 at about 190 Mflops, or about a hundred Gflops for
something like an Intel i5). It cost $2.9 million (nearly $20 million
in today's dollars).
Using the 7090, Hawkins mapped the positions of all of Stonehenge's
major stones, then looked for interesting alignments with the sun and moon.
He found quite a few of them.
(Hawkins and Fred Hoyle also had a theory about the fifty-six Aubrey
holes being a lunar eclipse predictor, which captured my seventh-grade
imagination but which most researchers today think was more likely
just a coincidence.)
But I got to thinking ... Hawkins mapped at least 38 stones if you
don't count the Aubrey holes. If you take 38 randomly distributed points,
what are the chances that you'll find interesting astronomical alignments?
A Modern Re-Creation of Hawkins' Work
Programmers today have it a lot easier than Hawkins did.
We have languages like Python, with libraries like PyEphem to handle
the astronomical calculations.
And it doesn't hurt that our computers are about a million times faster.
Anyway, my script,
skyalignments.py
takes a GPX file containing a list of geographic coordinates and compares
those points to sunrise and sunset at the equinoxes and solstices,
as well as the full moonrise and moonset nearest the solstice or equinox.
It can find alignments among all the points in the GPX file, or from a
specified "observer" point to each point in the file. It allows a slop
of a few degrees, 2 degrees by default; this is about four times the
diameter of the sun or moon, but a half-step from your observing
position can make a bigger difference than that. I don't know how
much slop Hawkins used; I'd love to see his code.
My first thought was, what if you stand on a mountain peak and look
around you at other mountain peaks? (It's easy to get GPS coordinates
for peaks; if you can't find them online you can click on them on a map.)
So I plotted the major peaks in the Jemez and Sangre de Cristo mountains
that I figured were all mutually visible. It came to 22 points; about
half what Hawkins was working with.
Yikes! Way too many. What if I cut it down? So I tried eliminating all
but the really obvious ones, the ones you really notice from across
the valley. The most prominent 11 peaks: 5 in the Jemez, 6 in the Sangres.
That was a little more manageable. Now I was down to only 22 alignments.
Now, I'm pretty sure that the Ancient Ones -- or aliens -- didn't lay
out the Jemez and Sangre de Cristo mountains to align with the rising
and setting sun and moon. No, what this tells us is that pretty much any
distribution of points will give you a bunch of astronomical alignments.
And that's just the sun and moon, all Hawkins was considering. If you
look for writing on astronomical alignments in ancient monuments,
you'll find all people claiming to have found alignments with all
sorts of other rising and setting bodies, like Sirius and
Orion's belt. Imagine how many alignments I could have found if I'd
included the hundred brightest stars.
So I'm not convinced.
Certainly Stonehenge's solstice alignment looks real; I'm not disputing that.
And there are lots of other archaeoastronomy sites that are even
more convincing, like the Chaco sun dagger. But I've also seen plenty of
web pages, and plenty of talks, where someone maps out a collection of
points at an ancient site and uses alignments among them as proof that
it was an ancient observatory. I suspect most of those alignments are more
evidence of random chance and wishful thinking than archeoastronomy.
Someone asked me about my Javascript
Jupiter code, and whether it used PyEphem. It doesn't, of course,
because it's Javascript, not Python (I wish there was something
as easy as PyEphem for Javascript!); instead it uses code from the book
Astronomical Formulae for Calculators by Jean Meeus.
(His better known Astronomical Algorithms, intended for
computers rather than calculators, is actually harder to use for
programming because Astronomical Algorithms is written
for BASIC and the algorithms are relatively hard to translate into other
languages, whereas Astronomical Formulae for Calculators concentrates
on explaining the algorithms clearly, so you can punch them into a
calculator by hand, and this ends up making it fairly easy to
implement them in a modern computer language as well.)
Anyway, the person asking also mentioned JPL's page
HORIZONS Ephemerides
page, which I've certainly found useful at times.
Years ago, I tried emailing the site maintainer asking if they might
consider releasing the code as open source; it seemed like a
reasonable request, given that it came from a government agency
and didn't involve anything secret. But I never got an answer.
But going to that page today, I find that code is now available!
What's available is a massive toolkit called SPICE
(it's all in capitals but there's no indication what it might stand for.
It comes from NAIF, which is NASA's Navigation and Ancillary
Information Facility).
SPICE allows for accurate calculations of all sorts of solar system
quantities, from the basic solar system bodies like planets to
all of NASA's active and historical public missions.
It has bindings for quite a few languages, including C.
The official list doesn't include Python, but there's a third-party Python
wrapper called SpiceyPy
that works fine.
The tricky part of programming with SPICE is that most of the code is
hidden away in "kernels" that are specific to the objects and quantities
you're calculating. For any given program you'll probably need to
download at least four "kernels", maybe more. That wouldn't be a
problem except that there's not much help for figuring out which
kernels you need and then finding them. There are lots of SPICE
examples online but few of them tell you which kernels they need,
let alone where to find them.
After wrestling with some of the examples, I learned some tricks for
finding kernels, at least enough to get the basic examples working.
I've collected what I've learned so far into a new GitHub repository:
NAIF SPICE Examples.
The README there explains what I know so far about getting kernels;
as I learn more, I'll update it.
SPICE isn't easy to use, but it's probably much more accurate than
simpler code like PyEphem or my Meeus-based Javascript code, and it
can calculate so many more objects. It's definitely something
worth knowing about for anyone doing solar system simulations.
Dave and I are giving a planetarium show at PEEC tonight on the analemma.
I've been interested in the analemma for years and have
written about it before,
here on the blog
and in the SJAA Ephemeris.
But there were a lot of things I still didn't understand as well as
I liked. When we signed up three months ago to give this talk, I had
plenty of lead time to do more investigating, uncovering lots of
interesting details regarding the analemmas of other planets,
the contributions of the two factors that go into the Equation of Time,
why some analemmas are figure-8s while some aren't,
and the supposed "moon analemmas" that have appeared on the
Astronomy Picture
of the Day. I added some new features to the analemma script I'd
written years ago as well as corresponding with an expert who'd written
some great Equation of Time code for all the planets. It's been fun.
I'll write about some of what I learned when I get a chance, but
meanwhile, people in the Los Alamos area can hear all about it
tonight, at our PEEC show:
The Analemma Dilemma,
7 pm tonight, Friday Feb 23, at the Nature Center,
admission $6/adult, $4/child.
My first total eclipse! The suspense had been building for years.
Dave and I were in Wyoming. We'd made a hotel reservation nine months
ago, by which time we were already too late to book a room in the zone
of totality and settled for Laramie, a few hours' drive from the centerline.
For visual observing, I had my little portable 80mm refractor. But
photography was more complicated. I'd promised myself that for my
first (and possibly only) total eclipse, I wasn't going to miss the
experience because I was spending too much time fiddling with cameras.
But I couldn't talk myself into not trying any photography at all.
Initially, my plan was to use my
90mm Mak
as a 500mm camera lens. It had worked okay for the
the 2012 Venus transit.
I spent several weeks before the eclipse in a flurry of creation,
making a couple of
solar finders,
a barn-door
mount, and then wrestling with motorizing the barn-door (which was
a failure because I couldn't find a place to buy decent gears for the motor.
I'm still working on that and will eventually write it up).
I wrote up a plan: what equipment I would use when, a series of
progressive exposures for totality, and so forth.
And then, a couple of days before we were due to leave, I figured I
should test my rig -- and discovered that it was basically impossible
to focus on the sun. For the Venus transit, the sun wasn't that high
in the sky, so I focused through the viewfinder. But for the total
eclipse, the sun would be almost overhead, and the viewfinder nearly
impossible to see. So I had planned to point the Mak at a distant
hillside, focus it, then slip the filter on and point it up to the sun.
It turned out the focal point was completely different through the filter.
With only a couple of days left to go, I revised my plan.
The Mak is difficult to focus under any circumstances. I decided
not to use it, and to stick to my Canon 55-250mm zoom telephoto,
with the camera on a normal tripod. I'd skip the partial eclipse
(I've photographed those before anyway) and concentrate on
getting a few shots of the diamond ring and the corona, running
through a range of exposures without needing to look at the camera
screen or do any refocusing. And since I wasn't going to be usinga
telescope, my nifty solar finders wouldn't work; I designed a new
one out of popsicle sticks to fit in the camera's hot shoe.
Getting there
We stayed with relatives in Colorado Saturday night, then drove to
Laramie Sunday. I'd heard horror stories of hotels canceling people's
longstanding eclipse reservations, but fortunately our hotel honored
our reservation. WHEW! Monday morning, we left the hotel at 6am in
case we hit terrible traffic. There was already plenty of traffic on
the highway north to Casper, but we turned east hoping for fewer crowds.
A roadsign sign said "NO PARKING ON HIGHWAY." They'd better not try
to enforce that in the totality zone!
When we got to I-25 it was moving and, oddly enough, not particularly
crowded. Glendo Reservoir had looked on the map like a nice spot on
the centerline ... but it was also a state park, so there was a risk
that everyone else would want to go there. Sure enough: although
traffic was moving on I-25 at Wheatland, a few miles north the freeway
came to a screeching halt. We backtracked and headed east toward Guernsey,
where several highways went north toward the centerline.
East of Glendo, there were crowds at every highway pullout and rest
stop. As we turned onto 270 and started north, I kept an eye on
OsmAnd on my phone, where I'd loaded
a GPX file of the eclipse path. When we were within a mile of the
centerline, we stopped at a likely looking pullout. It was maybe 9 am.
A cool wind was blowing -- very pleasant since we were expecting a hot
day -- and we got acquainted with our fellow eclipse watchers as we
waited for first contact.
Our pullout was also the beginning of a driveway to a farmhouse we could
see in the distance. Periodically people pulled up, looking lost,
checked maps or GPS, then headed down the road to the farm. Apparently
the owners had advertised it as an eclipse spot -- pay $35, and you
can see the eclipse and have access to a restroom too! But apparently
the old farmhouse's plumbing failed early on, and some of the people
who'd paid came out to the road to watch with us since we had better
equipment set up.
There's not much to say about the partial eclipse. We all traded views
-- there were five or six scopes at our pullout, including a nice
little H-alpha scope. I snapped an occasional photo through the 80mm
with my pocket camera held to the eyepiece, or with the DSLR through
an eyepiece projection adapter. Oddly, the DSLR photos came out worse
than the pocket cam ones. I guess I should try and debug that at some point.
Shortly before totality, I set up the DSLR on the tripod, focused on a
distant hillside and taped the focus with duct tape, plugged in the
shutter remote, checked the settings in Manual mode, then set the
camera to Program mode and AEB (auto exposure bracketing). I put the
lens cap back on and pointed the camera toward the sun using the
popsicle-stick solar finder. I also set a countdown timer, so I could
press START when totality began and it would beep to warn me when it was
time to the sun to come back out. It was getting chilly by then, with
the sun down to a sliver, and we put on sweaters.
The pair of eclipse veterans at our pullout had told everybody to
watch for the moon's shadow racing toward us across the hills from the
west. But I didn't see the racing shadow, nor any shadow bands.
And then Venus and Mercury appeared and the sun went away.
Totality
One thing the photos don't prepare you for is the color of the sky. I
expected it would look like twilight, maybe a little darker; but it
was an eerie, beautiful medium slate blue. With that unworldly
solar corona in the middle of it, and Venus gleaming as bright as
you've ever seen it, and Mercury shining bright on the other side.
There weren't many stars.
We didn't see birds doing anything unusual; as far as I can tell,
there are no birds in this part of Wyoming. But the cows did all
get in a line and start walking somewhere. Or so Dave tells me.
I wasn't looking at the cows.
Amazingly, I remembered to start my timer and to pull off the DSLR's
lens cap as I pushed the shutter button for the diamond-ring shots
without taking my eyes off the spectacle high above. I turned the
camera off and back on (to cancel AEB), switched to M mode, and
snapped a photo while I scuttled over to the telescope, pulled the
filter off and took a look at the corona in the wide-field eyepiece.
So beautiful! Binoculars, telescope, naked eye -- I don't know which
view was best.
I went through my exposure sequence on the camera, turning the dial a
couple of clicks each time without looking at the settings, keeping my
eyes on the sky or the telescope eyepiece. But at some point I happened
to glance at the viewfinder -- and discovered that the sun was drifting
out of the frame. Adjusting the tripod to get it back in the frame
took longer than I wanted, but I got it there and got my eyes
back on the sun as I snapped another photo ...
and my timer beeped.
I must have set it wrong! It couldn't possibly have been two
and a half minutes. It had been 30, 45 seconds tops.
But I nudged the telescope away from the sun, and looked back up -- to
another diamond ring. Totality really was ending and it was time to
stop looking.
Getting Out
The trip back to Golden, where we were staying with a relative, was
hellish. We packed up immediately after totality -- we figured we'd
seen partials before, and maybe everybody else would stay. No such luck.
By the time we got all the equipment packed there was already a steady
stream of cars heading south on 270.
A few miles north of Guernsey the traffic came to a stop. This was to
be the theme of the afternoon. Every small town in Wyoming has a stop sign
or signal, and that caused backups for miles in both directions.
We headed east, away from Denver, to take rural roads down through
eastern Wyoming and Colorado rather than I-25, but even so,
we hit small-town stop sign backups every five or ten miles.
We'd brought the Rav4 partly for this reason. I kept my eyes glued on
OsmAnd and we took dirt roads when we could, skirting the paved
highways -- but mostly there weren't any dirt roads going where we
needed to go. It took about 7 hours to get back to Golden, about twice
as long as it should have taken. And we should probably count
ourselves lucky -- I've heard from other people who took 11 hours to
get to Denver via other routes.
Lessons Learned
Dave is fond of the quote,
"No battle plan survives contact with the enemy"
(which turns out to be from Prussian military strategist
Helmuth
von Moltke the Elder).
The enemy, in this case, isn't the eclipse; it's time.
Two and a half minutes sounds like a lot, but it goes by like nothing.
Even in my drastically scaled-down plan, I had intended exposures from
1/2000 to 2 seconds (at f/5.6 and ISO 400). In practice, I only made
it to 1/320 because of fiddling with the tripod.
And that's okay. I'm thrilled with the photos I got, and definitely
wouldn't have traded any eyeball time for more photos. I'm more annoyed
that the tripod fiddling time made me miss a little bit of extra looking.
My script actually worked out better than I expected, and I was very
glad I'd done the preparation I had. The script was reasonable, the
solar finders worked really well, and the lens was even in focus
for the totality shots.
Then there's the eclipse itself.
I've read so many articles about solar eclipses as a mystical,
religious experience. It wasn't, for me. It was just an eerily
beautiful, other-worldly spectacle: that ring of cold fire staring
down from the slate blue sky, bright planets but no stars, everything
strange, like nothing I'd ever seen. Photos don't get across what it's
like to be standing there under that weird thing in the sky.
I'm not going to drop everything to become a globe-trotting eclipse
chaser ... but I sure hope I get to see another one some day.
While I was testing various attempts at motorizing my barn-door mount,
trying to get it to track the sun, I had to repeatedly find the sun
in my telescope.
In the past, I've generally used the shadow of the telescope combined
with the shadow of the finderscope. That works, more or less, but it's
not ideal: it doesn't work as well with just a telescope with no finder,
which includes both of the scopes I'm planning to take to the eclipse;
and it requires fairly level ground under the telescope: it doesn't
work if there are bushes or benches in the way of the shadow.
For the eclipse, I don't want to waste any time finding the sun:
I want everything as efficient as possible. I decided to make a little
solar finderscope. One complication, though: since I don't do solar
observing very often, I didn't want to use tape, glue or, worse, drill
holes to mount it.
So I wanted something that could be pressed against the telescope and
held there with straps or rubber bands, coming off again without
leaving a mark. A length of an angled metal from my scrap pile
seemed like a good size to be able to align itself against a small
telescope tube.
Then I needed front and rear sights. For the front sight, I wanted a
little circle that could project a bulls-eye shadow onto a paper card
attached to the rear sight. I looked at the hardware store for small
eye-bolts, but no dice. Apparently they don't come that small.I
settled for the second-smallest size of screw eye.
The screw eye, alas, is meant to screw into wood, not metal. So I
cut a short strip of wood a reasonable size to nestle into the inside
of the angle-iron. (That ripsaw Dave bought last year sure does come
in handy sometimes.) I drilled some appropriately sized holes and
fastened screw eyes on both ends, adding a couple of rubber grommets
as spacers because the screw eyes were a little too long and I didn't
want the pointy ends of the screws getting near my telescope tube.
I added some masking tape on the sides of the angle iron so it wouldn't
rub off the paint on the telescope tube, then bolted a piece of
cardboard cut from an old business card to the rear screw eye.
Voila! A rubber-band-attached solar sight that took about an hour to make.
Notice how the shadow of the front sight exactly fits around the rear
sight: you line up the shadow with the rear sight to point the scope.
It seems to work pretty well, and it should be adaptable to any
telescope I use.
I used a wing nut to attach the rear cardboard: that makes it easy to
replace it or remove it. With the cardboard removed,
the sight might even work for night-time astronomy viewing. That is,
it does work, as long as there's enough ambient light to see the rings.
Hmm... maybe I should paint the rings with glow-in-the-dark paint.
Update: I have an even simpler design that works perfectly on a camera
with a hot shoe, and almost as well on a telescope, pictured here:
Camera solar finder made from popsicle sticks.
I've been meaning forever to try making a "barn door" tracking mount.
Used mainly for long-exposure wide-field astrophotography, the barn door
mount, invented in 1975, is basically two pieces of wood with a hinge.
The bottom board mounts on a tripod and is pointed toward the North Star;
"opening" the hinge causes the top board to follow the motion of the
sky, like an equatorial telescope mount. A threaded rod and a nut
control the angle of the "door", and you turn the nut manually every
so often. Of course, you can also drive it with a motor.
We're off to view the eclipse in a couple of weeks.
Since it's my first total eclipse, my plan is to de-emphasize
photography: especially during totality, I want to experience the
eclipse, not miss it because my eyes are glued to cameras and timers
and other equipment. But I still want to take photos every so often.
Constantly adjusting a tripod to keep the sun in frame is another
hassle that might keep my attention away from the eclipse. But real
equatorial mounts are heavy and a time consuming to set up;
since I don't know how crowded the area will be, I wasn't
planning to take one. Maybe a barn door would solve that problem.
Perhaps more useful, it would mean that my sun photos would all be
rotated approximately the right amount, in case I wanted to make an
animation. I've taken photos of lunar and partial solar eclipses, but
stringing them together into an animation turned out to be too much
hassle because of the need to rotate and position each image.
I've known about barn-door mounts since I was a kid, and I knew the
basic theory, but I'd never paid much attention to the details. When I
searched the web, it sounded complicated -- it turned out there are
many types that require completely different construction techniques.
The best place to start (I found out after wasting a lot of time on
other sites) is the
Wikipedia
article on "Barn door tracker", which gives a wonderfully clear
overview, with photos, of the various types. I had originally been
planning a simple tangent or isosceles type; but when I read
construction articles, it seemed that those seemingly simple types
might not be so simple to build: the angle between the threaded rod
and the boards is always changing, so you need some kind of a pivot.
Designing the pivot looked tricky. Meanwhile, the pages I found on
curved-rod mounts all insisted that bending the rod was easy, no
trouble at all. I decided to try a curved-rod mount first.
The crucial parts are a "piano hinge", a long hinge that eliminates
the need to line up two or more hinges, and the threaded rod.
Buying a piano hinge in the right size proved impossible locally,
but the folks at Metzger's assured me that piano hinges can be cut,
so I bought one longer than I needed and cut it to size.
I used a 1/4-20 rod, which meant (per the discussions in the Cloudy
Nights discussion linked above) that a 11.43-inch radius from the
hinge to the holes the rod passes through would call for the nut to
turn at a nice round number of 1 RPM.
I was suspicious of the whole "it's easy to bend the threaded rod ina
11.43-inch circle" theory, but it turned out to be true. Draw the
circle you want on a sheet of newspaper, put on some heavy gloves
and start bending, frequently comparing your rod to the circle you drew.
You can fine-tune the curvature later.
I cut my boards, attached the hinge, measured about 11.4" and drilled
a hole for the threaded rod. The hole needed to be a bit bigger than
5/8" to let the curved rod pass through without rubbing. Attach the
curved rod to the top wood piece with a couple of nuts and some
washers, and then you can fine-tune the rod's curvature, opening and
closing the hinge and re-bending the rod a little in any place it rubs.
A 5/8" captive nut on the top piece lets you attach a tripod head
which will hold your camera or telescope. A 1/4" captive nut on the
bottom piece serves to attach the mount to a tripod -- you need a
1/4", not 3/8": the rig needs to mount on a tripod head, not just the
legs, so you can align the hinge to the North Star. (Of course, you
could build a wedge or your own set of legs, if you prefer.) The 3/4"
plywood I was using turned out to be thicker than the captive nuts, so
I had to sand the wood thinner in both places. Maybe using half-inch
plywood would have been better.
The final piece is the knob/nut you'll turn to make the mount track.
I couldn't find a good 1/4" knob for under $15.
A lot of people make a wood circle and mount the nut in
the center, or use a gear so a motor can drive the mount. I looked
around at things like jam-jar lids and the pile of metal gears and
sprinkler handles in my welding junkpile, but I didn't see anything
that looked quite right, so I decided to try a wing nut just for
testing, and worry about the knob later. Turns out a wing nut works
wonderfully; there's no particular need for anything else if you're
driving your barn-door manually.
Testing time! I can't see Polaris from my deck, and I was too lazy to
set up anywhere else, so I used a protractor to set the hinge angle to
roughly 36° (my latitude), then pointed it approximately north.
I screwed my Pro-Optic 90mm Maksutov (the scope I plan to use for
my eclipse photos) onto the ball head and pointed it at the moon
as soon as it rose. With a low power eyepiece (20x), turning the wing
nut kept the moon more or less centered in the field for the next
half-hour, until clouds covered the moon and rain began threatening.
I didn't keep track of how many turns I was making, since I knew the
weather wasn't going to allow a long session, and right now I'm not
targeting long-exposure photography, just an easy way of keeping an
object in view.
A good initial test! My web searches, and the discovery of all
those different types of barn-door mounts and pivots and flex
couplings and other scary terms, had seemed initially daunting.
But in the end, building a barn-door mount was just as easy as
people say it is, and I finished it in a day.
And what about a motor? I added one a few days later, with a stepper
and an Arduino. But that's a separate article.
Late notice, but Dave and I are giving a talk on the moon
tonight at PEEC. It's called
Moonlight
Sonata, and starts at 7pm. Admission: $6/adult, $4/child
(we both prefer giving free talks, but PEEC likes to charge for
their Friday planetarium shows, and it all goes to support PEEC,
a good cause).
We'll bring a small telescope in case anyone wants to do any actual
lunar observing outside afterward, though usually planetarium
audiences don't seem very interested in that.
If you're local but can't make it this time, don't worry; the moon
isn't a one-time event, so I'm sure we'll give the moon show again at
some point.
I haven't had a chance to do much astronomy since moving to New Mexico,
despite the stunning dark skies. For one thing, those stunning dark
skies are often covered with clouds -- New Mexico's dramatic skyscapes
can go from clear to windy to cloudy to hail or thunderstorms and back
to clear and hot over the course of a few hours. Gorgeous to watch,
but distracting for astronomy, and particularly bad if you want to
plan ahead and observe on a particular night. The Pajarito Astronomers'
monthly star parties are often clouded or rained out, as was the PEEC
Nature Center's moon-and-planets star party last week.
That sort of uncertainty means that the best bet is a so-called
"quick-look scope": one that sits by the door, ready to be hauled
out if the sky is clear and you have the urge.
Usually that means some kind of tiny refractor; but it can also
mean leaving a heavy mount permanently set up (with a cover to protect
it from those thunderstorms) so it's easy to carry out a telescope
tube and plunk it on the mount.
I have just that sort of scope sitting in our shed: an old, dusty Cave
Astrola 6" Newtonian on an equatorian mount.
My father got it for me on my 12th birthday.
Where he got the money for such a princely gift -- we didn't have
much in those days -- I never knew, but I cherished that telescope,
and for years spent most of my nights in the backyard peering through
the Los Angeles smog.
Eventually I hooked up with older astronomers (alas, my father had
passed away) and cadged rides to star parties out in the Mojave desert.
Fortunately for me, parenting standards back then allowed a lot
more freedom, and my mother was a good judge of character and let
me go. I wonder if there are any parents today who would let their
daughter go off to the desert with a bunch of strange men? Even back
then, she told me later, some of her friends ribbed her -- "Oh,
'astronomy'. Suuuuuure. They're probably all off doing drugs in the desert."
I'm so lucky that my mom trusted me (and her own sense of the guys
in the local astronomy club) more than her friends.
The Cave has followed me through quite a few moves, heavy, bulky and
old fashioned as it is; even when I had scopes
that were bigger, or more portable, I kept it for the sentimental value.
But I hadn't actually set it up in years. Last week, I assembled the
heavy mount and set it up on a clear spot in the yard. I dusted off
the scope, cleaned the primary mirror and collimated everything,
replaced the finder which had fallen out somewhere along the way,
set it up ... and waited for a break in the clouds.
I'm happy to say that the optics are still excellent.
As I write this (to be posted later),
I just came in from beautiful views of Hyginus Rille and the
Alpine Valley on the moon. On Jupiter the Great Red Spot was just
rotating out. Mars, a couple of weeks before opposition, is still
behind a cloud (yes, there are plenty of clouds). And now the clouds
have covered the moon and Jupiter as well. Meanwhile, while I wait for
a clear view of Mars, a bat makes frenetic passes overhead, and
something in the junipers next to my observing spot is making rhythmic
crunch, crunch, crunch sounds. A rabbit chewing something tough?
Or just something rustling in the bushes?
I just went out again,
and now the clouds have briefly uncovered Mars. It's the first good look
I've had at the Red Planet in years. (Tiny achromatic refractors really
don't do justice to tiny, bright objects.) Mars is the most difficult
planet to observe: Dave liks to talk about needing to get your "Mars
eyes" trained for each Mars opposition, since they only come every two
years. But even without my "Mars eyes", I had no trouble seeing the
North pole with dark Acidalia enveloping it, and, in the south, the
sinuous chain of Sini Sabaeus, Meridiani, Margaritifer, and Mare Erythraeum.
(I didn't identify any of these at the time; instead, I dusted off my
sketch pad and sketched what I saw, then compared it with XEphem's
Mars view afterward.)
I'm liking this new quick-look telescope -- not to mention the
childhood memories it brings back.
For the animations
I made from the lunar eclipse last week, the hard part was aligning
all the images so the moon (or, in the case of the moonrise image, the
hillside) was in the same position in every time.
This is a problem that comes up a lot with astrophotography, where
multiple images are stacked for a variety of reasons: to increase
contrast, to increase detail, or to take an average of a series of images,
as well as animations like I was making this time.
And of course animations can be fun in any context, not just astrophotography.
In the tutorial that follows, clicking on the images will show a full
sized screenshot with more detail.
Load all the images as layers in a single GIMP image
The first thing I did was load up all the images as layers in a single image:
File->Open as Layers..., then navigate to where the images are
and use shift-click to select all the filenames I wanted.
Work on two layers at once
By clicking on the "eyeball" icon in the Layers dialog, I could
adjust which layers were visible. For each pair of layers, I made
the top layer about 50% opaque by dragging the opacity slider (it's
not important that it be exactly at 50%, as long as you can see both
images).
Then use the Move tool to drag the top image on top of the bottom image.
But it's hard to tell when they're exactly aligned
"Drag the top image on top of the bottom image":
easy to say, hard to do. When the images are dim and red like that,
and half of the image is nearly invisible, it's very hard to tell when
they're exactly aligned.
Use a Contrast display filter
What helped was a Contrast filter.
View->Display Filters... and in the dialog that pops up,
click on Contrast, and click on the right arrow to move it to
Active Filters.
The Contrast filter changes the colors so that dim red moon is fully
visible, and it's much easier to tell when the layers are
approximately on top of each other.
Use Difference mode for the final fine-tuning
Even with the Contrast filter, though, it's hard to see when the
images are exactly on top of each other. When you have them within a few
pixels, get rid of the contrast filter (you can keep the dialog up but
disable the filter by un-checking its checkbox in Active Filters).
Then, in the Layers dialog, slide the top layer's Opacity back to 100%,
go to the Mode selector and set the layer's mode to
Difference.
In Difference mode, you only see differences between the two layers.
So if your alignment is off by a few pixels, it'll be much easier to see.
Even in a case like an eclipse where the moon's appearance is changing
from frame to frame as the earth's shadow moves across it, you can still
get the best alignment by making the Difference between the two layers
as small as you can.
Use the Move tool and the keyboard: left, right, up and down arrows move
your layer by one pixel at a time. Pick a direction, hit the arrow key
a couple of times and see how the difference changes. If it got bigger,
use the opposite arrow key to go back the other way.
When you get to where there's almost no difference between the two layers,
you're done. Change Mode back to Normal, make sure Opacity is at 100%,
then move on to the next layer in the stack.
It's still a lot of work. I'd love to find a program that looks for
circular or partially-circular shapes in successive images and does
the alignment automatically. Someone on GIMP suggested I might be
able to write something using OpenCV, which has circle-finding
primitives (I've written briefly before about
SimpleCV,
a wrapper that makes OpenCV easy to use from Python).
But doing the alignment by hand in GIMP, while somewhat tedious,
didn't take as long as I expected once I got the hang of using the
Contrast display filter along with Opacity and Difference mode.
Creating the animation
Once you have your layers, how do you turn them into an animation?
The obvious solution, which I originally intended to use, is to save
as GIF and check the "animated" box. I tried that -- and discovered
that the color errors you get when converting an image to indexed make
a beautiful red lunar eclipse look absolutely awful.
So I threw together a Javascript script to animate images by loading
a series of JPEGs. That meant that I needed to export all the layers
from my GIMP image to separate JPG files.
GIMP doesn't have a built-in way to export all of an image's layers to
separate new images. But that's an easy plug-in to write, and a web
search found lots of plug-ins already written to do that job.
The lunar eclipse on Sunday was gorgeous. The moon rose already in
eclipse, and was high in the sky by the time totality turned the
moon a nice satisfying deep red.
I took my usual slipshod approach to astrophotography. I had my 90mm
f/5.6 Maksutov lens set up on the patio with the camera attached,
and I made a shot whenever it seemed like things had changed
significantly, adjusting the exposure if the review image looked
like it might be under- or overexposed, occasionally attempting
to refocus. The rest of the time I spent socializing with friends,
trading views through other telescopes and binoculars, and enjoying an
apple tart a la mode.
So the images I ended up with aren't all they could be --
not as sharply focused as I'd like (I never have figured out a
good way of focusing the Rebel on astronomy images) and rather
grainy.
Still, I took enough images to be able to put together a couple of
animations: one of the lovely moonrise over the mountains, and one
of the sequence of the eclipse through totality.
Since the 90mm Mak was on a fixed tripod, the moon drifted through the
field and I had to adjust it periodically as it drifted out.
So the main trick to making animations was aligning all the moon
images. I haven't found an automated way of doing that, alas,
but I did come up with some useful GIMP techniques, which I'm in
the process of writing up as a tutorial.
Once I got the images all aligned as layers in a GIMP image,
I saved them as an animated GIF -- and immediately discovered that
the color error you get when converting to an indexed GIF image
loses all the beauty of those red colors. Ick!
So instead, I wrote a little Javascript animation function that
loads images one by one at fixed intervals. That worked a lot better
than the GIF animation, plus it lets me add a Start/Stop button.
You can view the animations (or the source for the javascript
animation function) here:
Lunar eclipse animations
The street for a substantial radius around my mailbox has a wonderful,
strong minty smell.
The smell is coming from a clump of modest little yellow flowers.
They're apparently Dyssodia papposa, whose common name is "fetid marigold".
It's in the sunflower family, Asteraceae, not related to Lamiaceae, the mints.
"Fetid", of course, means "Having an offensive smell; stinking".
When I google for fetid marigold, I find quotes like
"This plant is so abundant, and exhales an odor so unpleasant as to
sicken the traveler over the western prairies of Illinois, in
autumn." And nobody says it smells like mint -- at least, googling
for the plant and "mint" or "minty" gets nothing.
But Dave and I both find the smell very minty and pleasant,
and so do most of the other local people I queried.
What's going on?
Another local plant which turns strikingly red in autumn has an even
worse name: fetid goosefoot. On a recent hike, several of us made a
point of smelling it. Sure enough: everybody except one found it
minty and pleasant. But one person on the hike said "Eeeeew!"
It's amazing how people's sensory perception can vary. Everybody knows
how people's taste varies: some people perceive broccoli and cabbage
as bitter while others love the taste. Some people can't taste lobster
and crab at all and find Parmesan cheese unpleasant.
And then there's color vision.
Every amateur astronomer who's worked public star parties knows about
Albireo. Also known as beta Cygni, Albireo is a double star, the head
of the constellation of the swan or the foot of the Northern Cross.
In a telescope, it's a double star, and a special type of double:
what's known as a "color double", two stars which are very different
colors from each other.
Most non-astronomers probably don't think of stars having colors.
Mostly, color isn't obvious when you're looking at things at night:
you're using your rods, the cells in your retina that are sensitive
to dim light, not your cones, which provide color vision but need
a fair amount of light to work right.
But when you have two things right next to each other that are
different colors, the contrast becomes more obvious. Sort of.
Point a telescope at Albireo at a public star party and ask the
next ten people what two colors they see. You'll get at least six,
more likely eight, different answers. I've heard blue and red, blue
and gold, red and gold, red and white, pink and blue ... and white
and white (some people can't see the colors at all).
Officially, the bright component is actually a close binary, too close
to resolve as separate stars. The components are
Aa (magnitude 3.18, spectral type K2II) and
Ac (magnitude 5.82, spectral type B8).
(There doesn't seem to be an Albireo Ab.)
Officially that makes Albireo A's combined color yellow or amber.
The dimmer component, Albireo B, is magnitude 5.09 and spectral
type B8Ve: officially it's blue.
But that doesn't make the rest of the observers wrong. Color vision is
a funny thing, and it's a lot more individual than most people think.
Especially in dim light, at the limits of perception.
I'm sure I'll continue to ask that question when I show Albireo
in my telescope, fascinated with the range of answers.
In case you're wondering,
I see Albireo's components as salmon-pink and pale blue.
I enjoy broccoli and lobster but find bell peppers bitter.
And I love the minty smell of plants that a few people, apparently,
find "fetid".
One of the adjustments we've had to make in moving to New Mexico is
getting used to the backward (compared to California) weather.
Like, rain in summer!
Not only is rain much more pleasant in summer, as a dramatic
thundershower that cools you off on a hot day instead of a constant
cold drizzle in winter (yes, I know that by now Calfornians need
a lot more of that cold drizzle! But it's still not very
pleasant being out in it). Summer rain has another unexpected effect:
flowers all summer, a constantly changing series of them.
Right now the purple asters are just starting up,
while skyrocket gilia and the last of the red penstemons add a note
of scarlet to a huge array of yellow flowers of all shapes and sizes.
Here's the vista that greeted us on a hike last weekend
on the Quemazon trail.
Down in the piñon-juniper where we live, things aren't usually
quite so colorful; we lack many red blooms, though we have just as many
purple asters as they do up on the hill, plus lots of pale trumpets
(a lovely pale violet gilia) and Cowpen daisy, a type of yellow sunflower.
But the real surprise is a plant with a modest name: snakeweed. It has
other names, but they're no better: matchbrush, broomweed. It grows
everywhere, and most of the year it just looks like a clump of bunchgrass.
Then come September, especially in a rainy year like this one,
and all that snakeweed suddenly bursts into a glorious carpet of gold.
We have plenty of other weeds -- learning how to identify Russian thistle
(tumbleweed), kochia and amaranth when they're young, so we can pull
them up before they go to seed and spread farther, has launched me on
a project of an Invasive Plants page for the nature center (we should be
ready to make that public soon).
But snakeweed, despite the name, is a welcome guest in our yard, and
it lifts my spirits to walk through it on a September evening.
By the way, if anyone in Los Alamos reads this blog, Dave and I are
giving our first planetarium show at the nature center tomorrow (that's
Friday) afternoon.
Unlike most PEEC planetarium shows, it's free! Which is probably just
as well since it's our debut. If you want to come see us, the info is here:
Night Sky Fiesta
Planetarium Show.
We had perfect weather for the partial solar eclipse yesterday.
I invited some friends over for an eclipse party -- we set up
a couple of scopes with solar filters, put out food and drink
and had an enjoyable afternoon.
And what views! The sunspot group right on the center of the sun's disk
was the most large and complex I'd ever seen, and there were some much
smaller, more subtle spots in the path of the eclipse. Meanwhile, the
moon's limb gave us a nice show of mountains and crater rims silhouetted
against the sun.
I didn't do much photography, but I did hold the point-and-shoot up to
the eyepiece for a few shots about twenty minutes before maximum eclipse,
and was quite pleased with the result.
An excellent afternoon. And I made too much blueberry bread and
far too many oatmeal cookies ... so I'll have sweet eclipse memories
for quite some time.
Finding separation between two objects is easy in PyEphem: it's just one
line once you've set up your objects, observer and date.
p1 = ephem.Mars()
p2 = ephem.Jupiter()
observer = ephem.Observer()  # and then set it to your city, etc.
observer.date = ephem.date('2014/8/1')
p1.compute(observer)
p2.compute(observer)

ephem.separation(p1, p2)
So all I have to do is loop over all the visible planets and see when
the separation is less than some set minimum, like 4 degrees, right?
Well, not really. That tells me if there's a conjunction between
a particular pair of planets, like Mars and Jupiter. But the really
interesting events are when you have three or more objects close
together in the sky. And events like that often span several days.
If there's a conjunction of Mars, Venus, and the moon, I don't want to
print something awful like
Friday:
  Conjunction between Mars and Venus, separation 2.7 degrees.
  Conjunction between the moon and Mars, separation 3.8 degrees.
Saturday:
  Conjunction between Mars and Venus, separation 2.2 degrees.
  Conjunction between Venus and the moon, separation 3.9 degrees.
  Conjunction between the moon and Mars, separation 3.2 degrees.
Sunday:
  Conjunction between Venus and the moon, separation 4.0 degrees.
  Conjunction between the moon and Mars, separation 2.5 degrees.
... and so on, for each day. I'd prefer something like:
Conjunction between Mars, Venus and the moon lasts from Friday through Sunday.
  Mars and Venus are closest on Saturday (2.2 degrees).
  The moon and Mars are closest on Sunday (2.5 degrees).
At first I tried just keeping a list of planets involved in the conjunction.
So if I see Mars and Jupiter close together, I'd make a list [mars,
jupiter], and then if I see Venus and Mars on the same date, I search
through all the current conjunction lists and see if either Venus or
Mars is already in a list, and if so, add the other one. But that got
out of hand quickly. What if my conjunction list looks like
[ [mars, venus], [jupiter, saturn] ] and then I see there's also
a conjunction between Mars and Jupiter? Oops -- how do you merge
those two lists together?
The solution to taking all these pairs and turning them into a list
of groups that are all connected actually lies in graph theory: each
conjunction pair, like [mars, venus], is an edge, and the trick is to
find all the connected edges. But turning my list of conjunction pairs
into a graph so I could use a pre-made graph theory algorithm looked
like it was going to be more code -- and a lot harder to read and less
maintainable -- than making a bunch of custom Python classes.
I eventually ended up with three classes:
ConjunctionPair, for a single conjunction observed between two bodies
on a single date;
Conjunction, a collection of ConjunctionPairs covering as many bodies
and dates as needed;
and ConjunctionList, the list of all Conjunctions currently active.
That let me write methods to handle merging multiple conjunction
events together if they turned out to be connected, as well as a
method to summarize the event in a nice, readable way.
So predicting conjunctions ended up being a lot more code than I
expected -- but only because of the problem of presenting it neatly
to the user. As always, user interface represents the hardest part
of coding.
All through the years I was writing the planet observing column for
the San Jose Astronomical Association, I was annoyed at the lack of places
to go to find out about upcoming events like conjunctions, when two or
more planets are close together in the sky. It's easy to find out
about conjunctions in the next month, but not so easy to find sites
that will tell you several months in advance, like you need if you're
writing for a print publication (even a club newsletter).
For some reason I never thought about trying to calculate it myself.
I just assumed it would be hard, and wanted a source that could
spoon-feed me the predictions.
The best source I know of is the
RASC Observer's Handbook,
which I faithfully bought every year and checked each month so I could
enter that month's events by hand. Except for January and February, when I
didn't have the next year's handbook yet by the time my column went
to press and I was on my own.
I have to confess, I was happy to get away from that aspect of the
column when I moved.
In my new town, I've been helping the local nature center with their
website. They had some great pages already, like a
What's
Blooming Now? page that keeps track
of which flowers are blooming now and only shows the current ones.
I've been helping them extend it by adding features like showing only
flowers of a particular color, separating the data into CSV databases
so it's easier to add new flowers or butterflies, and so forth.
Eventually we hope to build similar databases of birds, reptiles and
amphibians.
And recently someone suggested that their astronomy page could use
some help. Indeed it could -- it hadn't been updated in about five years.
So we got to work looking for a source of upcoming astronomy events
we could use as a data source for the page, and we found sources for
a few things, like moon phases and eclipses, but not much.
Someone asked about planetary conjunctions, and remembering
how I'd always struggled to find that data, especially in months when
I didn't have the RASC handbook yet, I got to wondering about
calculating it myself.
Obviously it's possible to calculate when a planet will
be visible, or whether two planets are close to each other in the sky.
And I've done some programming with
PyEphem before, and found
it fairly easy to use. How hard could it be?
Note: this article covers only the basic problem of predicting when
a planet will be visible in the evening.
A followup article will discuss the harder problem of conjunctions.
Calculating planet visibility with PyEphem
The first step was figuring out when planets were up.
That was straightforward. Make a list of the easily visible planets
(remember, this is for a nature center, so people using the page
aren't expected to have telescopes):
Then we need an observer with the right latitude, longitude and
elevation. Elevation is apparently in meters, though they never bother
to mention that in the PyEphem documentation:
observer = ephem.Observer()
observer.name = "Los Alamos"
observer.lon = '-106.2978'
observer.lat = '35.8911'
observer.elevation = 2286  # meters, though the docs don't actually say
Then we loop over the date range for which we want predictions.
For a given date d, we're going to need to know the time of sunset,
because we want to know which planets will still be up after nightfall.
observer.date = d
sunset = observer.previous_setting(sun)
Then we need to loop over planets and figure out which ones are visible.
It seems like a reasonable first approach to declare that any planet
that's visible after sunset and before midnight is worth mentioning.
Now, PyEphem can tell you directly the rising and setting times of a planet
on a given day. But I found it simplified the code if I just checked
the planet's altitude at sunset and again at midnight. If either one
of them is "high enough", then the planet is visible that night.
(Fortunately, here in the mid latitudes we don't have to
worry that a planet will rise after sunset and then set again before
midnight. If we were closer to the arctic or antarctic circles, that
would be a concern in some seasons.)
min_alt = 10. * math.pi / 180.
for planet in planets:
    observer.date = sunset
    planet.compute(observer)
    if planet.alt > min_alt:
        print planet.name, "is already up at sunset"
Easy enough for sunset. But how do we set the date to midnight on
that same night? That turns out to be a bit tricky with PyEphem's
date class. Here's what I came up with:
What's that 7 there? That's Greenwich Mean Time when it's midnight in
our time zone. It's hardwired because this is for a web site meant for
locals. Obviously, for a more general program, you should get the time
zone from the computer and add accordingly, and you should also be
smarter about daylight savings time and such. The PyEphem documentation,
fortunately, gives you tips on how to deal with time zones.
(In practice, though, the rise and set times of planets on a given
day doesn't change much with time zone.)
And now you have your predictions of which planets will be visible
on a given date. The rest is just a matter of writing it out into
your chosen database format.
In the next article, I'll cover planetary and lunar
conjunctions -- which were superficially very simple, but turned out
to have some tricks that made the programming harder than I expected.
Tomorrow, Sunday September 8th, is an interesting astronomical event:
a nice conjunction of a slim crescent moon and gibbous Venus, with
Saturn hanging above and to the left of the pair.
That alone isn't anything unusual, though
they'll be a lovely naked-eye sight just after nightfall.
But here's the kicker: they'll be quite a bit closest during the daytime,
best around 2-3 in the afternoon,
Which makes for a fun exercise: can you find the crescent moon
during daylight, then use it to guide you to Venus (right above it,
about a degree away) and Saturn (about 10 degrees away, down and left)?
They'll be just a little east of due south, and about 40 degrees up.
You'll definitely need binoculars to find Saturn, and they might help
in finding the other two as well, depending on how bright and how hazy
your afternoon sky is. Once you find them, a low powered telescope view
should show Venus' phase and Saturn's rings. Venus is gibbous, alas;
it would have been fun to see two crescents lined up one above the other.
If you have trouble finding them, wait until 3:30 pm, when they'll be
transiting. At that point, you should be able to point due south,
sweep your binoculars (or just your eyes) up just short of halfway to
the zenith, and the moon should be there.
If you don't get a chance to watch the daylight conjunction, or don't
have binoculars or a telescope handy, at least take a naked eye look
at the trio at nightfall.
Mars and an early view of Comet ISON
As long as I'm reposting tips from my
SJAA Ephemeris Shallow Sky column,
there's another interesting thing in the sky this month:
Comet C/2012 S1 ISON. Yes, that's the "super comet" that's supposed
to become brighter than the moon. No, it won't be bright yet.
It's still super wimpy, and worse, it's still in the morning sky,
so it's not an easy or convenient target.
On the other hand,
through September and October, Mars and Comet ISON will be
within a few degrees of each other. So if you're willing to stay up
(or get up) for early morning dark-sky observing, and you have a
big telescope, this could be a nice view.
The comet won't be very impressive yet -- it's only expected to be
10th magnitude in September -- but such close proximity to Mars makes
it easy to find and keep track of. In September, the pair don't rise
until about 3:30am, and that won't change much for the next few months.
The comet will probably stay below naked eye visibility at least
for the next two months, brightening from 11th magnitude in early
September to maybe 7th magnitude by Halloween.
As September opens, ISON makes a triangle with Mars and M44, the
Beehive cluster. The comet stands about 2 degrees north of the Beehive
and about 5 degrees east of Mars. But it closes with Mars as the month
progresses: by the end of September you can find the comet about two
degrees north of Mars, and by the middle of October they'll be down to
only a degree apart (with ISON brightening to about ninth magnitude).
About that Beehive cluster: right now (September 7 through 9),
Mars is passing right through the Beehive, like an angry red wasp
among the smaller bees. Should be a nice view even if the comet isn't.
It's a good binocular or even naked eye view (though great with a
telescope, too).
So if you find yourself up before dawn, definitely take a look.
[This a slight revision of my monthly "Shallow Sky" column in the
SJAA Ephemeris newsletter.
Looks like the Ephemeris no longer has an online HTML version,
just the PDF of the whole newsletter,
so I may start reposting my Ephemeris columns here more often.]
Last month I stumbled upon a loony moon book I hadn't seen before, one
that deserves consideration by all lunar observers.
The book is The Moon: Considered as a Planet, a World, and a Satellite
by James Nasmyth, C.E. and James Carpenter, F.R.A.S.
It's subtitled "with twenty-six illustrative plates of lunar objects,
phenomena, and scenery; numerous woodcuts &c." It was written in 1885.
Astronomers may recognize the name Nasmyth: his name is attached to a modified
Cassegrain focus design used in a lot of big observatory telescopes.
Astronomy was just a hobby for him, though; he was primarily a
mechanical engineer. His coauthor, James Carpenter, was an astronomer
at the Royal Greenwich Observatory.
The most interesting thing about their book is the plates illustrating
lunar features. In 1885, photography wasn't far enough along to get
good close-up photos of the moon through a telescope. But Nasmyth and
Carpenter wanted to show something beyond sketches. So they built
highly detailed models of some of the most interesting areas of the
moon, complete with all their mountains, craters and rilles, then
photographed them under the right lighting conditions for interesting
shadows similar to what you'd see when that area was on the terminator.
I loved the idea, since I'd worked on a similar but much less
ambitious project myself. Over a decade ago, before we were married,
Dave North got the idea
to make a 3-D model of the full moon that he could use for the SJAA
astronomy class. I got drafted to help. We started by cutting a 3-foot
disk of wood, on which we drew a carefully measured grid corresponding
to the sections in Rukl's Atlas of the Moon. Then, section by section,
we drew in the major features we wanted to incorporate. Once the
drawing was done, we mixed up some spackle -- some light, and some
with a little black paint in it for the mare areas -- and started
building up relief on top of the features we'd sketched. The project
was a lot of fun, and we use the moon model when giving talks
(otherwise it hangs on the living room wall).
Nasmyth and Carpenter's models cover only small sections of the moon --
Copernicus, Plato, the Apennines -- but in amazing detail. Looking at
their photos really is like looking at the moon at high magnification
on a night of great seeing.
So I had to get the book. Amazon has two versions, a paperback and a
hardcover. I opted for the paperback, which turns out to be scanned
from a library book (there's even a scan of the pocket where the book's
index card goes). Some of the scanning is good, but some of the plates
come out all black. Not very satisfying.
But once I realized that an 1885 book was old enough to be public domain,
I checked the web. I found two versions: one at Archive.org and one on
Google Books. They're scans from two different libraries; the Archive.org
scan is better, but the epub version I downloaded for my ebook reader
has some garbled text and a few key plates, like Clavius, missing.
The Google version is a much worse scan and I couldn't figure out if
they had an epub version. I suspect the hardcover on Amazon is likely
a scan from yet a fourth library.
At the risk of sounding like some crusty old Linux-head, wouldn't it
be nice if these groups could cooperate on making one GOOD version
rather than a bunch of bad ones?
I also discovered that the San Jose library has a copy. A REAL copy,
not a scan.
It gave me a nice excuse to take the glass elevator up
to the 8th floor and take in the view of San Jose.
And once I got it,
I scanned all the
moon sculpture plates myself.
Sadly, like the Archive.org ebook, the San Jose copy is missing Copernicus.
I wonder if vandals are cutting that page out of library copies?
That makes me wince even to think of it, but I know such things happen.
Whichever version you prefer, I'd recommend that lunies get hold of
a copy. It's a great introduction to planetary science, with
very readable discussions of how you measure things like the distance
and size of the moon. It's an even better introduction to lunar
observing: if you merely go through all of their descriptions of
interesting lunar areas and try to observe the features they mention,
you'll have a great start on a lunar observing program that'll keep
you busy for months. For experienced observers, it might give you a
new appreciation of some lunar regions you thought you already knew
well. Not at super-fine levels of detail -- no Alpine Valley rille --
but a lot of good discussion of each area.
Other parts of the book are interesting only from a historical
perspective. The physical nature of lunar features wasn't a settled
issue in 1885, but Nasmyth and Carpenter feel confident that all of
the major features can be explained as volcanism. Lunar craters are
the calderas of enormous volcanoes; mountain ranges are volcanic too,
built up from long cracks in the moon's crust, like the Cascades range
in the Pacific Northwest.
There's a whole chapter on "Cracks and Radiating Streaks", including a
wonderful plate of a glass ball with cracks, caused by deformation,
radiating from a single point. They actually did the experiment: they
filled a glass globe with water and sealed it, then "plunged it into a
warm bath". The cracks that resulted really do look a bit like Tycho's
rays (if you don't look TOO closely: lunar rays actually line up with
the edges of the crater, not the center).
It's fun to read all the arguments that are plausible, well reasoned
-- and dead wrong. The idea that craters are caused by meteorite
impacts apparently hadn't even been suggested at the time.
Anyway, I enjoyed the book and would definitely recommend it. The
plates and observing advice can hold their own against any modern
observing book, and the rest ... is a fun historical note.
A couple of months ago I wrote about
watching
an eclipse of Europa by Jupiter's shadow. It's a game I call
"Whac-a-Moon", where a moon comes out from behind Jupiter, but stays there
for only a short time then disappears into eclipse. If you aren't ready
for it, it's gone.
This can only happen when Jupiter's shadow is offset from Jupiter that
there's a gap between the planet and the shadow as seen from Earth.
Jupiter is getting low in the west, and soon we'll lose it behind the
sun, but tonight, Wednesday May 8, there's a decent Ganymede Whac-a-Moon
opportunity for those of us on the US west coast.
Ganymede disappears behind Jupiter at 6:45 pm PDT, still during daylight.
Some time around 9:43 Ganymede reappears from behind Jupiter,
but it only stays visible for a couple of minutes before entering
Jupiter's eclipse. Don't trust these times I'm giving you: set up at
least five minutes early, preferably more than that. And set up
somewhere with a good western horizon, because Jupiter will be very
low, less than 8 degrees above the horizon.
You can simulate the event on my
Javascript Jupiter.
When the G goes blue, that means Ganymede is in eclipse.
But the simulation won't show you the interesting part:
how gradual the eclipse is, as the moon slides through the edge
of Jupiter's shadow. During the Europa eclipse a few months ago,
I wanted to record the time of disappearance so I could adjust
my code accordingly, but I found I couldn't pin it down at all --
Europa started dimming almost as soon as it emerged from behind
Jupiter, and kept dimming until I couldn't convince myself I saw
it any more.
So far, I've only watched Europa as it slid into eclipse by
Jupiter's shadow; I haven't whacked Ganymede. But Ganymede is so much
larger that I suspect the slow dimming effect will be even more
obvious. Unfortunately, I'm not optimistic about being able to see it
myself; we've had cloudy skies here for the last few nights, and that
combined with the low western horizon may do me in. I may have to wait
until autumn, when Jupiter will next be visible in our evening skies.
But I hope someone reading this gets a chance to see this month's eclipse.
I wrote last week about an upcoming
eclipse
of Europa by Jupiter's shadow. One of the interesting things I'd found
was how much the predicted times of Europa's appearance from behind
Jupiter, and subsequent disappearance into Jupiter's shadow, varied
depending on which program you were using. I had just recently managed
to get my own Javascript Jupiter
page showing eclipse events, and its times didn't agree with any of the
other programs either. So I was burning with curiosity to know who was right.
The predicted times were:
Europa appears
Europa disappears
XEphem
7:43
7:59
S&T Jupiter's Moons
7:40
7:44
my Javascript Jupiter
7:45
7:52
Stellarium
6:49
7:05
I was out of town on March 10. I brought along a travel scope,
an Orion 80mm f/6 Orion Express. Not the perfect planetary scope, but
certainly enough to see Europa. (The Galilean moons are even visible in
binoculars, as long as you mount the binoculars on a tripod or
otherwise hold them steady.)
I synchronized my watch and had the telescope set up by 7:35. Sure enough,
there was no Europa there. But at 7:38 on the dot, I saw the first
hint of Europa peeking out. No question about it. I watched, and
timed, and by 7:41 the whole disk of Europa was visible and I could
start to think I could see blackness between it and Jupiter.
I'd been to a school star party a few days earlier and hadn't cleaned
my eyepieces afterward -- oops! -- so the view was a little foggy
and it was hard to tell for sure exactly when Europa's disk cleared Jupiter.
In fact, no matter which eyepiece I used, the fogginess seemed to get
worse and worse. I had a hard time seeing Europa at all. Finally I
realized that I was looking through a tree branch, and moved the
scope. But by the time I got it moved again, Europa had gotten
even harder to see. That was when I realized that it had been going
into eclipse practically the whole time I was watching it.
It was already significantly dimmed by 7:43, very dim indeed by 7:48
and gone -- in the 80mm -- by 7:49:20, though I suspect it still would
have been visible in a larger scope with clean eyepieces.
So that's why the times in different programs varied so much! Galilean
moons aren't point sources: you can't predict a single time for a moon
disappearance, appearance or eclipse. Do you want to predict the
beginning of the event, the end of the event or the time at the moon's
center point?
And that goes double for eclipses, where the moon is gradually sliding
into the shadow of Jupiter's atmosphere. I found that it took over
seven minutes the moon to go from full brightness to fully eclipsed.
So what part of that do you predict?
All in all, a very interesting observing session. I'm looking forward to
observing more of these eclipses, doing more timings, and tuning my
program to give better predictions. (I notice my program was
significantly late on both the appearance and the eclipse. I'll work
on that. Better to err on the early side, and not miss anything!)
While I was adding eclipses to my Jupiter program, I also added
longer-range predictions, so it would be easier to find out when these events
will happen. Once that was implemented, I looked for upcoming Whac-a-Moon
events. I found one on Mar 26, when Ganymede appears at 7:29pm PDT
(add 7 hours for GMT).
Europa and its shadow are transiting Jupiter's disk, too, so there's
plenty to look at. Ganymede then enters eclipse at 9:40pm PDT.
A long time between the events, I know, but it's easy enough to leave
a scope set up in the backyard and go out to check it now and then.
These times are from my Javascript Jupiter program and may be
a few minutes late. Always be ready at least five minutes early in
case the predictions are off, no matter which program you use.
Don't say I didn't warn you.
I found no events in April visible at night in California
(for other time zones, you can generate predictions on my
Javascript Jupiter page).
But May 8 has a decent one:
Ganymede appears at 9:44pm PDT, then disappears into
eclipse at 9:46. Based on what I saw tonight with Europa, that means
the moon should start to fade almost immediately after it has emerged from
behind Jupiter, maybe even before it has fully emerged. Ganymede's
larger size may also mean the fade-out will take longer. Stay tuned.
Jupiter will be very low by then, only 7 degrees above the horizon.
Not many events to observe -- this is a bit rarer than I'd thought.
Of course, there are lots of moons disappearing into eclipse and
appearing from out of it every night, so watching that long gradual
appearance or disappearance isn't difficult; the only rare part is
when they appear briefly between Jupiter and Jupiter's shadow.
That is relatively rare, and I'm glad I had a chance to catch it.
This is an edited and updated version of my "Shallow Sky" column
this month in the
SJAA Ephemeris newsletter.
A few months ago, I got email from a Jupiter observer
calling my attention to an interesting phenomenon of Jupiter's moons
that I hadn't seen before. The person who mailed me described himself
as a novice, and wasn't quite sure what he had seen, but he knew it
was odd. After some further discussion we pinned it down.
He was observing Jupiter at 11/11/12 at 00.25 UT (which would have
been mid-afternoon here in San Jose). Three of the moons were
visible, with only Ganymede missing. Then Ganymede appeared: near
Jupiter's limb, but not right on it. As he watched over the next
few minutes, Ganymede seemed to be moving backward -- in toward Jupiter
rather than away from it. Eventually it disappeared behind the planet.
It turned out that what he was seeing was the end of an eclipse.
Jupiter was still a few months away from opposition, so the shadow
thrown by the planet streamed off to one side as seen from our
inner-planet vantage point on Earth. At 0:26 UT on that evening, long
before he started observing, Ganymede, still far away from Jupiter's
limb, had entered Jupiter's shadow and disappeared into eclipse. It
took over two hours for Ganymede to cross Jupiter's shadow; but at
2:36, when it left the shadow, it hadn't yet disappeared behind the
planet. So it became visible again. It wasn't until 2:50
that Ganymede finally disappeared behind Jupiter.
So it was an interesting effect -- bright Ganymede appearing out of
nowhere, moving in toward Jupiter then disappearing again fourteen
minutes later. It was something I'd never seen, or thought to look for.
It's sort of like playing Whac-a-mole -- the moon appears only
briefly, so you've got to hit it with your telescope at just the right
time if you want to catch it before it disappears again.
A lot of programs don't show this eclipse effect -- including, I'm sad
to say, my own Javascript
Jupiter's moons web page. (I have since remedied that.)
The open source program Stellarium shows the effect; on the web,
Sky and Telescope's Jupiter's Moons page shows it, and even prints out
a table of times of various moon events, including eclipses.
These eclipse events aren't all that uncommon -- but only when the sun
angle is just right.
Searching in late February and early March this year, I found
several events for Ganymede and Europa (though, sadly, many of them were
during our daytime). By mid-March, the angles have changed so that
Europa doesn't leave Jupiter's shadow until after it's disappeared
behind the planet's limb; but Ganymede is farther out, so we can see
Ganymede appearances all the way through March and for months after.
The most interesting view, it seems to me, is right on the boundary
when the moon only appears for a short time before disappearing again.
Like the Europa eclipse that's happening this Sunday night, March 10.
Reporting on that one got a little tricky -- because that's the day we
switch to Daylight Savings time. I have to confess that I got a little
twisted up trying to compare results between programs that use UTC and
programs that use local time -- especially when the time zone converter
I was using to check my math told me "That time doesn't exist!"
Darnit, if we'd all just use UTC all the time, astronomy calculations
would be a lot easier! (Not to mention dropping the silly Daylight
Savings Time fiasco, but that's another rant.)
Before I go into the details, I want to point out that Jupiter's moons
are visible even in binoculars. So even if you don't have a telescope,
grab binoculars and set them up in as steady a way as you can -- if
you don't have a tripod adaptor, try bracing them on the top of a
gate or box.
On Sunday night, March 10, at some time around 7:40 pm PDT,
Europa peeks out from behind Jupiter's northeast limb.
(All times are given in PDT; add 7 hours for GMT.)
The sky will still be bright here in California -- the
sun sets at 7:12 that night -- but Jupiter will be 66 degrees up and
well away from the sun, so it shouldn't give you too much trouble.
Once Europa pops out, keep a close eye on it -- because if Sky & Tel's
calculations are right, it will disappear again just four minutes
later, at 7:44, into eclipse in Jupiter's shadow. It will remain
invisible for almost three hours, finally reappearing out of nowhere,
well off Jupiter's limb, at around 10:24 pm.
I want to stress that those times are approximate. In fact,
I tried simulating the event in several different programs, and got
wildly varying times:
Io disappears
Europa appears
Europa disappears
Europa reappears
Io appears
XEphem
7:15
7:43
7:59
10:06
10:43
S&T Jupiter's Moons
7:16
7:40
7:44
10:24
10:48
Javascript Jupiter
7:17
7:45
7:52
10:15
10:41
Stellarium
6:21
6:49
7:05
9:32
10:01
You'll note Stellarium seems to have a time zone problem ...
maybe because I ran the prediction while we were still in standard time,
not daylight savings time.
I'm looking forward to timing the events to see which program is
most accurate. I'm betting on XEphem. Once I know the real times,
maybe I can adjust my Javascript Jupiter's code to be more accurate.
If anyone else times the event, please send me your times, in case
something goes wrong here!
Anyway, the spread of times makes it clear that when observing this
sort of phenomenon, you should always set up the telescope ten or
fifteen minutes early, just in case. And ten extra minutes spent
observing Jupiter -- even without moons -- is certainly never
time wasted! Just keep an eye out for Europa to appear -- and be
ready to whack that moon before it disappears again.
We were marveling at how early it's getting dark now -- seems like
a big difference even compared to a few weeks ago. Things change fast
this time of year.
Since we're bouncing back and forth a lot between southern and northern
California, Dave wondered how Los Angeles days differed from San Jose days.
Of course, San Jose being nearly 4 degrees farther north, it should
have shorter days -- but by the weirdness of orbital mechanics that
doesn't necessarily mean that the sun sets earlier in San Jose.
His gut feel was that LA was actually getting an earlier sunset.
"I can calculate that," I said, and fired up a Python interpreter
to check with PyEphem. Since PyEphem doesn't know San Jose (hmph!
San Jose is bigger than San Francisco) I used San Francisco.
Since PyEphem's Observer class only has next_rising() and next_setting(),
I had to set a start date of midnight so I could subtract the two dates
properly to get the length of the day.
So Dave's intuition was right: northern California really does have a
later sunset than southern California at this time of year, even
though the total day length is shorter -- the difference in sunrise
time makes up for the later sunset.
This morning, the last space shuttle, Endeavour, made a piggyback
fly-by of California cities prior to landing at LAX, where it will be
trucked to its final resting place in Exposition Park.
And what science and astronomy fan could resist a once in a lifetime
chance to see the last shuttle in flight, piggyback on its 747 transporter?
Events kept me busy all morning, so I was late getting away.
Fortunately I'd expected that and planned for it. While watching the
flyby from Griffith Observatory sounded great, I suspected there would
be huge crowds, no parking and there's no way I could get there in time.
The Times suggested Universal City -- which I took to mean that
there would be huge crowds and traffic there too. So I picked a place
off the map, Blair Dr., that looked like it was easy to get to,
reasonably high and located in between Griffith and Universal.
It turned out to be a good choice. There were plenty of people there,
but I found a parking spot a few blocks away from where everybody
was hanging out and walked back to the viewpoint where I'd seen the
crowds.
I looked down and the first thing I saw was a smashed jumbo jet among
the wreckage of some houses. Um ... not the way I wanted to see the
shuttle! But then I realized I was looking at the Universal Studios
back lot. Right. Though binoculars I could even see the tram where
the folks on the studio tour went right by the "plane crash".
And I could look across to Universal City, where the
crowds made me happy I'd decided against going there -- I bet they
had some traffic jams too.
The crowd was friendly and everybody was sharing the latest rumors
of the shuttle's location -- "It just flew over Santa Barbara!"
"It's over West Hollywood -- get ready!" "Nope, now it's going west
again, might be a while." That helped with the wait in the hot sun.
Finally, "It's coming!" And we could see it, passing south of the
crowds at Universal City and coming this way ... and disappearing
behind some trees. We all shifted around so we'd see it when it
cleared the trees.
Only it didn't! We only got brief glimpses of it, between branches,
as the shuttle flew off toward Griffith Observatory. Oh no! Were we
in exactly the wrong location?
Then the word spread, from people farther down the road -- "It's
turning -- get ready for another pass!" This time it came by south of
us, giving us all a beautiful clear view as the 747 flew by with
the shuttle and its two fighter-plane escorts.
We hung around for a few more minutes, hoping for another pass, but
eventually we dispersed. The shuttle and its escorts flew on to LAX,
where it will be unloaded and trucked to Exposition Park. I feel lucky
to have gotten such a beautiful view of the last shuttle flight.
Tomorrow -- Monday, August 13th -- starting a little after 1 pm PDT
(20 UT), the moon passes in front of Venus. That's during the day
for those of us in the US, but don't worry -- both Venus and the
moon are easily visible during the daytime.
The RASC
handbook lists the time as exactly 1pm, but XEphem and some web
sources show Venus disappearing at more like 1:30.
The time isn't critical, because the most interesting part of this
occultation is the lead-up, where you can see both Venus and the moon
at once. The nearness of the moon will make it easy to locate Venus
during the day, something that's usually a bit challenging even with
this bright magnitude -4 planet.
Binoculars should show both objects just fine, though a telescope
is even better.
In a telescope, you'll be able to compare the phases of the
two objects: the slim crescent of the moon contrasted with the
half Venus.
If you've never seen a Venus occultation before, you'll be amazed
at the difference between the brightness of Venus and the dimness
of the moon's limb. We think of the moon as bright, but it's actually
dark grey, about the same albedo (reflectivity) as asphalt; whereas
Venus is covered with brightly reflective clouds.
It's a great excuse to set up a telescope or binoculars for a late
lunchtime observing session and share some photons with your
co-workers or anyone else who happens by. I've heard an amazing number
of adults express amazement at the idea of seeing the moon during the
daytime (even though they've undoubtedly seen it themselves at some
point, and just don't remember it). So seeing both objects, and their
phases, should be a great conversation starter outside the cafeteria
or local coffeehouse.
I'd suggest setting up no later than 12:30, and earlier works fine.
Even before 11, a low power eyepiece should show both the moon and
Venus in the same field. Watch out for the sun! Try to find a place
where you're shaded from the sun but can still see the moon. That way,
not only do you stay cooler, but you're protected against accidentally
swinging binoculars toward the sun and blinding yourself.
Of course, what goes behind must come out again: Venus should
re-emerge from behind the dark side of the moon around 2:30 to 3 pm.
For the 3 pm ingress, Dave and I set up in the backyard -- a 4.5-inch
Newtonian, a Takahashi FS102, and an 80mm f/6 refractor with an
eyepiece projection camera mount. I'd disliked the distraction during
the annular eclipse of switching between eyepiece and camera mount,
and was looking forward to having a dedicated camera scope this time.
Venus is big! There wasn't any trouble seeing it once it started its
transit. I was surprised at how slowly it moved -- so much slower than
a Mercury transit, though it shouldn't have been a surprise, since I
knew the event would take the rest of the evening, and wouldn't be
finished until well past our local sunset.
The big challenge of the day was to see the aureole -- the arc of Venus'
atmosphere standing out from the sun. With the severely windy weather
and turbulent air (lots of cumulus clouds) I wasn't hopeful. But
as Venus reached the point where only about 1/3 of its disk remained
outside the sun, the aureole became visible as a faint arc.
We couldn't see it in the 4.5-inch, and it definitely isn't visible
in the poorly-focused photos from the 80mm, but in the FS102 it
was definitely there.
About those poorly focused pictures: I hadn't used the 80mm, an Orion
Express, for photography before. It turned out its 2-inch Crayford
focuser, so nice for visual use, couldn't hold the weight of
a camera. With the sun high overhead, as soon as I focused,
the focuser tube would start to slide downward and I couldn't lock it.
I got a few shots through the 80mm, but had better luck holding a
point-and-shoot camera to the eyepiece of the FS102.
Time for experiments
Once the excitement of ingress was over,
there was time to try some experiments. I'd written about binocular
projection as a way anyone, without special equipment, could watch
the transit; so I wanted to make sure that worked. I held my cheap
binoc (purchased for $35 many years ago at Big 5) steady on top
of a tripod -- I never have gotten around to making a tripod mount
for it; though if I'd wanted a more permanent setup, duct tape would
have worked.
I couldn't see much projecting against the ground,
and it was too windy to put a piece of paper or cardboard down, but
an old whiteboard made a perfect solar projection screen. There was n
trouble at all seeing Venus and some of the larger sunspots projected
onto the whiteboard.
As the transit went on, we settled down to a routine of popping
outside the office every now and then to check on the transit.
Very civilized. But the transit lasted until past sunset, and our
western horizon is blocked by buildings.
I wanted some sunset shots. So we took a break for dinner, then drove
up into the hills to look for a place with a good ocean view.
The sunset expedition
Our first idea, a pullout off Highway 9,
had looked promising in Google Earth but turned out to have trees
and a hill (that somehow hadn't shown up in Google Earth) blocking
the sunset. So back up highway 9 and over to Russian Ridge, where
I remembered a trail entrance on the western side of the ridge that
might serve. Sure enough, it gave us a great sunset view. There was
only parking space for one car, but fortunately that's all we needed.
And we weren't the only transit watchers there -- someone else had
hiked in from the main parking lot carrying a solar filter, so we
joined him on the hillside as we waited for sunset.
I'd brought the 80mm refractor for visual observing and the 90 Mak
for camerawork. I didn't have a filter for the Mak, but Dave had some
Baader solar film, so earlier in the afternoon I'd whipped up a filter.
A Baskin-Robbins ice cream container lid turned out to be the perfect
size. Well, almost perfect -- it was just a trifle too large, but some
pads cut from an old mouse pad and taped inside the lid made it fit
perfectly. Dave used the Baader film, some foam and masking tape to
make a couple of filters for his binocular.
The sun sank through a series of marine cloud layers. Through the scopes
it looked more like Jupiter than the sun, with Jupiter's banding -- and Venus'
silhouette even looked like the shadow of one of Jupiter's moons.
Finally the sun got so low, and so obscured by clouds, that it seemed
safe to take the solar filter off the 90mm camera rig. (Of course, we
kept the solar filters on the other scope and binocular for visual observing.)
But even at the camera's fastest shutter speed, 1/4000, the sun came out
vastly overexposed with 90mm of aperture feeding it at f/5.6.
I had suspected that might be a problem, so I'd prepared a couple of
off-axis stops for the Mak, to cover most of the aperture leaving only a
small hole open. Again, BR ice cream containers turned out to be
perfect. I painted the insides flat black to eliminate reflections,
then cut holes in the ends -- one about the size of a quarter, the
other quite a bit larger. It turned out I didn't use the larger stop
at all, and it would have been handy to have one smaller than the
quarter-sized one -- even with that stop, the sun was overexposed at
first even at 1/4000 and I had to go back to the solar filter for a while.
I was happy with the results, though -- I got a nice series of sunset
photos complete with Venus silhouette.
More clouds rolled in as we packed up, providing a gorgeous
blue-and-pink sunset sky backdrop for our short walk back to the car.
What a lovely day for such a rare celestial event!
June 5 brings the last Venus transit until 2117, when Venus will pass
across the face of the sun -- the second of the only two Venus
transits any of us will see in our lives. (The first,
pictured in this lovely image from Bill
Arnett, was in 2004, visible on the east coast of the US but not
visible here in California.)
Venus is just a small spot against the vastness of the sun -- the skies
won't dim like in an eclipse, and you need equipment to see it.
So why should a non-astronomer care?
Mostly because it's so rare.
Venus transits happen in pairs with more than a century
between successive pairs: the last transit before 2004 was in 1882,
and the next one after this week's won't happen until 2117. The entire
20th century passed without a single Venus transit.
They're historically interesting, too. It was in 1663 that Scottish
mathematician James Gregory proposed that you could calculate the
distance to the Sun by measuring a Venus transit, by observing
at many different places on earth and
measuring
parallax.
Edmund Halley (of Halley's Comet fame) tried this method during the
Mercury transit of 1676, but since Mercury is so much closer to the
sun and farther from us, the results weren't good enough.
Unfortunately, Halley died in 1742, too early for the Venus
transit of 1761.
But lots of other astronomers were ready, mounting expeditions that year to
Siberia, Norway, Newfoundland and Madagascar (some of these expeditions
were major adventures, and several books have been written about them).
They followed up in 1769 with expeditions to Hudson Bay, Baja
California, Norway, St Petersburg, Philadelphia...
and the first voyage of Captain Cook to Tahiti, where they
observed the transit at a location that's still called "Point Venus" today.
Alas, their measurements weren't as accurate as they had hoped.
The exact times of a Venus transit turn out to be difficult to measure
due to the dreaded
black drop effect,
where the black circle of Venus can seem to elongate into a teardrop
shape as it "tears away" from the edge of the sun. The effect seems
to be caused by blurring from our own atmosphere (poor seeing)
combined with telescope diffraction. So the steadier your seeing is,
and the bigger and better your optics, the less likely you are to see
the black drop.
Of course, this being a solar event, you can't look at it directly --
you need a filter or other apparatus.
No need for a fancy H-alpha filter -- a white light solar filter is
fine, the kind that covers the aperture of the telescope.
(Don't use the kind that screw into the eyepiece! They can overheat
and crack while you're looking through them.)
You don't need a big telescope. I used an
Orion solar filter
on my little 80mm f/7 refractor for the last Mercury transit and it
worked great. And Venus is much larger than Mercury, at about 50 arcseconds
versus Mercury's 12 (the sun is half a degree, or 30 arcminutes).
So if you've seen a Mercury transit, you can imagine how much easier
and more spectacular a Venus transit can be.
If you use binoculars, either make sure that you have solar filters
for both sides, or keep one side covered at all times. If your telescope
has a finderscope, keep it covered.
If you can't find a solar filter in time for the transit,
you can set up your telescope to project the sun's image onto a white
board or sheet of paper. (This is how Jeremiah Horrocks made the first
known Venus transit observation.)
Use a cheap, low powered eyepiece for this:
the eyepiece will get hot, and you don't want to risk damaging a
fancy eyepiece. Be careful with solar projection -- make sure nobody
nearby can walk between the telescope and the surface you're using as
a projection screen, or place their hands or eyes in the light path.
A web search for solar projection will uncover other tips.
You can project the sun's image with binoculars, too, so don't feel
left out if you don't have a telescope. You'll definitely want
a tripod mount. I tried binocular projection during last month's
annular eclipse,
and found it very fiddly to hold the binoculars just right.
Don't count on being able to hold them steady while also looking for
Venus on the projected image.
If you don't have a tripod adapter (try
Orion), cobble something together
with duct tape and a block of wood, or whatever you have handy.
And do try to get a good white surface to project onto. Concrete worked
well enough for the solar eclipse, but you'll want better resolution
for Venus.
Timeline
When does this all happen?
Seen from the bay area,
Venus begins its ingress onto the disc of the sun on 3:06 PDT on the
afternoon of June 5. The transit continues until after the sun
sets at 8:26. So we won't get to see egress. Venus's exit from the face
of the sun, but it's the mirror image of what we'll see at ingress.
Ingress has two parts: first contact, when the edge of Venus's disk
first touches the outside of the sun's disk, and "internal ingress" or
second contact, when Venus's disk is fully inside that of the
sun. Second contact is the most interesting period of the transit,
since it's when the "black drop effect" occurs.
And if you have a good telescope and filter and you're blessed with
especially good seeing around the time of second contact, try looking
for the aureole, an arc of light just outside of the solar disk
made by the refraction of sunlight through Venus's atmosphere.
Amazingly, the aureole has the same surface brightness as the sun's
surface, and is said to be possible to see even through a solar
filter. That's something you'll never see in a Mercury transit!
(Follow the link on the image to see Lorenzo Comolli's amazing
aureole photo in more detail, along with other great aureole images
courtesy of the VT-2004 programme.)
Here's the time table for the bay area (from the table on NASA's
eclipse website):
First contact:
3:06:20
Internal ingress:
3:23:56
Maximum transit:
6:25:30
Sunset:
8:26
At first contact, the sun will still be high for bay area observers,
60° up. By maximum transit the pair will have sunk to 21°,
still plenty high enough to see the spectacle. Photographers will want to
wait around for sunset for a chance at some spectacular photos, like
the Bill Arnett photo at the top of this article, taken from Chicago.
I've just seen the annular eclipse, and what a lovely sight it was!
This was only my second significant solar eclipse, the first being a
partial when I was a teenager. So I was pretty excited about an
annular so nearby -- the centerline was only about a 4-hour drive from home.
We'd made arrangements to join the Shasta astronomy club's eclipse party
at Whiskeytown Lake, up in the Trinity Alps. Sounded like a lovely spot,
and we'd be able to trade views with the members of the local astronomy
club as well as showing off the eclipse to the public. As astronomers
bringing telescopes, we'd get reserved parking and didn't even have to
pay the park fee. Sounded good!
Not knowing whether we might hit traffic, we left home first thing in
the morning, hours earlier than we figured was really necessary.
A good thing, as it turned out.
Not because we hit any traffic -- but because when we got to the site,
it was a zoo. There were cars idling everywhere, milling up and
down every road looking for parking spots.
We waited in the queue at the formal site, and finally got to the
front of the line, where we told the ranger we were bringing
telescopes for the event. He said well, um, we could drive in and
unload, but there was no parking so we'd just have to drive out
after unloading, hope to find a parking spot on the road somewhere,
and walk back.
What a fiasco!
After taking a long look at the constant stream of cars inching along in
both directions and the chaotic crowd at the site, we decided the
better part of valor was to leave this vale of tears and high-tail it
back to our motel in Red Bluff, only little farther south of the
centerline and still well within the path of annularity. Fortunately
we'd left plenty of extra time, so we made it back with time to spare.
The Annular Eclipse itself
One striking thing about watching the eclipse through a telescope was
how fast the moon moves. The sun was well decorated with several excellent
large sunspot groups, so we were able to watch the moon swallow them
bit by bit.
Some of the darker sunspot umbras even showed something like a
black drop effect
as they disappeared behind the moon. We couldn't see the same
effect on the smaller sunspot groups, or on the penumbras.
There was also a pronounced black drop effect at the onset and end
of annularity.
The seeing was surprisingly good, as solar observing goes. Not only
could we see good detail on the sunspot groups and solar faculae,
but we could easily see irregularities in the shape of the moon's
surface -- in particular one small sharp mountain peak on the leading edge,
and what looked like a raised crater wall farther south on that
leading edge. We never did get a satisfactory identification on
either feature.
After writing and speaking about eclipse viewing, I felt honor bound
to try viewing with pinholes of several sizes. I found that during early
stages of the eclipse, the pinholes had to be both small (under about
5 mm) and fairly round to show much. Later in the eclipse,
nearly anything worked to show the crescent or the annular ring,
including interlaced fingers or the shadow of a pine tree on the wall.
I wish I'd remembered to take an actual hole punch, which would have
been just about perfect.
I also tried projection through binoculars, and convinced myself that
it would probably work as a means of viewing next month's Venus
transit -- but only with the binoculars on a tripod. Hand-holding
them is fiddly and difficult. (Of course, never look through
binoculars at the sun without a solar filter.) Look for an upcoming
article with more details on binocular projection.
The cast of characters
For us, the motel parking lot worked out great. We were staying at the
Crystal Motel in Red Bluff, an unassuming little motel that proved to be
clean and quiet, with friendly, helpful staff and the fastest motel
wi-fi connection I've ever seen. Maybe not the most scenic of
locations, but that was balanced by the convenience of having the car
and room so close by.
And we were able to show the eclipse to locals
and motel guests who wouldn't have been able to see it otherwise.
Many of these people, living right in the eclipse path, didn't even
know there was an eclipse happening, so poor had the media coverage been.
(That was true in the bay area too -- most people I talked to last week
didn't know there was an eclipse coming up, let alone how or where to
view it.)
We showed the eclipse to quite a cast of characters --
The mother with medical problems, obviously feeling quite poorly
but still bringing her husband and son out for repeated views.
the woman who said she didn't want to be in the sun because she'd
been drinking too much by the pool.
The family where Dad kept looking through paper glasses the kids
insisted was a "3-D viewer". Alarmed, we took a look, and found it
was a perfectly reasonable eclipse viewer marked SAFE FOR SOLAR VIEWING.
Whew!
The teen girl who kept looking directly at the sun despite everyone
telling her not to ... I hope she didn't damage her vision.
The kid who wanted to borrow my binocular to look at some birds
circling in the distance. I wanted to let him, but with all the
attention on the sun I was too nervous, so instead I changed the
subject and showed him how to identify turkey vultures (wings in a V,
tipping from side to side) even without binoculars).
The man who sat in a parking space near us reading a catalog,
telling us repeatedly he was just reading his catalog. When Dave
insisted he come and take a look, he looked in the eyepiece for about
ten seconds, then looked Dave in the eye and informed him solemnly
that he was just reading his catalog.
The family who'd been instructed by their grandmother, in the hospital
awaiting an operation, to watch the eclipse and bring back pictures for her.
I hope they got some decent ones!
In between visitors, we had plenty of time to fiddle with equipment,
take photos, and take breaks sitting in the shade to cool down.
(Annularity was pleasantly cool, but the rest of the eclipse stayed
hot on an over 90 degree central valley day.)
There's a lot to be said for sidewalk astronomy! Overall, I'm glad
we ended up where we did rather than in that Whiskeytown chaos.
This Sunday, May 20th, the western half of the US will be treated
to an annular solar eclipse.
Annular means that the moon is a bit farther away than usual, so it
won't completely cover the sun even if you travel to the eclipse
centerline. Why? Well, the moon's orbit around the earth
isn't perfectly circular, so sometimes it's farther away, sometimes
nearer. Remember all the hype two weeks ago about the "supermoon",
where it was unusually close at full moon? The other side of that
is that during this eclipse, at new moon, the moon is unusually far
away, and therefore a little smaller, not quite big enough to cover
the sun.
Since the sun will never be totally covered, make sure
you have a safe solar filter for this one -- don't look with your
naked eyes! You want a solar filter anyway, if you have any kind of
telescope or even binoculars, because of next month's once-in-a-lifetime
Venus transit (I'll write about that separately).
But if you don't have a solar filter and absolutely can't get one
in time, read on -- I'll have some suggestions later even for people
without any sort of optical aid.
But first, the path of the eclipse.
Here in the bay area, we're just a bit south of the southern limit of the
annular path, which passes just south of the town of Redway, through
Covelo, just south of Willows, then just misses Yuba City and
Auburn. If you want to be closer to the centerline, go camping at
Lassen National Park or Lake Shasta, or head to Reno or Tahoe
If you're inclined to travel, NASA has a great
interactive
2012 eclipse map you can use to check out possible locations.
Even back in the bay area, we still get a darn good dinner show. The partial
eclipse starts at 5:17 pm PDT, with maximum eclipse at 6:33. The sun
will be 18 degrees above the horizon at that point, and 89%
eclipsed. Compare that with 97% for a site right on the centerline --
remember, since this is an annular eclipse, no place sees 100%
coverage. The partial eclipse ends at 7:40 -- still well before
sunset, which isn't until 8:11.
Photographers, if you want a shot of an annular eclipse as the sun
sets, you'll need to head east, to Albuquerque, NM or Lubbock, TX.
A little before sunset, the centerline also crosses
near a lot of great vacation spots like Bryce, Zion and Canyon de Chelly.
I mentioned that even without a solar filter, there are ways of
watching the eclipse. The simplest is with a pinhole. You don't need
to use an actual pin -- the size and shape of the hole isn't critical,
as you can see in this
image
of the sun through the leaves of a tree during a 2005 eclipse in Malta.
If you don't have a leafy tree handy, you can even lace your fingers
together and look at the shadow of your hands. This eclipse will be
very low in the sky, continuing through sunset, so you may need to
project its shadow onto a wall rather than the ground.
If you have some
time to prepare, take a piece of cardboard and punch a few holes
through it. Try different sizes -- an actual pinhole, a BBQ skewer,
a 3-hole punch, maybe even bigger holes up to the size of a penny.
You might also try using aluminum foil -- you can get very clean
circular holes that way, which might give a crisper image.
Here's a good page on
eclipse
pinhole projection.
What works best? I don't remember! It's been a very long time since
the last eclipse here! Do the experiment! I know I will be.
If you do have a telescope or binoculars but couldn't get a solar
filter in time, don't despair. Instead of looking through the
eyepiece, you can project the sun's image onto a white screen or even
the ground or a wall. Use a cheap, low-power eyepiece -- any eyepiece
you use for solar projection will get very hot, and you don't want to
risk ruining a fancy one.
Point the telescope at the sun -- it's easy to tell when it's
lined up by watching the shadow of the telescope -- and rotate the
eyepiece so that it's aimed at your screen, which can be as simple
as a sheet of paper. Be careful where that eyepiece is aimed -- make
sure no one can walk through the path or put their hand in the way,
and if you have a finderscope, make sure it's covered.
This solar projection method works with binoculars too, but you'll want
to mount them on a tripod so you don't have to hold them the whole time.
This eclipse should be pretty cool -- and a great chance to test
out your solar equipment before next month's Venus transit.
When I went to put the event on my wall calendar last month, I discovered
the calendar already had an entry for May 20: it's the start of Bear
Awareness Week. So if you head up to Lassen or Shasta to watch the
eclipse, be sure to be aware of the bears! (Also, maybe I should get a
calendar that's a little more in tune with the sky.)
Venus has been a beautiful sight in the evening sky for months, but
at the end of April it's reaching a brightness peak, magnitude -4.7.
By then, if you look at it in a telescope or even good binoculars,
you'll see it has waned to a crescent. That's a bit non-obvious:
when the moon is a crescent, it's a lot fainter than a full moon.
So why is Venus brightest in its crescent phase?
It has to do with their orbits. The moon is always about the same
distance away, about 385,000 km or 239,000 miles (I've owned cars with
more miles than that!), though it varies a little, from 362,600 km at
perigee to 405,400 km at apogee.
When we look at the full moon, not only are we seeing the whole
Earth-facing surface illuminated, but the central part of that light
is reflecting straight up off the moon's surface. When we look at a
crescent moon, we're seeing light that's near the moon's sunrise or
sunset point -- dimmer and more spread out than the concentrated light
of noon -- and in addition we're seeing less of it.
Venus, in contrast, varies its distance from us immensely.
We can't see Venus when it's "full", because it's on the other side of
the sun from us and lost in the sun's glow. It'll next be there a year
from now, in April of 2013. But if we could see it when it's full, Venus
would be a distant 1.7 AU from us. An AU is an Astronomical Unit, the
average distance of the earth from the sun or about 89 million miles,
so Venus when it's full is about 170 million miles away.
Its disk is a tiny 9.9 arcseconds (an arcsecond is 1/3600 of a degree)
-- about the size of Mars this month.
In contrast, when we look at the crescent Venus around the end of this
month, although we're only seeing about 28% of its surface illuminated,
and that only with glancing twilight rays, it's much closer to us --
less than half an AU, or about 45 million miles -- and its disk
extends a huge 37 arcseconds, bigger than Jupiter this month.
Of course, eventually, as Venus pulls between us and the sun, its
crescent gets so slim that even its huge size can't compensate. So
its peak brightness happens when those two curves cross, when the disk
is somewhere around 27% illuminated, as happens at the end of this
month and the beginning of May.
Exactly when? Good question. The RASC Handbook says Venus' "greatest
illuminated extent" is on April 30, but PyEphem and XEphem say Venus
is actually brighter from May 3-8 ... and when it emerges from the
sun's glare and moves into the morning sky in June, it'll be slightly
brighter still, peaking at magnitude -4.8 in the first week of July.)
Tracking Venus with PyEphem
When I started my Shallow
Sky column this month, I saw the notice of Venus's maximum
brightness and greatest illuminated extent in the
RASC Handbook. But
I wanted more details -- how much did its distance and size really change,
when would the brightness peak again as it emerged from the sun's glare,
when would it next be "full"?
PyEphem made it easy to
calculate all this. Just create an ephem.Venus() object,
calculate its values for any date of interest, then print out
parameters like phase, mag, earth_distance and size.
In just a few minutes of programming, I had a nice table of Venus data.
import ephem

venus = ephem.Venus()

print '%10s   %6s %6s %6s %6s' % ('date', '%', 'mag', 'dist', 'size')
def print_venus(when) :
    venus.compute(when)
    fmt = '%02d-%02d-%02d   %6.2f %6.2f %6.2f %6.2f'
    trip = when.triple()
    print fmt % (trip[0], trip[1], trip[2],
                 venus.phase, venus.mag, venus.earth_distance, venus.size)

# Loop from the beginning of 2012 through the middle of 2013:
d = ephem.date('2012')
end_date = ephem.date('2013/6/1')
while d < end_date :
    print_venus(d)
    # Add a week:
    d = ephem.date(d + ephem.hour * 24)
I've found PyEphem very handy for calculations like this --
and it's great to be able to double-check listings in other publications.
The analemma is that funny figure-eight you see on world globes in the
middle of the Pacific Ocean. Its shape is the shape traced out by
the sun in the sky, if you mark its position at precisely the same
time of day over the course of an entire year.
The analemma has two components: the vertical component represents
the sun's declination, how far north or south it is in our sky.
The horizontal component represents the equation of time.
The equation of time describes how the sun moves relatively faster or
slower at different times of year. It, too, has two components: it's
the sum of two sine waves, one representing how the earth speeds up
and slows down as it moves in its elliptical orbit, the other a
function the tilt (or "obliquity") of the earth's axis compared to
its orbital plane, the ecliptic.
But if you look at photos
of real analemmas in the sky, they're always tilted. Shouldn't they
be vertical? Why are they tilted, and how does the tilt vary with
location? To find out, I wanted a program to calculate the analemma.
Calculating analemmas in PyEphem
The very useful astronomy Python package
PyEphem
makes it easy to calculate the position of any astronomical object
for a specific location. Install it with: easy_install pyephem
for Python 2, or easy_install ephem for Python 3.
The alt and az are the altitude and azimuth of the sun right now.
They're printed as strings: 25:23:16.6 203:49:35.6
but they're actually type 'ephem.Angle', so float(sun.alt) will
give you a number in radians that you can use for calculations.
Of course, you can specify any location, not just major cities.
PyEphem doesn't know San Jose, so here's the approximate location of
Houge Park where the San Jose Astronomical
Association meets:
You can also specify elevation, barometric pressure and other parameters.
So here's a simple analemma, calculating the sun's position at noon
on the 15th of each month of 2011:
    for m in range(1, 13) :
        observer.date('2011/%d/15 12:00' % (m))
        sun.compute(observer)
I used a simple PyGTK window to plot sun.az and sun.alt, so once
it was initialized, I drew the points like this:
    # Y scale is 45 degrees (PI/2), horizon to halfway to zenith:
    y = int(self.height - float(self.sun.alt) * self.height / math.pi)
    # So make X scale 45 degrees too, centered around due south.
    # Want az = PI to come out at x = width/2.
    x = int(float(self.sun.az) * self.width / math.pi / 2)
    # print self.sun.az, float(self.sun.az), float(self.sun.alt), x, y
    self.drawing_area.window.draw_arc(self.xgc, True, x, y, 4, 4, 0, 23040)
So now you just need to calculate the sun's position at the same time
of day but different dates spread throughout the year.
And my 12-noon analemma came out almost vertical! Maybe the tilt I saw
in analemma photos was just a function of taking the photo early in
the morning or late in the afternoon? To find out, I calculated the
analemma for 7:30am and 4:30pm, and sure enough, those were tilted.
But wait -- notice my noon analemma was almost vertical -- but
it wasn't exactly vertical. Why was it skewed at all?
Time is always a problem
As always with astronomy programs, time zones turned out to be the
hardest part of the project. I tried to add other locations to my
program and immediately ran into a problem.
The ephem.Date class always uses UTC, and has no concept
of converting to the observer's timezone. You can convert to the timezone
of the person running the program with localtime, but
that's not useful when you're trying to plot an analemma at local noon.
At first, I was only calculating analemmas for my own location.
So I set time to '20:00', that being the UTC for my local noon.
And I got the image at right. It's an analemma, all right, and
it's almost vertical. Almost ... but not quite. What was up?
Well, I was calculating for 12 noon clock time -- but clock time isn't
the same as mean solar time unless you're right in the middle of your
time zone.
You can calculate what your real localtime is (regardless of
what politicians say your time zone should be) by using your longitude
rather than your official time zone:
Maybe that needs a little explaining. I take the initial time string,
like '2011/12/15 12:00', and convert it to an ephem.date.
The number of hours I want to adjust is my longitude (in radians)
times 12 divided by pi -- that's because if you go pi (180) degrees
to the other side of the earth, you'll be 12 hours off.
Finally, I have to multiply that by ephem.hour because ...
um, because that's the way to add hours in PyEphem and they don't really
document the internals of ephem.Date.
Set the observer date to this adjusted time before calculating your
analemma, and you get the much more vertical figure you see here.
This also explains why the morning and evening analemmas weren't
symmetrical in the previous run.
This code is location independent, so now I can run my analemma program
on a city name, or specify longitude and latitude.
PyEphem turned out to be a great tool for exploring analemmas.
But to really understand analemma shapes, I had more exploring to do.
I'll write about that, and post my complete analemma program,
in the next article.
Today is the winter solstice -- the official beginning of winter.
The solstice is determined by the Earth's tilt on its axis, not
anything to do with the shape of its orbit: the solstice is the point
when the poles come closest to pointing toward or away from the sun.
To us, standing on Earth, that means the winter solstice is the day
when the sun's highest point in the sky is lowest.
You can calculate the exact time of the equinox using the handy Python
package PyEphem.
Install it with: easy_install pyephem
for Python 2, or easy_install ephem for Python 3.
Then ask it for the date of the next or previous equinox.
You have to give it a starting date, so I'll pick a date in late summer
that's nowhere near the solstice:
That agrees with my RASC Observer's Handbook: Dec 22, 5:30 UTC. (Whew!)
PyEphem gives all times in UTC, so, since I'm in California, I subtract
8 hours to find out that the solstice was actually last night at 9:30.
If I'm lazy, I can get PyEphem to do the subtraction for me:
I used 8./24 because PyEphem's dates are in decimal days, so in order
to subtract 8 hours I have to convert that into a fraction of a 24-hour day.
The decimal point after the 8 is to get Python to do the division in
floating point, otherwise it'll do an integer division and subtract
int(8/24) = 0.
The shortest day
The winter solstice also pretty much marks the shortest day of the year.
But was the shortest day yesterday, or today?
To check that, set up an "observer" at a specific place on Earth,
since sunrise and sunset times vary depending on where you are.
PyEphem doesn't know about San Jose, so I'll use San Francisco:
>>> import ephem
>>> observer = ephem.city("San Francisco")
>>> sun = ephem.Sun()
>>> for i in range(20,25) :
...   d = '2011/12/%i 20:00' % i
...   print d, (observer.next_setting(sun, d) - observer.previous_rising(sun, d)) * 24
2011/12/20 20:00 9.56007901422
2011/12/21 20:00 9.55920379754
2011/12/22 20:00 9.55932991847
2011/12/23 20:00 9.56045709446
2011/12/24 20:00 9.56258416496
I'm multiplying by 24 to get hours rather than decimal days.
So the shortest day, at least here in the bay area, was actually yesterday,
2011/12/21. Not too surprising, since the solstice wasn't that long
after sunset yesterday.
If you look at the actual sunrise and sunset times, you'll find
that the latest sunrise and earliest sunset don't correspond to the
solstice or the shortest day. But that's all tied up with the equation
of time and the analemma ... and I'll cover that in a separate article.
My SJAA Ephemeris planetary
astronomy column for next month will discuss Saturn, among other topics,
since Saturn is the main planet visible in the evening sky right now.
Saturn has some storms visible right now in the north polar and
equatorial bands, and a great way to focus your attention to see
more detail through a telescope, especially on subtle details like
Saturnian storms, is to take pencil and paper and sketch what you see.
I've recommended sketching in my column many times before, but don't
talk about it on the blog very often.
When sketching Saturn, it helps to start with a template, so you can
concentrate on the interesting details of the rings and bands rather
than fussing over trying to get the exact width of the rings right.
Saturn's tilt changes with time -- right now it's tilted at 8°
to observers here on Earth -- so sometimes the rings are open wide,
sometimes they're narrow, and sometimes (as last year) they're edge-on
and invisible to us. That's a hassle to try to get right in a sketch,
when you'd rather be focusing on the gaps in the rings and the
pastel colors of the cloud bands on the planet.
ALPO, the Association of Lunar
and Planetary Observers, makes templates for sketching Saturn;
but I had trouble finding any online that showed a tilt appropriate
for this month's Saturn. You can get observing materials by joining
ALPO, but sheesh! you shouldn't have to join an organization just to
get a simple sketching template. And I wanted one for my column.
Besides, the ALPO templates fill in too much detail -- they don't
really give you a chance to do your own ring sketch.
So here's an easy way to make a Saturn sketching template with GIMP.
Start with an image
You can calculate the aspect ratio you need for the planet from the
ring tilt, but why go to all that trouble? I started with an image
of Saturn I got by running
XEphem.
Call up View->Saturn, then make the window as big as you can.
Of course, you may substitute any planetarium program of your choosing,
as long as it shows Saturn with the right ring tilt.
I used GIMP's screenshot facility to open this as an image:
File->Create->Screenshot..., then
Select a region to grab.
You can also use a recent photo of Saturn. The point here is to get
something that's the right shape: it doesn't matter if it's beautiful
or large.
Fix the rotation and size
You want the rings horizontal, if they're not already. Use GIMP's Free
Rotate tool to do that. You can eyeball it to make it approximately right,
or if you want to be more accurate, use the Measure tool (the icon looks
like a drawing compass) to measure from one edge of the rings to the
other and note the angle in the status bar at the bottom of the window.
Then when you use Free Rotate, type in the number you measured.
You'll be printing this out on sketching paper, so if the original
image is small, use Image->Scale to expand it. Remember, you
won't be looking at this original image -- it's just for tracing --
so don't worry if the image comes out fuzzy after you scale it up.
I made mine about 1000 pixels wide.
Make a white background layer
Layer->New Layer... to make a new layer; check "white"
in the dialog. Then click the eyeball icon next to it in the Layers
dialog to make it invisible. You'll want it later.
Outline the planet on its own layer
Layer->New Layer... to make a new layer; this time make
it transparent, not white.
I named mine "planet", since this is where I'll draw the ellipse
for the planet. (Yes, Saturn is an ellipse, not a sphere. So is
the Earth, for that matter, but Saturn is a lot less spherical
than Earth is.)
Choose the ellipse selection tool and drag out a selection that matches
the outer edges of the planet. Use the resize handles to adjust the
selection until it fits as closely as you can manage.
In the Toolbox or the Brushes dialog, choose the smallest hard brush,
"Circle (01)".
Then Edit->Stroke Selection.... Click "Stroke with a paint
tool", and click Stroke.
Tip: You may notice my template ended up with very jaggy lines.
That's a common artifact of GIMP's Stroke Selection.
I'm not worried about it for a sketching template, but if the jaggies
bother you, you can get a much smoother line by converting the
selection to a path and stroking the path instead of the selection.
Preview your work so far
Go back to the Layers dialog and make that white layer visible again,
so you can see the outline you just made. You may want to do
Select->None and click on some tool other than ellipse
select, so the selection outline disappears and you can see the line better.
If you're not happy with your planet outline, Edit->Undo and
repeat with a different selection, a thicker line or whatever.
Outline the rings on their own layer
Repeat what you just did for the planet, this time for the rings.
I recommend using a new layer for just the rings (you'll see why in
the next step).
I outlined just the outside of the rings, so the sketch can show the
ring thickness. ALPO's templates don't do this, but how much
ring you can see can vary based on seeing conditions. If you want the
inner edge of the ring on your template, add it now.
Erase the hidden parts of the ring and planet outlines
You can't see the rings where they go behind the planet, or the part
of the planet hidden by the rings. And you don't want your template
lines spoiling your sketch in those regions. So use GIMP's eraser tool
and a large brush to erase the appropriate parts.
This is a little easier if you used separate layers for the rings and
planet: you won't have to be as careful with the eraser. But it's not
a big deal: this is a template, not a finished artwork, and you're
going to be drawing over it anyway. So don't sweat it too much.
Optionally, make the lines fainter
I made the template lines fainter using the Opacity slider in
the Layers dialog on the planet and ring layers. Of course, you can
just draw in grey in the first place, but I like being able to decide
afterward what color I want, or change it later.
Label the template
Trust me, you'll be really annoyed if you decide in 2026 that you want
to make another Saturn sketch, find your old template but can't remember
what ring tilt it's for. So use the Text tool to label either the current
date or the approximate ring tilt. Or put that information in an image
comment under Image->Image Properties..., or in the filename.
Save your template as XCF.gz, save a copy in some other format like
jpg, png or gif, and you're ready to print templates on paper.
Then go out and sketch Saturn!
I write a monthly column for the San Jose Astronomical Association.
Usually I don't reprint the columns here, but last
month's column,
Worlds of Controversy,
discussed several recently controversial topics in planetary science.
One of the topics was the issue of methane on Mars --
or lack thereof. We've all read the articles about how
the measurements of Mars methane points to possible signs of life,
woohoo! But none of the articles cover the problems with those
measurements, as described in a recent paper by Kevin Zahnle,
Richard S. Freedmana and David C. Catling:
Is there methane on Mars?
Lack of life on Mars isn't sexy, I guess; The Economist
was the only mainstream publication covering Kevin's
paper, in an excellent article,
Methane on Mars:
Now you don't...
Here's the short summary from my column last month:
I'm sure you've seen articles on Martian methane.
Methane doesn't last long in the atmosphere -- only a
few hundred years -- so if it's there, it's being replenished somehow.
On Earth, one of the most common ways to produce methane is through
biological processes. Life on Mars! Whoopee! So everyone wants
to see methane on Mars, and it makes for great headlines.
The problem, according to Kevin, is that the Mars measurements
show changes on a scale much shorter than hundreds of years: they
fluctuate on a seasonal basis. That's tough to explain. Known
atmospheric oxidation processes wouldn't get rid of methane fast
enough, so you'd need to invent some even more exotic process --
perhaps methane-eating bacteria in the Martian soil? -- to account for
the drops.
Worse, the measurements showing methane aren't very reliable.
The evidence is spectroscopic: methane absorbs light at several
fixed wavelengths, so you can measure methane by looking for its
absorption lines.
But any Earth-based measurement of Martian methane has to cope with
the fact that Earth's atmosphere has far more methane than Mars. How
do you separate possible Mars methane absorption lines from Terran
ones? There's one clever way: you can measure Mars at quadrature, when
it's coming toward us or going away from us, and any methane spectral
lines would be red- or blue-shifted compared to the Terran ones. But
then the lines overlap with other absorption lines from Earth's
atmosphere. It's very difficult to get a reliable measurement.
Of course, a measurement from space would avoid those problems, so
the spectrograph on the ESA Mars orbiter has been pressed into service.
But there are questions about its accuracy.
The published evidence so far for Martian methane just isn't
convincing, especially with those unlikely seasonal fluctuations.
That doesn't mean there's no methane there; it means we need better
data. The next Mars Rover, dubbed "Curiosity", will include a
laser spectrometer which can give us much more accurate methane
measurements. Curiosity is set to launch this fall and arrive at
Mars in August of next year.
It gets worse: the kapton tape issue
But it gets worse.
That Curiosity rover whose sensitive equipment is going to answer
the question for us? Well, check out an article in Wired last week:
Space
Duct Tape Could Confuse Mars Rover.
... the large amount of kapton tape used on the MSL rover (lower bound
estimated at 3 m2) is likely to create a significant source of
terrestrial methane contamination during the early part of the
mission.
A skeptical eye
So let's sum up:
* We desperately want to see methane on Mars, because it might point to
biological processes and that would be cool.
* But we don't currently have any reliable way to measure Martian methane.
* So we build a special mission one of whose primary purposes is to
get accurate measurements of Martian methane.
* But we build the probe with materials that will make the measurements
unreliable.
It's apparently too late to fix the problem; so instead, just shrug
and say, well, it might not be so bad if we measure at night, or if
we wait a while (how long?) until most of the methane outgasses.
The methane emission from the kapton tape is fairly small -- though
it's hard to know exactly how small, since it's impossible to test it
in a real Martian environment.
So in a couple of years, when you start seeing news releases trumpeting
Curiosity's methane measurements and talking about life on Mars,
read them with a skeptical eye.
Maybe Curiosity will see methane levels on Mars so large that they
swamp any contamination issues. Maybe not. But we won't be able to tell
from the reports we read in the popular press.
You may have seen the headlines a few weeks ago, when everyone was
crowing "Water on the Moon!" after the LCROSS results were finally
published. Turns out the moon is wetter than the Sahara (woo!) and
all the news sites seemed excited about how we'd be using this for a
lunar base. It only takes a ton of rock to get 11-12 gallons of water!
I wondered, am I the only one who thinks 12 gallons isn't very much?
I couldn't help envisioning a tiny lunar base surrounded by acres of
mine tailing devastation.
So I calculated how much rock it takes to make a ton (assuming basalt;
lunar highland anorthosite would be a little less dense). Turns out
it's not very much: a ton of basalt would make a cube about 8.6 feet
on a side. So okay, I guess it would take quite a while to work up
to those acres of devastation. It was an interesting calculation, anyway;
rock is a lot less dense than I thought.
You can read the details in my SJAA Ephemeris column this month,
Full of Moon.
I had the opportunity to participate in a focus group on NASA's new
"citizen science" project, called Moon Zoo, with a bunch of other
fellow lunatics, amateur astronomers and lunar enthusiasts.
Moon Zoo sounds really interesting. Ordinary people will
analyze high-resolution photos of the lunar surface: find out how many
boulders and craters are there. I hope it will also include more
details like crater type and size, rilles and so forth, though that
wasn't mentioned. These are all tasks that are easy for a human and
hard for a computer: perfect for crowdsourcing.
Think Galaxy Zoo for the moon.
The resulting data will be used for planning future lunar missions as
well as for general lunar science.
It sounds like a great project and I'm excited about it. But
I'm not going to write about Moon Zoo today -- it doesn't
exist yet (current estimate is mid-March), though there is a
preliminary
PDF.
Instead, I want to talk about some of the great ideas that came
out of the focus group.
The primary question: How do we get people -- both amateur astronomers
and the general public, people of all ages -- interested in
contributing to a citizen science project like Moon Zoo?
Here are some of the key ideas:
Make the data public
This was the most important point, echoed by a lot of participants.
Some people felt that many of the existing "citizen science" projects
project the attitude "We want something from you, but we're not going to give
you anything in return." If you use crowdsourcing to create a dataset,
make it available to the crowd.
Opening the data has a lot of advantages:
People can make "mashups", useful sites that display your data
in useful ways or combine it with other data. This can generate
more interest in your project and more contributors.
School groups can work on class projects or science fair projects,
probably contributing more data along the way.
It might help the next generation of scientist get started.
It shows openness and good faith: witness the recent blow-up over
the leaked IPCC emails and the debate over how much climate data has
been kept private.
Projects like
Wikipedia and
Open Street Map,
as well as Linux and the rest of the open source movement,
show how much an open data model can inspire contributions.
Give credit to individuals and teams
People cited the example of SETI@Home, where teams of contributors can
compete to see who's contributed the most. Show rankings for both
individuals and groups, so they can track their progress and maybe
get a bit competitive with other groups. Highlight groups
and individuals who contribute a lot -- maybe even make it a formal
competition and offer inexpensive prizes like T-shirts or mugs.
A teenaged panel member had the great suggestion of making
buttons that said "I'm a Moon Zookeeper." Little rewards like that
don't cost much but can really motivate people.
Offer an offline version
They wanted to hear ideas for publicizing Moon Zoo to groups like
our local astronomy clubs.
I mentioned that I've often wanted to spread the word about Galaxy Zoo,
but it's entirely a web-based application and when I give talks to clubs
or school groups, web access is never an option. (Ironically, the person
leading the focus group had planned to demonstrate Galaxy Zoo to us but
couldn't get connected to the wi-fi at the Lawrence Hall of Science.)
Projects are so much easier to evangelize if you can download
an offline demo.
And not just a demo, either. There should be a way to download a
real version, including a small data set. Imagine if you could grab a
Moon Zoo pack and do a little classifying whenever you got a few spare
minutes -- on the airplane or train, or in a hotel room while traveling.
Important note: this does not mean you should write a separate
Windows app for people to download. Keep it HTML, Javascript and cross
platform so everyone can run it. Then let people download a local copy
of the same web app they run on your site.
Make sure it works on phones and game consoles
Lots of people use smartphones more than they use a desktop computer
these days. Make sure the app runs on all the popular smartphones.
And lots of kids have access to handheld web-enabled game consoles:
you can reach a whole new set of kids by supporting these platforms.
Offer levels of accomplishment, like a game
Lots of people are competitive by nature, and like to feel they're
getting better at what they're doing. Play to that: let users advance
as they get more experienced, and give them the option of
doing harder projects. "I'm up to level 7 in Moon Zoo!"
Use social networking
Facebook. Twitter. Nuff said.
Don't keep results a secret
Quite a few scientific publications have arisen out of Galaxy Zoo --
yet although most of us were familiar with Galaxy Zoo, few of us
knew that. Why so secretive?
They should be trumpeting achievements like that.
How many times have you volunteered for a survey or study, then
wondered for years afterward how the results came out? Researchers
never contact the volunteers when the paper is finally published.
It's frustrating and demotivating; it makes you not want to volunteer
again. Lots of us sign up because we're curious about the science --
but that means we're also curious about the results.
With citizen science projects, this is particularly easy. Set up a
mailing list or forum (or both) to discuss results and announce when
papers are published. Set up a Twitter account and a Facebook group
to announce new papers to anyone who wants to follow. This is the age of
Web 2.0, folks -- there's no excuse for not communicating.
I don't know if NASA will listen to our ideas. But I hope they do.
Moon Zoo promises to be a terrific project ... and the more of these
principles they follow, the more dedicated volunteers they'll get and
that will make the project even better.
This PG&E billboard just went up down the street from where I live.
"Solar Power: Making planets orbit and bagels toast."
And here all this time I'd been under the impression that orbits
had mostly to do with gravity. Somehow I'd missed the influence of
light pressure when writing my orbital software.
Or is the sun's gravitational influence considered a part of "solar power"?
Can we look forward to the upcoming generation of gravitovoltaic solar cells?
I wrote last week about the sorts of
programmer
compulsions that lead to silly apps like my
animated Javascript
Jupiter. I got it working well enough and stopped, knowing
there were more features that would be easy to add but trying
to ignore them.
My mom, immediately upon seeing it, unerringly zeroed in on the biggest
missing feature I'd been trying to ignore. "Can you make it go
faster or slower?"
I put it off for a while, but of course I had to do it -- so now
there are Faster and Slower buttons. It still goes by hour jumps,
so the fastest you can go is an hour per millisecond. Fun to watch.
Or you can slow it down to 1 hour per 3600000 milliseconds if you
want to see it animate in real time. :-)
It's not like I needed another Jupiter's moons application.
I've already written more or less the same app for four platforms.
I don't use the Java web version,
Juplet, very much
any more, because I often have Java disabled or missing. And I don't
use my Zaurus any more so
Juplet for Zaurus
isn't very relevant. But I can always call up my
Xlib or PalmOS
Jupiter's moons app if I need to check on those Galilean moons.
They work fine.
Another version would be really pointless. A waste of time.
So it should have been no big deal when, during the course of
explaining to someone the difference between Java and Javascript,
it suddenly occurred to me that it would be awfully easy to
re-implement that Java Juplet web page using Javascript, HTML
and CSS. I mean, a rational person would just say "oh, yeah, I
suppose that's true" and go on with life.
But what I'm trying to say is that programming isn't a career path,
or a hobby, or a field of academic study. It's a disease.
It's a compulsion, where, sometimes, just realizing that
something could be done renders you unable to think about
anything else until you just ... try ... just a few minutes ...
see how well it works ... oh, wow, that really looks a lot better
than the Java version, wouldn't it look even nicer if you just added
in this one other little tweak ... but wait, now it's so close to
working, I bet it wouldn't be all that hard to take the Java class
and turn it into ...
... and before you know it, it's tomorrow and you have something
that's almost a working app, and it's just really a shame to
get that far and not finish it at least to the point where you can
share it.
But then, Javascript and web pages are so easy to work on that it
really isn't that much extra work to add in some features that the
old version didn't have, like an animate button ...
... and your Saturday morning is gone forever, and there's not much
you can do about that, but at least you have a nice
animated Jupiter's moons
(and shadows) page when the sickness passes and you can finally
think about other things.
This is a reprinting of an article I wrote for my monthly planet column
in the SJAA Ephemeris:
Is Pluto a planet, or not?
Maybe you caught the news last month that Illinois,
birthplace of Clyde Tombaugh, has declared Pluto a planet.
It joins New Mexico, Tombaugh's longtime home, which made a
similar declaration two years ago.
When I first heard about the New Mexico resolution, I was told that they
had declared that Pluto would be a planet within the state's
boundaries.
That made me a bit curious: would Pluto even fit inside New Mexico?
I looked it up: Pluto has a diameter of 2300km, while New Mexico is
about 550km in longitude and a bit more in latitude. Not even close
(see Figure 1). Too bad -- I liked the image of Pluto and Charon coming to
visit and hang out with friends. Though at Pluto's orbital velocity (it
takes it just under 248 years to complete its 18 billion kilometer
orbit, meaning an average speed of 23 million km/year or 63,000
km/day)
and its current distance of about 32 AU (4.8 billion km), it whould
take it about 207 years to get here.
But it turns out that's not what the resolution said anyway.
Both states' resolutions said roughly the same thing:
BE IT RESOLVED BY THE LEGISLATURE OF THE STATE OF NEW MEXICO that, as
Pluto passes overhead through New Mexico's excellent night skies, it
be declared a planet and that March 13, 2007 be declared "Pluto Planet
Day" at the legislature.
RESOLVED, BY THE SENATE OF THE NINETY-SIXTH GENERAL ASSEMBLY OF THE
STATE OF ILLINOIS, that as Pluto passes overhead through Illinois'
night skies, that it be reestablished with full planetary status, and
that March 13, 2009 be declared "Pluto Day" in the State of Illinois
in honor of the date its discovery was announced in 1930.
So the law applies to anyone (though it's probably not enforceable
outside state boundaries) -- but only when Pluto is overhead
in New Mexico or Illinois.
But wait -- does Pluto ever actually pass overhead in those states?
New Mexico stretches from 31.2 to about 37 degrees latitude,
while Illinois spans 36.9 to 42.4.
Right now Pluto is in Sagittarius, with a declination of -17° 41';
there's no way anyone in the US is going to see it directly overhead
this year. Worse, it's on its way even farther south. It won't
cross into the northern hemisphere until the beginning of 2111.
But how far north will it go?
My first thought was to add Pluto's inclination -- 17.15 degrees,
very high compared to other planets -- to the 23 degrees of the
ecliptic to get 40.4°. Way far north -- no problem in either
state! But unfortunately it's not as simple as that.
It turns out that when Pluto
gets to its maximum north inclination, it's in Bootes (bet you didn't
know Bootes was a constellation of the zodiac, did you? It's that
17° inclination that puts Pluto just past the Virgo border).
That'll happen in February of 2228.
But in the Virgo/Bootes region, the ecliptic is 8° south of the
equator, not 23° north. So we don't get to add 23 and 17; in fact,
Pluto's declination will only be about 7.3° north. That's no help!
To find the time when Pluto gets as far north as it's going to get,
you have to combine the declination of the ecliptic and the angle of
Pluto above the ecliptic. The online JPL HORIZONS simulator is very
helpful for running data like that over long periods -- much easier
than plugging dates into a planetarium program. HORIZONS told
me that Pluto's maximum northern declination, 23.5°, will happen in
spring of 2193.
Unfortunately, 23.5° isn't far enough north to be overhead even from
Las Cruces, NM. So Pluto, sadly, will never be overhead from either
New Mexico or Illinois, and thus by the text of the two measures, it
will never be a planet.
With that in mind, I'm asking you to support my campaign to persuade
the governments of Ecuador and Hawaii to pass resolutions similar to
the New Mexico and Illinois ones. Please give generously -- and hurry,
because we need your support before April 1!
In 1948, when she applied to Princeton as an aspiring astronomy grad
student, they wouldn't let her in because women weren't allowed.
(They finally started admitting women in 1975.)
Fortunately, Cornell was more accommodating.
For her thesis, she worked on a project that seemed useful and
uncontroversial. She took other people's data on the redshifts of
galaxies, and catalogued them to see how fast they were all moving
away from us.
Except something unexpected happened. She found that galaxies in one
direction weren't moving away as fast as galaxies in the other directions.
The universe was supposed to be expanding evenly in all directions --
but that's not what her data showed.
In 1950 she presented her results to a conference of the
American Astronomical Society. The results were not promising.
Famous astronomers she'd read about but never met stood up in the
audience to ridicule her paper and say it couldn't be true.
No one would publish her master's thesis.
It wasn't a good start to her career.
She decided to try to find something less controversial to study.
Her husband finished at Cornell and moved to Washington, D.C.. Rubin
and her new baby moved with him, and she enrolled as a PhD student at
Georgetown. They had two children by now; her parents watched the kids
while she took night classes.
She hooked up with George Gamow at Georgetown.
He called her to ask her about her research -- but
said they'd have to talk in the lobby, not in his office, because
women weren't allowed in the office area of the building.
After Rubin finished her PhD with Gamow in 1954,
Her experience trying to present her 1950 paper made her leery of
confrontation. She's said, "I wanted a problem that no one would
bother me about." Working with Kent Ford at the Carnegie Institute in
Washington, she helped design a super-sensitive digital spectrograph,
and they set out to make a huge catalog of data on boring "normal"
galaxies no one else was looking at.
They started with the Andromeda galaxy, M31, the closest large galaxy to
us (and the easiest one to see with the naked eye, if you go somewhere
away from city lights).
And right away they found something weird.
Normally, you'd expect the outer parts of the galaxy to be rotating
a lot slower than the inner parts. Think of our solar system:
Mercury goes around the sun really fast (a Mercury year is only 88
days), Earth goes not quite as fast, and when you get all the way out
to Pluto, it takes 247 years to go around the sun once.
It's not just that it has farther to go to make a circuit around the
sun; it's that the sun's influence is so weak way out there that
Pluto goes a lot slower in its orbit than we do.
Galaxies should be the same way: stars in the center should just whiz
around in no time, while stars at the outer edge take forever.
But Rubin and Ford found that Andromeda wasn't like that. When they
started looking at the stars farther out, they were all going about
the same speed. If anything, the stars at the edge were going a little
faster than the stars in the center.
That made no sense. It didn't follow any normal model of
gravity or galaxy formation. They published their results in 1970,
but no one took them seriously. They decided that maybe something was
wrong, or their equipment was faulty. They decided to try studying a
simpler problem: just measure the redshift of some faint galaxies
and make a catalog of those.
That went well for a while -- except that pretty soon, they ran into
the same thing Rubin had discovered as a graduate student back at
Cornell. Galaxies in the direction of Pegasus were moving away from us
at a different speed from galaxies in other parts of the sky.
She and Ford tried again to present that, but the reaction wasn't
any more positive this time.
Discouraged, they went back to trying to measure galaxy rotation,
hoping Andromeda had just been a fluke.
But every galaxy they studied looked the same as Andromeda,
with the stars far out near the edge of the galaxy rotating as
fast, or faster, than the stars near the hub.
There were only two possible explanations. Either the law of gravity
doesn't work the way we think it does ... or there's a lot more matter
inside a galaxy than what we see with a telescope.
When they tried to present this result, no one believed it, so they
kept measuring more galaxies, always with the same result.
By 1985, they had enough evidence that people finally started paying
attention. As their results got talked about more and taken more
seriously, they came up with a name for the extra mass that makes the
galaxy rotation flat: "dark matter". Yes, the dark matter you hear about
that apparently makes up more than 90% of all matter in the universe.
Not a bad discovery for someone who was just trying to lay low and
catalogue a lot of data that might be useful to other people!
(Rubin's first graduate project, on the rotation of the universe,
has also since been vindicated.)
I missed a lot of the miniconf talks on Tuesday because I wanted to
make some last-minute changes to my talk. But I do want to comment
on one: Simon Greener's talk on "A Review of Australian Geodata
Providers." Of course, I'm not in Australia, but it was quite
interesting to hear how similar Australia's problematic geodata
siguation is to the situation in the US. His presentation was
entertaining, animated and I learned some interesting facts about
GPS and geodata in general.
And Dave and I got another good astronomy opportunity with the dark
skies at Peppermint Bay at the Speakers' Dinner. Despite occasional
intrusive clouds we managed to get a great view of the Large
Magellanic Cloud and a decent view of the small one, as well as
eta Carinae and the star clouds between Crux and Carina. Pity
I'd forgotten to bring my thumpin' travel optics that I'd been using
the previous evening: a 6x20 monocular.
On day one of LCA 2009, I divided my time between the LinuxChix and
Kernel miniconfs.
In the morning,
Paul McKenney, in "Why is parallel Programming Hard?", discussed
some of the background of parallel programming research, then gave an
entertaining demonstration of instruction overhead using a roll of
toilet paper. Each square represented one clock cycle -- he estimated
there were a few hundred clock cycles in the full roll -- and he had
audience members unroll the roll carefully, passing it from one
person to the next. It took a long time.
Over at the LinuxChix miniconf, Jacinta Richardson gave a wonderfully
entertaining (and useful) talk "On Speaking".
She explained how to hack audience members' brains, particularly the
corpus callosum and the hippcampus, by using emotion, visual images
and suspenseful stories to give your audience whole-brain entertainment.
After Jacinta's talk we spent some time going around the room
introducing ourselves, and speakers got a chance to plug their
upcoming talks.
I skipped the panel on Geek Parenting (not being a parent)
to go back to the kernel miniconf's "Problem Solving Hour".
Questions involved network performance, solid state disk performance,
how to debug crashes, tracing (the moderator commented that if you're
thinking of getting involved in the kernel effort but aren't quite
sure what to do, there's a huge need for better tracing and
performance analysis tools), solid-state disks (someone plugged
the talk on that subject on Friday) and similar interesting topics.
I asked about an overheating problem I've been having with
my laptop. I mentioned that even in single-user mode, the CPU
temperature keeps going up, so I was pretty sure it was a kernel
and not userspace issue. Matthew Garrett said that a lot of drivers
are optimized for a normal use case -- meaning X -- and may work very
poorly in text mode. You can have something that's overheating in
single-user mode, then you start X and a bunch of power management
systems kick in and the temperature actually goes down. So how do
you figure out what's causing a temperature problem? Open up the
laptop when it's hot, poke around then figure out what's hot.
Then debug that component.
Lunch was a lovely BBQ provided by Google.
After lunch,
Matthew Garrett, in "How I learned to stop worrying and love ACPI",
was entertaining, as all his talks are. I'm not sure I actually
learned much in the way of practical advice for helping ACPI work
better on my machines, but at least I learned lots of new ways in
which ACPI sucks more than I ever realized.
Then it was back to LinuxChix for a workshop on getting schoolgirls
more interested in IT. We saw short presentations from the four
workshop leaders, then split into groups -- our group went outside
and sat in the hazy sunshine and talked about how to get girls,
teachers, parents and school IT staff on board.
After tea, all the LinuxChix groups reported back on the discussions
and there was a full-room discussion on how to get involved with
educational programs like that. Then we ended with lightning talks;
I got roped into giving one, so I didn't take notes on the rest,
but they were all fun and interesting.
Then in the evening, after dinner, we found a spot somewhat sheltered
from the lights of the hotel for some quick astronomy before bed.
The sky was hazy and picking up lots of sky glow from a light beam
shining from the hotel, but fortunately the sky around the Southern
Cross was clear.
We found both the Large and Small Magellanic clouds, as well as
Eta Carina and some other clusters around the Southern Cross.
A lovely view, unmatched by anything I saw from around Sydney or
Melbourne. Tasmania definitely wins for stargazing!
Kurt Fisher wrote to draw my attention to the latest
Lunar Photo Of the Day (LPOD), a lovely shot he made of one of my
favorite places anywhere,
Upheaval Dome
in Utah's Canyonlands National Park.
Upheaval Dome has long been strongly suspected to be a massive,
eroded impact crater, but the LPOD highlights a study that finally
puts this (non-)controversy to rest,
Elmar Buchner and Thomas Kenkmann's
Upheaval
Dome, Utah, USA: Impact origin confirmed,
documenting shocked quartz grains in the Kayenta sandstone of
Upheaval's outer ring.
It's about time -- it's been pretty clear for many years that
this structure was an impact formation, not a collapsed salt dome
(the relative lack of salt in the core might have been a clue)
but the park service doesn't seem to have gotten the message,
giving equal weight to the salt-dome theory in all its Canyonlands
literature and signs. Perhaps the Buchner and Kenkmann paper will
finally convince them.
Reading about this gave me the push I needed to update my own
Upheaval Dome page,
adding links to the latest research and to the excellent
Upheaval
Dome Bibliography Kurt has put together.
My page also badly needed a bigger view of the crater itself, so
I stitched together a quick
panorama
of the view from the rim
that I'd shot on a trip several years ago but never assembled.
I wrote moonroot
more to figure out how to do it than to run it myself.
But on the new monitor I have so much screen real estate
that I've started using it -- but the quality of the images was
such an embarrassment that I couldn't stand it. So I took a few
minutes and cleaned up the images and made a moonroot 0.6 release.
Turned out there was a trick I'd missed when I originally made the
images, years ago. XPM apparently only allows 1-bit transparency.
When I was editing the RGB image and removing the outside edge of the circle,
some of the pixels ended up semi-transparent, and when I saved the
file as .xpm, they ended up looking very different (much darker)
from what I had edited.
Here are two ways to solve that in GIMP:
Use the "Hard edge" option on the eraser tool (and a hard-edged
brush, of course, not a fuzzy one).
Convert the image to indexed, in which case GIMP will only allow
one bit's worth of transparency. (That doesn't help for full-color
images, but for a greyscale image like the moon, there's no loss
of color since even RGB images can only have 8 bits per channel.)
Either way, the way to edit a transparent image where you're trying
to make the edges look clean is to add a solid-color background
layer (I usually use white, but of course it depends on how you're going
to use the image) underneath the layer you're trying to edit.
(In the layers dialog, click the New button, chose White for the
new layer, click the down-arrow button to move it below the original
layer, then click on the original layer so your editing will all
happen there.)
Once you're editing a circle with sharp edges, you'll probably need
to adjust the colors for some of the edge pixels too. Unfortunately
the Smudge tool doesn't seem to work on indexed images, so you'll
probably spend a lot of time alternating between the Color Picker
and the Pencil tool, picking pixel colors then dabbing them onto
other pixels. Key bindings are the best way to do that: o activates
the Color Picker, N the Pencil, P the Paintbrush. Even if you don't
normally use those shortcuts it's worth learning them for the
duration of this sort of operation.
Or use the Clone tool, where the only keyboard shortcut you have to
remember is Ctrl to pick a new source pixel. (I didn't think of that
until I was already finished, but it works fine.)
Someone on #openbox this morning wanted help in bringing up a window
without decorations -- no titlebar or window borders.
Afterward, Mikael commented that the app should really be coded
not to have borders in the first place.
Me: You can do that?
Turns out it's not a standard ICCCM request, but one that mwm
introduced, MWM_HINTS_DECORATIONS.
Mikael pointed me to the urxvt source as an example of an app that uses it.
My own need was more modest: my little
moonroot
Xlib program that draws the moon at approximately its current phase.
Since the code is a lot simpler than urxvt, perhaps the new version,
moonroot 0.4, will be useful as an example for someone (it's also
an example of how to use the X Shape extension for making
non-rectangular windows).
Writing this one was somewhat tricky because
the current Ubuntu, "Hardy", has a bug in its Radeon handling
and both these apps lock my machine up pretty quickly, so I went
through a lot of reboot cycles getting the screenshots.
(I found lots of bug reports and comments on the web, so I know
it's not just me.)
Fortunately I was able to test both apps and grab a few screenshots
on Fedora 8 and Ubuntu "Feisty" without encountering crashes.
(Ubuntu sure has been having a lot of
trouble with their X support lately! I'm going to start keeping
current Fedora and Suse installs around for times like this.)
I have an article on Linux Planet! The first of many, I hope.
At least the first of a short series on Linux astronomy programs,
starting with the one that's easiest to use: KStars.
It's oriented toward binocular observing, with suggestions
for good targets for beginners.
I was looking at Dave's little phase-of-the-moon Mac application,
and got the urge to play with moonroot, the little xlib ditty I
wrote several years ago to put a moon (showing the right phase)
on the desktop.
I fired it up, and got the nice moon-shaped window ... but with a
titlebar. I didn't want that! Figuring out how to get rid of the
titlebar in openbox was easy, just
... but it didn't work! A poke with xwininfo showed the likely
cause: instead of "moonroot", the window was listed as "Unnamed window".
Whoops!
A little poking around revealed three different ways to set "name"
for a window: XStoreName, XSetClassHint (which sets both class
name and app name), and XSetWMName. Available online documentation
on these functions was not very helpful in explaining the differences;
fortunately someone hanging out on the openbox channel knew the
difference (thanks, Crazy_Hopper). Thus:
XSetWMName sets a property called XA_NAME which is
primarily used to update the window's titlebar.
Note that this may be more than the app name (for instance,
Firefox puts the title of the current page in the titlebar).
To use XSetWMName, you have to set up and populate an
XTextProperty structure, which first requires that you set up
a string list then run XStringListToTextProperty
-- not difficult but it's several annoying steps.
XStoreName is a shortcut to XSetWMName, a way to set
the XA_NAME (titlebar name) in one step.
XSetClassHint sets two properties at once: a name hint
and a class hint. This is the name and class that the window
manager uses for directives like suppressing the titlebar.
I didn't see much in the way of example code for what an app ought to
do with these, so I'll post mine here:
    char* appname;
    XClassHint* classHint;
[ ... ]
    if (argv && argc > 1)
        appname = basename(argv[0]);
    else
        appname = "moonroot";

    /* set the titlebar name */
    XStoreName(dpy, win, appname);

    /* set the name and class hints for the window manager to use */
    classHint = XAllocClassHint();
    if (classHint) {
        classHint->res_name = appname;
        classHint->res_class = "MoonRoot";
    }
    XSetClassHint(dpy, win, classHint);
    XFree(classHint);
And if anyone is interested in my silly moon program, it's at
moonroot-0.3.tar.gz.
moonroot gives you a large moon,
moonroot -s gives a smaller one.
I'm not terribly happy with its accuracy and wasted too much time
today fiddling with it and verifying that it's doing the right time
conversions. All I can figure is that the approximation in Meeus'
Astronomical Algorithms is way too approximate (it's
sometimes off by more than a day) and I should just rewrite all my
moon programs to calculate moon phase the hard (and slow) way.
I finally got a chance to take a look at Comet 17/P Holmes.
I'd been hearing about this bright comet for a couple of days, since
it unexpectedly broke up and flared from about 17th magnitude (fainter
than most amateur telescopes can pick up even in dark skies) to 2nd
magnitude (easily visible to the naked eye from light-polluted
cities). It's in Perseus, so only visible from the northern
hemisphere, pretty much any time after dark (but it's higher
a little later in the evening).
And it's just as bright as advertised. I grabbed my binoculars, used a
finder chart
posted by one of our local SJAA members,
and there it was, bright and obviously fuzzy. Without the binoculars
it was still easy to see, and still noticably fuzzy.
So I dragged out the trusty 6" dobsonian, and although it has no
visible tail, it has lots of structure. It looked like this:
It has a stellar nucleus, a bright inner area (the coma?) and a
much larger, fainter outer halo. There's also a faint star just
outside the coma, so it'll be fun (if we continue to get holes in
the clouds) to see how fast it moves relative to that star.
(Not much motion in the past hour.)
It's nice to have a bright comet in the sky again! Anyone interested
in astronomy should check this one out in the next few days -- since
it may be in the process of breaking up, there's no telling how long
it'll last or what will happen next. Grab some binoculars, or a 'scope
if you have one, and take a look.
Mercury transited the sun today. The weather forecast predicted
rain, and indeed, I awoke this morning to a thick overcast which
soon turned to drizzle. But miraculously, ten minutes before the
start of the transit the sky cleared, and we were able to see
the whole thing, all five hours of it (well, we weren't watching
for the whole five hours -- the most interesting parts are the
beginning and end).
I had plenty of practice with solar observing yesterday,
showing the sun to a group of middle school girls as part of
an astronomy workshop.
This is organized by the AAUW, the same group that runs the annual
Tech Trek
summer science girls' camps. (The Stanford Tech Trek has a star
party, which is how I got involved with this group.)
It's the second year I've done the astronomy workshop for
them; this year went pretty smoothly and everybody seemed to
have a good time observing the sun, simulating moon phases,
learning about the Doppler effect and plotting relative distances
of the planets on a road map.
But what I really wanted to write about was the amazing video
shown by last weekend's SJAA speaker, Dr. Ivan Linscott of Stanford.
As one of the team members on the New Horizons mission to Pluto,
he was telling us about Pluto's tenuous atmosphere. There isn't a
lot of information on Pluto's atmosphere yet, but one of the goals of
New Horizons is to take readings as Pluto occults the sun to
see how sunlight is refracted through Pluto's atmosphere.
But that's no problem: it turns out we've already
done more challenging occultation studies than that.
Back in December 2001, Titan occulted a binary star, and
researchers using Palomar's Adaptive Optics setup got a
spectacular video of the stars being refracted through Titan's
atmosphere as the occultation progresses.
This is old news, of course, but most of us hadn't seen it before
and everyone was blown away. Remember, this is a video from Earth,
of the atmosphere of a moon of Saturn, something most Earth-based
telescopes would have trouble even resolving as a disk.
Watch
the Titan occultation video here.
The BBC had a good
article today about the International Astronomical Union
vote that demoted Pluto from planet status.
It was fairly obvious that the previous proposal, last week,
that defined "planet" as anything big enough that its gravity made
it round, was obviously a red herring that nobody was going to take
very serious. Fercryinoutloud, it made the asteroid Ceres a planet,
as well as Earth's moon (in a few billion years when it gets a bit
farther away from us and ceases to be considered a moon).
But apparently there were several other dirty tricks played by the
anti-Pluto faction, and IAU members who weren't able to be in the
room at the time of the vote are not happy and are spoiling for
a rematch. The new definition doesn't make much more sense than
the previous one, anyway: it's based on gravitationally sweeping
out objects from an orbit, but that also rules out Earth, Mars,
Jupiter and Neptune, all of which have non-satellite objects along
their orbits.
And of course the public is pretty upset about it for sentimental,
non-scientific reasons. Try searching for Pluto or "Save Pluto" on Cafe Press to see the amazing
selection of pro-Pluto merchandise you can buy barely a day after
the IAU decision. (Personally, I want a Honk
if Pluto is still a planet bumper sticker.)
It'll be interesting to see if the decision sticks.
So do I have a viable definition of "planet" which includes Pluto
but not Ceres or the various other Kuiper belt objects which are
continually being discovered?
Why, no, I don't. But the discussion is purely semantic anyway.
Whether we call Pluto a planet doesn't make any difference to
planetary science. But it does make a difference to an enormous
collection of textbooks, museum exhibits, and other
science-for-the-public displays.
Pluto is big enough to have
been discovered in 1930, back in the days before computerized
robotic telescopes and satellite imaging; it's been considered
a planet for 76 years. There's no scientific benefit to changing
that, and a lot of social and political reason not to -- especially
now with New Horizons
headed there to give us our first up-close look at what Pluto
actually looks like.
There are two possible bright notes to the Pluto decision.
First, Mark Taylor pointed
out that it has become much easier to observe all the planets
in one night, even with a very small telescope or binoculars.
And second, maybe Christine Lavin will make a new
updated version of her song Planet X
and go on tour with it.
Yesterday was the annual Fremont Peak Star-b-q.
This year the weather managed to be fairly perfect for observing
afterward: the fog came in for a while, making for fairly dark
skies, and it wasn't too cold though it was a bit breezy.
It was even reasonably steady.
I had my homebuilt 8" dob, while Dave brought his homebuilt 12.5".
Incredibly, we were all alone in the southwest lot: the most
Star-b-q was fairly lightly attended, and most of the handful
who stayed to observe afterward set up at Coulter row.
The interesting sight of the evening was the supernova in M51 (the
Whirlpool galaxy). It was fairly easy in the 12.5" once we knew
where to look (Mike Koop came over to visit after looking at it
in the 30"), and once we found it there all three of us could see
it in the 8" as well.
We had excellent views of Jupiter in the 8", with detail in the red
spot, the thin equatorial band easily visible, and long splits in
both the northern and southern equatorial bands. I didn't make any
sketches since a family wandered by about then so I let them look
instead.
We also had lovely low-power views of Venus and crescent Mercury,
and we spent some time traversing detail on the dark side of the
slim crescent moon due to the excellent earthshine. All the major
maria were visible, and of course Aristarchus, but we could also
see Plato, Sinus Iridum, Kepler, Copernicus and its ray system,
Tycho (only in the 12" -- the 8" was having glare problems that
close to the lit part of the moon) and one long ray from Tycho
that extended across Mare Nubium and out to near Copernicus.
Pretty good for observing the "dark" side!
Neither of us was able to find Comet Tempel-1 (the Deep Impact
comet), even with the 12.5". But after moonset I picked up the Veil
and North American in the 8" unfiltered (having left my filters at
home), and we got some outstanding views of the nebulae in
Sagittarius, particularly the Trifid, which was showing more
dust-lane detail without a filter than I've ever seen even filtered.
It was a good night for carnivores, too. We saw one little grey fox
cub trotting up the road to the observatory during dinner, and there
was another by the side of the road on the way home. Then, farther
down the road, I had to stop for three baby raccoons playing in the
street. (Very cute!) They eventually got the idea that maybe they
should get off the road and watch from the shoulder. The parents
were nowhere to be seen: probably much more car-wise than their
children (I don't often see raccoon roadkill). I hope the kids
got a scolding afterward about finding safer places to play.
Remember the game of "Telephone" when you were a kid? Everybody gets
in a big circle. One kid whispers a message in the ear of the kid next
to them. That kid repeats the message to the next kid, and so on
around the circle. By the time the message gets back to the
originator, it has usually changed beyond recognition.
Sometimes the Internet is like that.
Background: a year and a half ago, in August 2003, there was an
unusually favorable Mars opposition. Mars has a year roughly double
ours, so Mars "oppositions" happen about every two years (plus a few
months). An opposition is when we and Mars are both on the same side
of the sun (so the sun is opposite Mars in our sky, and Mars is
at its highest at midnight). We're much closer to Mars at opposition
than at other times, and that makes a big difference on a planet as
small as Mars, so for people who like to observe Mars with a
telescope, oppositions are the best time to do it.
The August 2003 opposition was the closest opposition in thousands of
years, because Mars was near its perihelion (the point where
it's closest to earth) at the time of the opposition. Much was made of
this in the press (the press loves events where they can say "best in
10,000 years") to the point where lots of people who aren't
normally interested in astronomy decided they wanted to see Mars and
came to star parties to look through telescopes.
That's always nice, and we tried to show them Mars, though Mars is
very small, even during an opposition. The 2003 opposition wasn't
actually all that favorable for those of us in northern hemisphere.
because Mars was near the southernmost part of its orbit. That means
it was very low in the sky, which is never good for seeing detail
through a telescope. Down near the horizon you're looking through a
lot more of Earth's atmosphere, and you're down near all the heat
waves coming off houses and streets and even rocks. That disturbs the
view quite a bit, like trying to see detail on a penny at the bottom
of a swimming pool.
This year's opposition, around Halloween, will not be as
close as the 2003 opposition, but it's still fairly close as
oppositions go. Plus, this year, Mars will be much farther north.
So we're expecting a good opposition -- weather permitting, both on
Earth, which is sometimes cloudy in November, and on Mars, where you
never know when a freak dust storm might appear.
Which brings me back to the game of Telephone.
A few weeks ago I got the first of them. An email from someone
quoting a message someone had forwarded, asking whether it was
true. The message began:
The Red Planet is about to be spectacular! This month and next, Earth is
catching up with Mars in an encounter that will culminate in the closest
approach between the two planets in recorded history.
and it ended:
Share this with your children and grandchildren. NO ONE ALIVE TODAY WILL
EVER SEE THIS AGAIN
(sic on the caps and the lack of a period at the end).
I sent a reply saying the email was two years out of date, and giving
information on this year's Mars opposition and the fact that it may
actually be better for observing Mars than 2003 was. But the next day
I got a similar inquiry from someone else. So I updated my
Mars FAQ to mention the
misleading internet message, and the inquiries slowed down.
But today, I got a new variant.
Subject: IS MARS GOING TO BE AS BIG AS THE MOON IN AUGUST?
As big as the moon! That would be a very close opposition!
(Dave, always succinct, said I should reply and say simply, "Bigger."
Mars is, of course, always bigger than the moon, even if its apparent
size as viewed from earth is small.)
It looks like the story is growing in the telling, in a way it
somehow didn't two years ago.
I can't wait to see what the story will have become by August.
Mars is going to hit us?
Anthony
Liekens has a wonderful page on open-source Cassini-Huygens
image analysis.
A group of people from a space IRC channel took the raw images
from the descent of the Huygens probe onto Titan's surface, and
applied image processing: they stitched panoramas, created animations,
created stereograms, added sharpening and color. The results are
very impressive!
I hope NASA takes notice of this. There's a lot of interest, energy
and talent in the community, which could be very helpful in analysis
of astronomical data. Astronomy has a long history of amateur
involvement in scientific research, perhaps more so than any other
science; extending that to space-based research seems only a small step.
Hiking up to the top of Fremont Peak before the FPOA Star-b-q started,
we saw the Ghost and the Darkness, squirrel style.
A couple of ground squirrels hidden in the tall grass
startled as we walked by, and whisked off through the
grass, occasionally twitching a tail-tip up above the tops
of the grasses but otherwise mostly invisible.
Down in the parking lots, there were some interesting ant or
wasp-like insects: furry scarlet head, black thorax, furry scarlet
abdomen. The wings were black, too, and they could fly at least
a little. No idea what they were.
Learned a new word reading scoops on the way down: Anecdotage,
that advanced age where all one does is relate stories about "the
good, old days."
Turned out Jeff Moore was the speaker at FPOA. He always gives
good talks, but this one was especially good: interpretation of
the Mars Rover geologic results so far. Some of his slides showed
terrestrial scenes (mostly Death Valley) for comparison with the
Martian geologic features, and he mentioned that the terrestrial
slides were easy to tell because they were the ones with the
pocketknife showing (for scale). So the following morning,
I got inspired to whip up a
few counterexamples.
![[Tux the Linux penguin has his back to us as he observes a sky with stars and several shooting meteors]](https://shallowsky.com/software/tuxmeteor.jpg) Salon.com had an article predicting a rare Leonid show on Friday and
Saturday night this week:
Rare "outburst" meteor shower will be visible this weekend.
Salon.com had an article predicting a rare Leonid show on Friday and
Saturday night this week:
Rare "outburst" meteor shower will be visible this weekend.
![[Viewing the eclipse from 19 Mile Crossing, TX]](https://shallowsky.com/blog/images/eclipse2024/PXL_20240408_174051739.jpg) I'm sorry, but I have no eclipse photos to share. I messed that up.
But I did get to see totality.
I'm sorry, but I have no eclipse photos to share. I messed that up.
But I did get to see totality.
![[Annular eclipse, afocal with cellphone camera through H-alpha scope]](https://shallowsky.com/blog/images/annular-eclipse-2023/PXL_20231014_163643277.jpg)
![[Sun in h-alpha on 2222-03-07]](https://shallowsky.com/blog/images/sun-22220307-img_5585-6.jpg)
![[analemma webapp]](/blog/images/screenshots/analemma-preview.jpg) I have another PEEC Planetarium talk coming up in a few weeks,
a talk on the
I have another PEEC Planetarium talk coming up in a few weeks,
a talk on the
![[MarsMap screenshot]](https://shallowsky.com/blog/images/screenshots/marsmap-ss.jpg)
![[Comet Neowise and Starlink Satellites]](https://shallowsky.com/images/starlink/img_4003sl.jpg)
![[Comet C2020 F3 NEOWISE the morning of 2020-07-16 from White Rock, NM]](https://shallowsky.com/images/C2020-F3-NEOWISE/img_3915.jpg)
![[Comet C2020F3 NEOWISE over California desert landscape, by Dbot3000]](https://commons.wikimedia.org/wiki/File:Comet_C2020F3_NEOWISE_over_California_desert_landscape.png)
![[Solstice sun dagger]](http://shallowsky.com/blog/images/sundagger/img_3860.jpg) When I was in grade school -- probably some time around 7th grade -- I
happened upon an article in Scientific American about the Anasazi Sun
Dagger on
When I was in grade school -- probably some time around 7th grade -- I
happened upon an article in Scientific American about the Anasazi Sun
Dagger on ![[inner planet orbits from north ecliptic pole, with Venus pentagram]](http://shallowsky.com/blog/images/epicycles/inner-cycles.jpg)
![[planet orbits from north ecliptic pole]](http://shallowsky.com/blog/images/epicycles/outer-cycles.jpg)
![[Schroter's Valley on the Moon]](https://peecla.z2systems.com/neon/resource/peecla/images/2019/schroters-valley-web.jpg) This Friday, Dave and I will be presenting a planetarium show called
This Friday, Dave and I will be presenting a planetarium show called
![[Mercury transit 11/11/2019]](http://shallowsky.com/images/astro/img_2311c.jpg)
![[Mercury transit 11/11/2019 in H-alpha]](http://shallowsky.com/images/astro/img_2304c.jpg)
![[Mercury Transit 2006, photo by Brocken Inaglory]](https://commons.wikimedia.org/wiki/File:Mercury_transit_1.jpg)
![[binocular projection of a solar eclipse]](http://shallowsky.com/images/annular-eclipse-2012/?pic=img_5283.jpg)
![[Lunar Perigee and Apogee sizes]](https://commons.wikimedia.org/wiki/File:Lunar_perigee_apogee.png)
![[Gerald Hawkins' Stonehenge alignments from Stonehenge Decoded]](http://shallowsky.com/blog/images/stonehenge/orig-alignments.jpg)
![[Astronomical alignments between pairs of New Mexico peaks]](http://shallowsky.com/blog/images/stonehenge/peakalignments.jpg)
![[Astronomical alignments between pairs of New Mexico peaks]](http://shallowsky.com/blog/images/stonehenge/minpeakalignments.jpg)
![[SpiceyPy example: Cassini's position]](http://shallowsky.com/blog/images/screenshots/spiceypy-cassini.jpg) But going to that page today, I find that code is now available!
What's available is a massive toolkit called SPICE
(it's all in capitals but there's no indication what it might stand for.
It comes from NAIF, which is NASA's Navigation and Ancillary
Information Facility).
But going to that page today, I find that code is now available!
What's available is a massive toolkit called SPICE
(it's all in capitals but there's no indication what it might stand for.
It comes from NAIF, which is NASA's Navigation and Ancillary
Information Facility).
![[Analemma by Giuseppe Donatiello via Wikimedia Commons]](https://peecla.z2systems.com/neon/resource/peecla/images/2017/Analemma-GiuseppeDonatiello.jpg "Analemma by Giuseppe Donatiello via Wikimedia Commons") Dave and I are giving a planetarium show at PEEC tonight on the analemma.
Dave and I are giving a planetarium show at PEEC tonight on the analemma.
![[2017 Solar eclipse with corona]](http://shallowsky.com/images/eclipse2017/?pic=img_1505.jpg)
![[Homemade solar finder for telescope]](http://shallowsky.com/blog/images/solar-finder/img_1448.jpg) I spent several weeks before the eclipse in a flurry of creation,
making a couple of
I spent several weeks before the eclipse in a flurry of creation,
making a couple of
![[Solar finder for DSLR, made from popsicle sticks]](http://shallowsky.com/images/eclipse2017/img_7792T.jpg) With only a couple of days left to go, I revised my plan.
The Mak is difficult to focus under any circumstances. I decided
not to use it, and to stick to my Canon 55-250mm zoom telephoto,
with the camera on a normal tripod. I'd skip the partial eclipse
(I've photographed those before anyway) and concentrate on
getting a few shots of the diamond ring and the corona, running
through a range of exposures without needing to look at the camera
screen or do any refocusing. And since I wasn't going to be usinga
telescope, my nifty solar finders wouldn't work; I designed a new
one out of popsicle sticks to fit in the camera's hot shoe.
With only a couple of days left to go, I revised my plan.
The Mak is difficult to focus under any circumstances. I decided
not to use it, and to stick to my Canon 55-250mm zoom telephoto,
with the camera on a normal tripod. I'd skip the partial eclipse
(I've photographed those before anyway) and concentrate on
getting a few shots of the diamond ring and the corona, running
through a range of exposures without needing to look at the camera
screen or do any refocusing. And since I wasn't going to be usinga
telescope, my nifty solar finders wouldn't work; I designed a new
one out of popsicle sticks to fit in the camera's hot shoe.
![[Our eclipse viewing pullout on Wyoming 270]](http://shallowsky.com/images/eclipse2017/img_7726T.jpg) When we got to I-25 it was moving and, oddly enough, not particularly
crowded. Glendo Reservoir had looked on the map like a nice spot on
the centerline ... but it was also a state park, so there was a risk
that everyone else would want to go there. Sure enough: although
traffic was moving on I-25 at Wheatland, a few miles north the freeway
came to a screeching halt. We backtracked and headed east toward Guernsey,
where several highways went north toward the centerline.
When we got to I-25 it was moving and, oddly enough, not particularly
crowded. Glendo Reservoir had looked on the map like a nice spot on
the centerline ... but it was also a state park, so there was a risk
that everyone else would want to go there. Sure enough: although
traffic was moving on I-25 at Wheatland, a few miles north the freeway
came to a screeching halt. We backtracked and headed east toward Guernsey,
where several highways went north toward the centerline.
![[Terrible afocal view of partial eclipse]](http://shallowsky.com/images/eclipse2017/img_1491T.jpg) There's not much to say about the partial eclipse. We all traded views
-- there were five or six scopes at our pullout, including a nice
little H-alpha scope. I snapped an occasional photo through the 80mm
with my pocket camera held to the eyepiece, or with the DSLR through
an eyepiece projection adapter. Oddly, the DSLR photos came out worse
than the pocket cam ones. I guess I should try and debug that at some point.
There's not much to say about the partial eclipse. We all traded views
-- there were five or six scopes at our pullout, including a nice
little H-alpha scope. I snapped an occasional photo through the 80mm
with my pocket camera held to the eyepiece, or with the DSLR through
an eyepiece projection adapter. Oddly, the DSLR photos came out worse
than the pocket cam ones. I guess I should try and debug that at some point.
![[Solar eclipse diamond ring]](http://shallowsky.com/images/eclipse2017/?pic=img_1499c.jpg)
![[Constructing a solar sight]](http://shallowsky.com/blog/images/solar-finder/img_1444.jpg)
![[Curved rod barn-door mount]](http://shallowsky.com/blog/images/barndoor/img_1410.jpg)
![[Barn-door mount, showing piano hinge]](http://shallowsky.com/blog/images/barndoor/img_1405.jpg)
![[Wing nut on barn-door mount]](http://shallowsky.com/blog/images/barndoor/img_1407.jpg) The final piece is the knob/nut you'll turn to make the mount track.
I couldn't find a good 1/4" knob for under $15.
A lot of people make a wood circle and mount the nut in
the center, or use a gear so a motor can drive the mount. I looked
around at things like jam-jar lids and the pile of metal gears and
sprinkler handles in my welding junkpile, but I didn't see anything
that looked quite right, so I decided to try a wing nut just for
testing, and worry about the knob later. Turns out a wing nut works
wonderfully; there's no particular need for anything else if you're
driving your barn-door manually.
The final piece is the knob/nut you'll turn to make the mount track.
I couldn't find a good 1/4" knob for under $15.
A lot of people make a wood circle and mount the nut in
the center, or use a gear so a motor can drive the mount. I looked
around at things like jam-jar lids and the pile of metal gears and
sprinkler handles in my welding junkpile, but I didn't see anything
that looked quite right, so I decided to try a wing nut just for
testing, and worry about the knob later. Turns out a wing nut works
wonderfully; there's no particular need for anything else if you're
driving your barn-door manually.
![[Hyginus Rille by Michael Karrer]](http://shallowsky.com/blog/images/3916055839_58310565c8_m.jpg "Hyginus Rille by Michael Karrer")
![[Upper layer 50% opaque to align two layers]](http://shallowsky.com/blog/images/screenshots/aligning-eclipse/dim-red.jpg)
![[]](http://shallowsky.com/blog/images/screenshots/aligning-eclipse/almost-aligned.jpg)
![[]](http://shallowsky.com/blog/images/screenshots/aligning-eclipse/contrast-filter.jpg)
![[]](http://shallowsky.com/blog/images/screenshots/aligning-eclipse/almost-aligned-difference.jpg)
![[Eclipsed moon rising]](http://shallowsky.com/lunareclipse/moonrise-frames/moonrise-eclipse-img_9476T.jpg)
![[Fetid marigold, which actually smells wonderfully minty]](http://shallowsky.com/blog/images/fetid/img_9406-crop.jpg) The street for a substantial radius around my mailbox has a wonderful,
strong minty smell.
The smell is coming from a clump of modest little yellow flowers.
The street for a substantial radius around my mailbox has a wonderful,
strong minty smell.
The smell is coming from a clump of modest little yellow flowers.
![[Fetid goosefoot]](http://shallowsky.com/blog/images/fetid/img_4110.jpg) Another local plant which turns strikingly red in autumn has an even
worse name: fetid goosefoot. On a recent hike, several of us made a
point of smelling it. Sure enough: everybody except one found it
minty and pleasant. But one person on the hike said "Eeeeew!"
Another local plant which turns strikingly red in autumn has an even
worse name: fetid goosefoot. On a recent hike, several of us made a
point of smelling it. Sure enough: everybody except one found it
minty and pleasant. But one person on the hike said "Eeeeew!"
![[Albireo, from Jefffisher10 on Wikimedia Commons]](https://en.wikipedia.org/wiki/Albireo#/media/File:Albireo_20150919.jpg)
![[Wildflowers on the Quemazon trail]](http://shallowsky.com/blog/images/nature/img_4164.jpg) One of the adjustments we've had to make in moving to New Mexico is
getting used to the backward (compared to California) weather.
Like, rain in summer!
One of the adjustments we've had to make in moving to New Mexico is
getting used to the backward (compared to California) weather.
Like, rain in summer!
![[Snakeweed in bloom]](http://shallowsky.com/lasenda/img_9367T.jpg) Then come September, especially in a rainy year like this one,
and all that snakeweed suddenly bursts into a glorious carpet of gold.
Then come September, especially in a rainy year like this one,
and all that snakeweed suddenly bursts into a glorious carpet of gold.
![[Partial solar eclipse, with sunspots]](http://shallowsky.com/blog/images/img_1346c.jpg)
![[Plate IX: The Lunar Apennines, Archemedes &c.]](http://shallowsky.com/moon/MoonConsidered/?pic=IX-Apennines-800.jpg)
![[David North explaining the moon]](http://shallowsky.com/moon/MoonConsidered/p1010027.jpg)
![[Plate XVIII: Aristarchus & Herodotus ]](http://shallowsky.com/moon/MoonConsidered/?pic=XVIII-Aristarchus-Herodotus-800.jpg)
![[Europa eclipse on Mar 10 2013]](http://shallowsky.com/blog/images/screenshots/europa-mar-2013.jpg)
![[Space shuttle Endeavour flyby]](http://shallowsky.com/images/endeavour/img_6477-sm.jpg) This morning, the last space shuttle, Endeavour, made a piggyback
fly-by of California cities prior to landing at LAX, where it will be
trucked to its final resting place in Exposition Park.
And what science and astronomy fan could resist a once in a lifetime
chance to see the last shuttle in flight, piggyback on its 747 transporter?
This morning, the last space shuttle, Endeavour, made a piggyback
fly-by of California cities prior to landing at LAX, where it will be
trucked to its final resting place in Exposition Park.
And what science and astronomy fan could resist a once in a lifetime
chance to see the last shuttle in flight, piggyback on its 747 transporter?
![[Universal Studios back lot]](http://shallowsky.com/images/endeavour/img_6461-sm.jpg) I looked down and the first thing I saw was a smashed jumbo jet among
the wreckage of some houses. Um ... not the way I wanted to see the
shuttle! But then I realized I was looking at the Universal Studios
back lot. Right. Though binoculars I could even see the tram where
the folks on the studio tour went right by the "plane crash".
And I could look across to Universal City, where the
crowds made me happy I'd decided against going there -- I bet they
had some traffic jams too.
I looked down and the first thing I saw was a smashed jumbo jet among
the wreckage of some houses. Um ... not the way I wanted to see the
shuttle! But then I realized I was looking at the Universal Studios
back lot. Right. Though binoculars I could even see the tram where
the folks on the studio tour went right by the "plane crash".
And I could look across to Universal City, where the
crowds made me happy I'd decided against going there -- I bet they
had some traffic jams too.
![[Space shuttle Endeavour flyby]](http://shallowsky.com/images/endeavour/img_6470-sm.jpg) Finally, "It's coming!" And we could see it, passing south of the
crowds at Universal City and coming this way ... and disappearing
behind some trees. We all shifted around so we'd see it when it
cleared the trees.
Finally, "It's coming!" And we could see it, passing south of the
crowds at Universal City and coming this way ... and disappearing
behind some trees. We all shifted around so we'd see it when it
cleared the trees.
![[Daytime Venus occultation]](http://shallowsky.com/images/venus-day-occultation/img_6430T.jpg) And now it's over. A fun event! It disappeared at about 1:35pm.
You can see my low-tech photos here:
And now it's over. A fun event! It disappeared at about 1:35pm.
You can see my low-tech photos here:
![[Transit of Venus, June 5 2012]](http://shallowsky.com/images/venustransit/earlyhandheld/img_5440T.jpg)
![[Binocular projection of Venus transit]](http://shallowsky.com/images/venustransit/?pic=earlyhandheld/img_5430.jpg)
![[Mak 90 with solar filter]](http://shallowsky.com/images/venustransit/?pic=sunset-ps/img_5447.jpg)
![[off-axis aperture stops from ice cream containers]](http://shallowsky.com/images/venustransit/?pic=sunset-ps/img_5476.jpg)
![[Venus transit at sunset]](http://shallowsky.com/images/venustransit/?pic=sunset-dslr/img_5463.jpg)
![[Venus transit at sunset]](http://shallowsky.com/images/venustransit/?pic=sunset-dslr/img_5460.jpg)
![[Venus transit 2004 from Chicago. Copyright © 2004 by Bill Arnett]](http://ephemeris.sjaa.net/1206/venus2004.jpg)
![[Black drop effect]](http://upload.wikimedia.org/wikipedia/commons/thumb/3/30/Venustransit_2004-06-08_07-44.jpg/250px-Venustransit_2004-06-08_07-44.jpg)

![[Annular eclipse 2012]](http://shallowsky.com/images/annular-eclipse-2012/img_5308T.jpg)
![[early stage of annular eclipse 2012, showing sunspots]](http://shallowsky.com/images/annular-eclipse-2012/img_5402.jpg)
![[black drop at end of annularity]](http://shallowsky.com/images/annular-eclipse-2012/img_5412.jpg)
![[pinhole eclipse viewing]](http://shallowsky.com/images/annular-eclipse-2012/img_5287.jpg)
![[binocular projection for eclipse]](http://shallowsky.com/images/annular-eclipse-2012//img_5283.jpg)
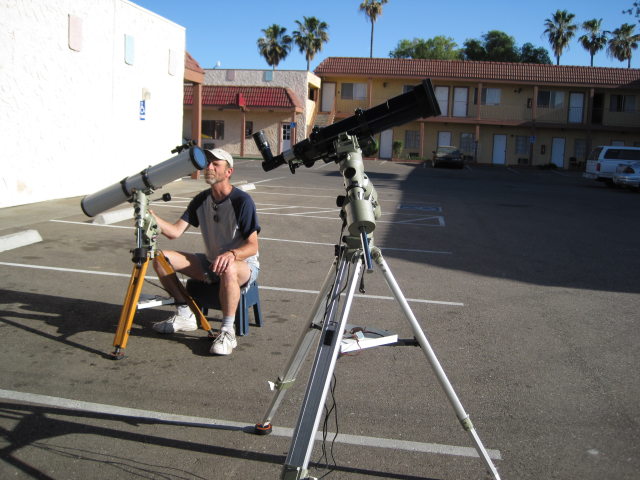
![[Solar annular eclipse of January 15, 2010 in Jinan, Republic of China, by A013231 on Wikimedia Commons.]](http://commons.wikimedia.org/wiki/File:Solar_annular_eclipse_of_January_15,_2010_in_Jinan,Republic_of_China.JPG)
![[eclipse viewed through leaves]](http://commons.wikimedia.org/wiki/File:IMG_1650_zonsverduistering_Malta.JPG)
![[Solar projection with a Dobsonian]](http://commons.wikimedia.org/wiki/File:Home_made_dobsonian_user_to_make_a_solar_projection_%28Split,_Croatia%29_3.jpg)
![[components of the Equation of time]](http://ephemeris.sjaa.net/1201/graph.jpg)
![[analemma in San Jose at noon clock time]](http://shallowsky.com/blog/images/analemma/sj-analemma-clocktimes.jpg) And my 12-noon analemma came out almost vertical! Maybe the tilt I saw
in analemma photos was just a function of taking the photo early in
the morning or late in the afternoon? To find out, I calculated the
analemma for 7:30am and 4:30pm, and sure enough, those were tilted.
And my 12-noon analemma came out almost vertical! Maybe the tilt I saw
in analemma photos was just a function of taking the photo early in
the morning or late in the afternoon? To find out, I calculated the
analemma for 7:30am and 4:30pm, and sure enough, those were tilted.
![[analemma in San Jose at noon clock time]](http://shallowsky.com/blog/images/analemma/sj-analemma-localtime.jpg) Set the observer date to this adjusted time before calculating your
analemma, and you get the much more vertical figure you see here.
This also explains why the morning and evening analemmas weren't
symmetrical in the previous run.
Set the observer date to this adjusted time before calculating your
analemma, and you get the much more vertical figure you see here.
This also explains why the morning and evening analemmas weren't
symmetrical in the previous run.
![[Saturn sketch template]](http://shallowsky.com/images/saturn-8-template.jpg)
![[PGE billboard: Solar Power: Making planets orbit and bagels toast]](http://shallowsky.com/blog/images/solarsign.jpg)
![[Size of Pluto and Charon vs. the US]](http://shallowsky.com/blog/images/pluto-and-states.jpg)
![[Upheaval Dome]](http://shallowsky.com/images/upheaval/upheavalT.jpg) It's about time -- it's been pretty clear for many years that
this structure was an impact formation, not a collapsed salt dome
(the relative lack of salt in the core might have been a clue)
but the park service doesn't seem to have gotten the message,
giving equal weight to the salt-dome theory in all its Canyonlands
literature and signs. Perhaps the Buchner and Kenkmann paper will
finally convince them.
It's about time -- it's been pretty clear for many years that
this structure was an impact formation, not a collapsed salt dome
(the relative lack of salt in the core might have been a clue)
but the park service doesn't seem to have gotten the message,
giving equal weight to the salt-dome theory in all its Canyonlands
literature and signs. Perhaps the Buchner and Kenkmann paper will
finally convince them.
![[moonroot]](http://shallowsky.com/software/moonroot/moonroot-s.png) I wrote
I wrote ![[Comet 17/P Holmes]](http://shallowsky.com/images/sketch/cometholmes.jpg)